
Шуруповерты Makita DTD156Z LXT 18V - инструкция пользователя по применению, эксплуатации и установке на русском языке. Мы надеемся, она поможет вам решить возникшие у вас вопросы при эксплуатации техники.
Если остались вопросы, задайте их в комментариях после инструкции.
"Загружаем инструкцию", означает, что нужно подождать пока файл загрузится и можно будет его читать онлайн. Некоторые инструкции очень большие и время их появления зависит от вашей скорости интернета.


8 ENGLISH
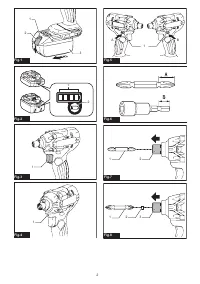
Procedure 1
For tool without one-touch type sleeve
►
Fig.7:
1.
Driver bit
2.
Sleeve
To install the driver bit, pull the sleeve in the direction of
the arrow and insert the driver bit into the sleeve as far
as it will go.
Then release the sleeve to secure the driver bit.
For tool with one-touch type sleeve
To install the driver bit, insert the driver bit into the
sleeve as far as it will go.
Procedure 2
Optional accessory
In addition to
Procedure 1
, insert the bit-piece into the
sleeve with its pointed end facing in.
►
Fig.8:
1.
Driver bit
2.
Bit-piece
3.
Sleeve
To remove the driver bit, pull the sleeve in the direction
of the arrow and pull the driver bit out.
NOTE:
If the driver bit is not inserted deep enough
into the sleeve, the sleeve will not return to its original
position and the driver bit will not be secured. In this
case, try re-inserting the bit according to the instruc
-
tions above.
NOTE:
When it is difficult to insert the driver bit, pull
the sleeve and insert it into the sleeve as far as it will
go.
NOTE:
After inserting the driver bit, make sure that it
is firmly secured. If it comes out, do not use it.
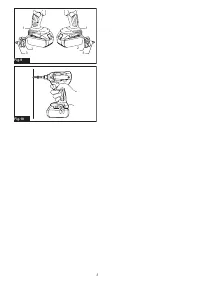
Installing hook
CAUTION:
When installing the hook, always
secure it with the screw firmly.
If not, the hook
may come off from the tool and result in the personal
injury.
CAUTION:
Use the hanging/mounting parts
for their intended purposes only.
Using for unin-
tended purpose may cause accident or personal
injury.
►
Fig.9:
1.
Groove
2.
Hook
3.
Screw
The hook is convenient for temporarily hanging the tool.
This can be installed on either side of the tool. To install
the hook, insert it into a groove in the tool housing on
either side and then secure it with a screw. To remove,
loosen the screw and then take it out.
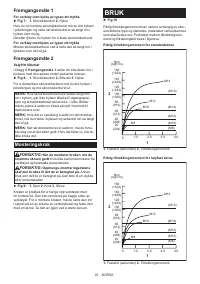
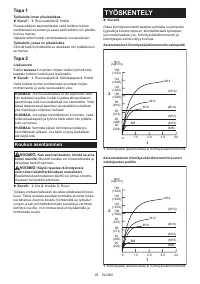
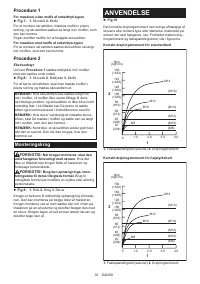
OPERATION
►
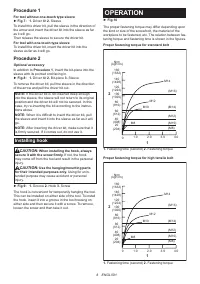
Fig.10
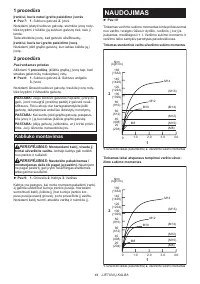
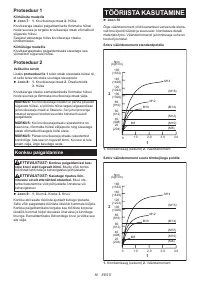
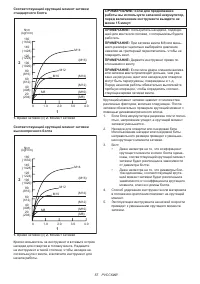
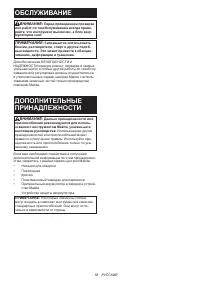
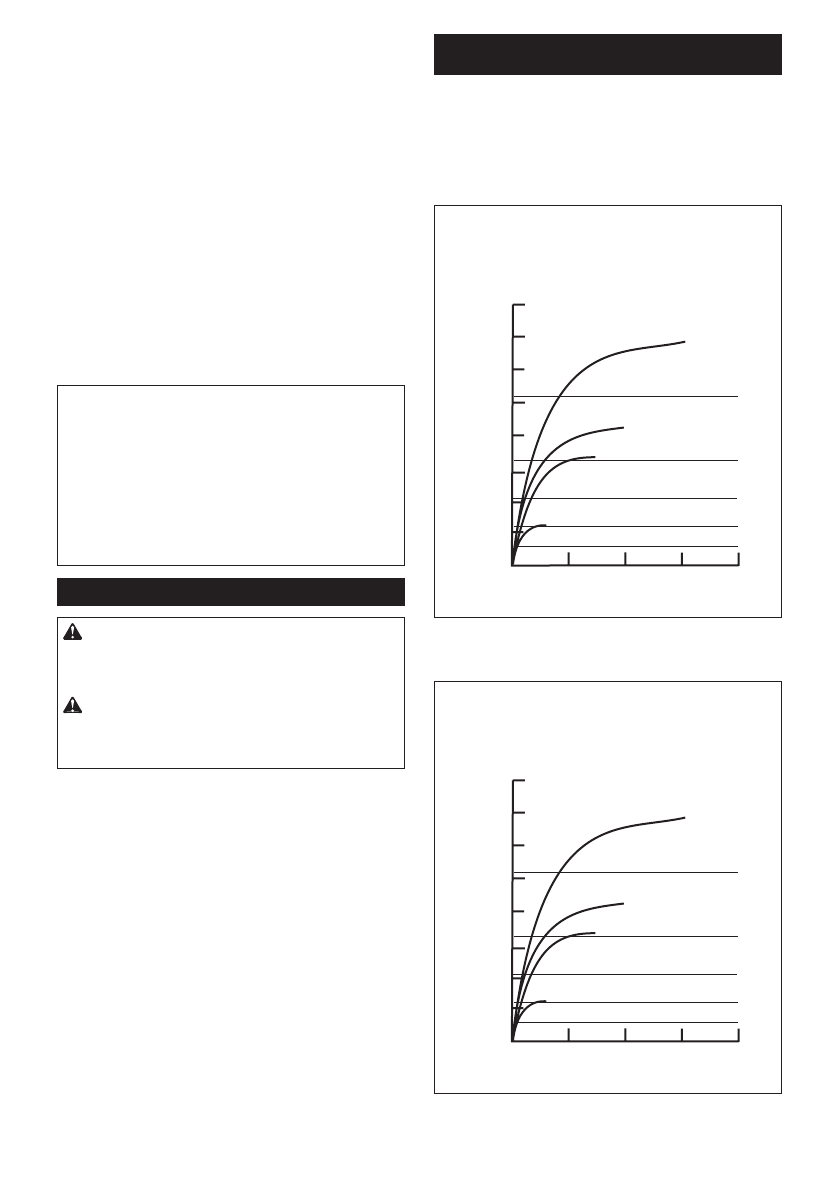
The proper fastening torque may differ depending upon
the kind or size of the screw/bolt, the material of the
workpiece to be fastened, etc. The relation between fas-
tening torque and fastening time is shown in the figures.
Proper fastening torque for standard bolt
2
1
N•m
(kgf•cm)
160
(1632)
140
(1428)
120
(1224)
100
(1020)
80
(816)
60
(612)
40
(408)
20
(204)
0
M14
M12
(M14)
(M16)
(M12)
(M10)
(M8)
M10
M8
2.0
3.0
4.0
1.0
1.
Fastening time (second)
2.
Fastening torque
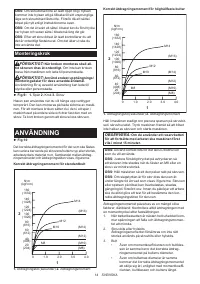
Proper fastening torque for high tensile bolt
2
1
N•m
(kgf•cm)
160
(1632)
140
(1428)
120
(1224)
100
(1020)
80
(816)
60
(612)
40
(408)
20
(204)
0
M14
M12
(M14)
(M16)
(M12)
(M10)
(M8)
M10
M8
2.0
3.0
4.0
1.0
1.
Fastening time (second)
2.
Fastening torque
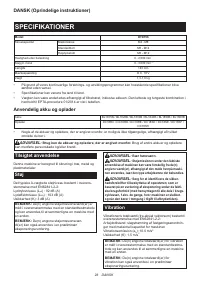
Характеристики

Остались вопросы?Не нашли свой ответ в руководстве или возникли другие проблемы? Задайте свой вопрос в форме ниже с подробным описанием вашей ситуации, чтобы другие люди и специалисты смогли дать на него ответ. Если вы знаете как решить проблему другого человека, пожалуйста, подскажите ему :)


