
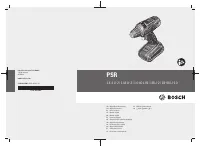
Шуруповерты Bosch PSB 18 Li-2 - инструкция пользователя по применению, эксплуатации и установке на русском языке. Мы надеемся, она поможет вам решить возникшие у вас вопросы при эксплуатации техники.
Если остались вопросы, задайте их в комментариях после инструкции.
"Загружаем инструкцию", означает, что нужно подождать пока файл загрузится и можно будет его читать онлайн. Некоторые инструкции очень большие и время их появления зависит от вашей скорости интернета.


English |
15
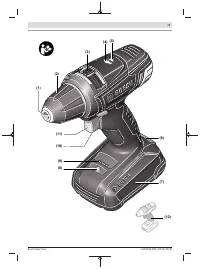
Open the keyless chuck
(2)
by turning it in the direction of
rotation
➊
until the tool can be inserted. Insert the tool.
Firmly tighten the sleeve of the keyless chuck
(2)
by turning
it by hand in the direction of rotation
➋
until it audibly clicks
into place. This will automatically lock the drill chuck.
The lock will disengage again if you turn the sleeve in the op-
posite direction to remove the tool.
Dust/Chip Extraction
Dust from materials such as lead-containing coatings, some
wood types, minerals and metal can be harmful to one’s
health. Touching or breathing-in the dust can cause allergic
reactions and/or lead to respiratory infections of the user or
bystanders.
Certain dust, such as oak or beech dust, is considered carci-
nogenic, especially in connection with wood-treatment ad-
ditives (chromate, wood preservative). Materials containing
asbestos may only be worked by specialists.
– Provide for good ventilation of the working place.
– It is recommended to wear a P2 filter-class respirator.
Observe the relevant regulations in your country for the ma-
terials to be worked.
u
Avoid dust accumulation at the workplace.
Dust can
easily ignite.
Operation
Starting Operation
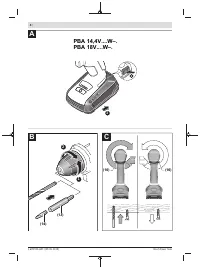
Inserting the battery
Note:
The use of batteries unsuitable for your power tool can
lead to malfunctions or damage to the power tool.
Set the rotational direction switch
(10)
to the middle posi-
tion to avoid unintentionally switching it on. Insert the
charged battery
(7)
into the handle until you feel it engage
and it is flush with the handle.
Set the rotational direction (see figure C)
The rotational direction switch
(10)
is used to change the ro-
tational direction of the power tool. However, this is not pos-
sible while the on/off switch
(11)
is being pressed.
Right rotation:
To drill and to drive in screws, press the ro-
tational direction switch
(10)
through to the left stop.
The rotational direction indicator for right rotation
(4)
lights up when the on/off switch
(11)
is
pressed and the motor is running.
Left Rotation:
To loosen and unscrew screws and nuts,
press the rotational direction switch
(10)
through to the
right stop.
The rotational direction indicator for left rotation
(5)
lights up when the on/off switch
(11)
is
pressed and the motor is running.
Preselecting the Torque
The required torque and speed ranges can be preselected
using the slider
(3)
. When the correct setting is used, the ap-
plication tool will be stopped as soon as the screw is driven
flush into the material or as soon as the set torque has been
reached. In position
the overload clutch is deactivated,
e.g. for drilling.
When unscrewing screws, it may be advisable to select a
higher setting or the
symbol.
Screwdriving Mode
Low speed range; for screwdriving or working
with a large drilling diameter.
Drilling Mode
High speed range; for working with a small
drilling diameter.
Temperature-dependent overload protection
In normal conditions of use, the power tool cannot be over-
loaded. If the power tool is overloaded or the permitted bat-
tery temperature is exceeded, the electronics of the power
tool will switch off until the temperature returns to within the
optimum operating temperature range.
Protection against deep discharge
The lithium-ion battery is protected against deep discharge
by the Electronic Cell Protection (ECP). When the battery is
discharged, the power tool is switched off by means of a pro-
tective circuit: The application tool no longer rotates.
Switching on/off
To
start
the power tool, press and hold the on/off switch
(11)
.
The lamp
(8)
lights up when the on/off switch
(11)
is lightly
or fully pressed, meaning that the work area is illuminated in
poor lighting conditions.
To
switch off
the power tool, release the on/off switch
(11)
.
Practical advice
u
Only apply the power tool to the screw/nut when the
tool is switched off.
Rotating tool inserts can slip off.
After working at a low speed for an extended period, you
should operate the power tool at the maximum speed for ap-
proximately three minutes without load to cool it down.
Maintenance and Service
Maintenance and Cleaning
u
Remove the battery from the power tool before carry-
ing out work on the power tool (e.g. maintenance,
changing tool, etc.). The battery should also be re-
moved for transport and storage.
There is risk of injury
from unintentionally pressing the on/off switch.
u
To ensure safe and efficient operation, always keep
the power tool and the ventilation slots clean.
Clean the application tool, the tool holder, the power tool’s
ventilations slots, and the battery’s ventilation slots each
time after using.
Bosch Power Tools
1 609 92A 4WF | (09.05.2019)
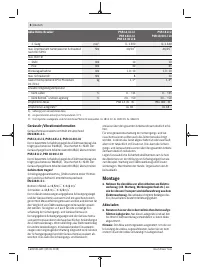
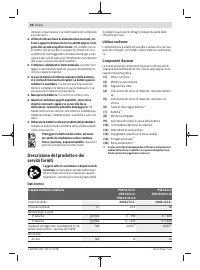
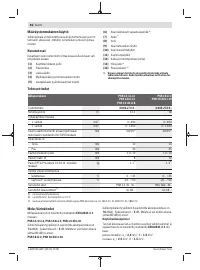
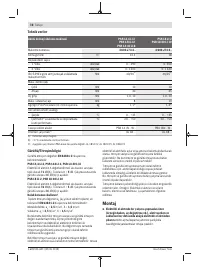
Характеристики

Остались вопросы?Не нашли свой ответ в руководстве или возникли другие проблемы? Задайте свой вопрос в форме ниже с подробным описанием вашей ситуации, чтобы другие люди и специалисты смогли дать на него ответ. Если вы знаете как решить проблему другого человека, пожалуйста, подскажите ему :)


