
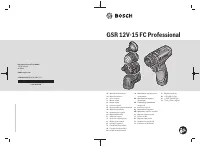
Шуруповерты Bosch GSR 12V-15 FC - инструкция пользователя по применению, эксплуатации и установке на русском языке. Мы надеемся, она поможет вам решить возникшие у вас вопросы при эксплуатации техники.
Если остались вопросы, задайте их в комментариях после инструкции.
"Загружаем инструкцию", означает, что нужно подождать пока файл загрузится и можно будет его читать онлайн. Некоторые инструкции очень большие и время их появления зависит от вашей скорости интернета.


English |
17
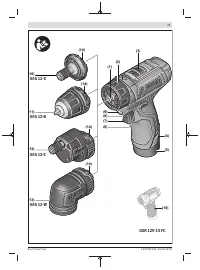
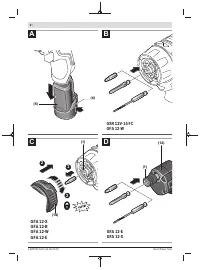
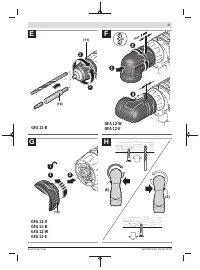
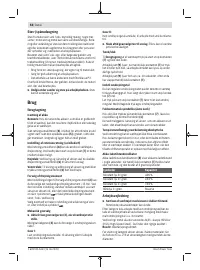
Inserting the application tool into the adapter GFA 12-E,
GFA 12-X (see figure D)
Insert the application tool all the way into the mounting
(1)
.
The application tool is held in the mounting by means of a
magnet.
GFA 12-B (see figure E)
Open the drill chuck adapter
(11)
by turning it in direction of
rotation
➊
until the application tool can be inserted. Insert
the application tool.
Firmly tighten the sleeve of the drill chuck adapter
(11)
by
turning it by hand in direction of rotation
➋
. This will auto-
matically lock the drill chuck.
Turning the adapter (see figure F)
Pull the locked adapter approx. 5 mm away from the power
tool. Turn the adapter to the required position and then let it
go.
Removing the adapter (see figure G)
Remove the application tool.
Unlock the adapter in the
direction and pull it off the
mounting
(1)
.
Dust/chip extraction
The dust from materials such as lead paint, some types of
wood, minerals and metal can be harmful to human health.
Touching or breathing in this dust can trigger allergic reac-
tions and/or cause respiratory illnesses in the user or in
people in the near vicinity.
Certain dusts, such as oak or beech dust, are classified as
carcinogenic, especially in conjunction with wood treatment
additives (chromate, wood preservative). Materials contain-
ing asbestos may only be machined by specialists.
– Use a dust extraction system that is suitable for the ma-
terial wherever possible.
– Provide good ventilation at the workplace.
– It is advisable to wear a P2 filter class breathing mask.
The regulations on the material being machined that apply in
the country of use must be observed.
u
Avoid dust accumulation at the workplace.
Dust can
easily ignite.
Operation
Start-up
Inserting the battery
Note:
The use of batteries unsuitable for your power tool can
lead to malfunctions or damage to the power tool.
Set the rotational direction switch
(6)
to the middle position
to avoid unintentionally switching it on. Insert the charged
battery
(5)
into the handle until you feel it engage and it is
flush with the handle.
Setting the rotational direction (see figure H)
The rotational direction switch
(6)
is used to change the ro-
tational direction of the power tool. However, this is not pos-
sible while the on/off switch
(7)
is being pressed.
Right rotation:
To drill and to drive in screws, press the ro-
tational direction switch
(6)
through to the left stop.
Left Rotation:
To loosen and unscrew screws and nuts,
press the rotational direction switch
(6)
through to the right
stop.
Preselecting the Torque
The torque presetting ring
(2)
can be used to preselect the
required torque in 15 stages. When the correct setting is
used, the application tool will be stopped when the screw is
driven flush into the material or once the set torque has been
reached. In position
the overload clutch is deactivated,
e.g. for drilling.
When unscrewing screws, it may be advisable to select a
higher setting or the
symbol.
Mechanical gear selection
u
Only operate the gear selector (3) when the power
tool is not in use.
You can preselect two speed ranges with the gear selector
(3)
.
Gear I:
Low speed range; for screwdriving or working with a large
drilling diameter.
Gear II:
High speed range; for working with a small drilling diameter.
u
Always push the gear selector switch as far as it will
go.
Otherwise, the power tool may become damaged.
Switching on/off
To
start
the power tool, press and hold the on/off switch
(7)
.
The worklight
(9)
lights up when the on/off switch
(7)
is
lightly or fully pressed, allowing the work area to be illumin-
ated in poor lighting conditions.
The worklight
(9)
will remain lit for approximately ten
seconds after the on/off switch
(7)
has been released.
Adjusting the Speed
You can adjust the speed of the power tool when it is on by
pressing in the on/off switch
(7)
to varying extents.
A light pressure on the on/off switch
(7)
results in a low rota-
tional speed. Increased pressure on the switch causes an in-
crease in speed.
Fully automatic spindle lock (Auto-Lock)
The drill spindle, and therefore the holder
(1)
, are locked
when the on/off switch
(7)
is not pressed.
This enables screws to be screwed in even when the battery
is empty and allows the power tool to be used as a screw-
driver.
Temperature-dependent overload protection
In normal conditions of use, the power tool cannot be over-
loaded. If the power tool is overloaded or not kept within the
Bosch Power Tools
1 609 92A 53H | (23.06.2020)
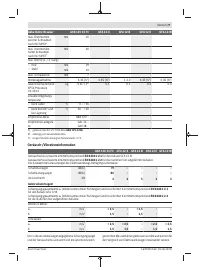
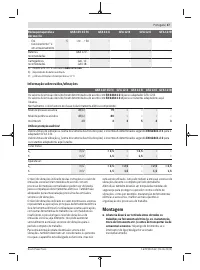
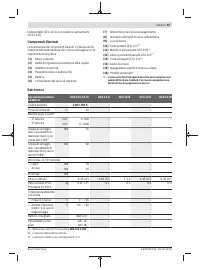
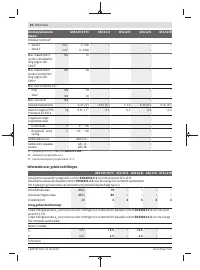
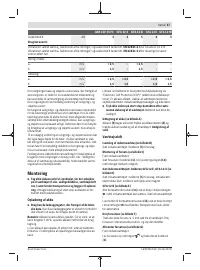
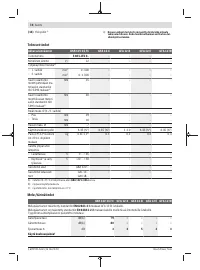
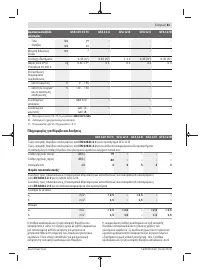
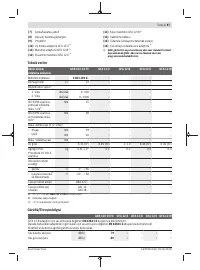
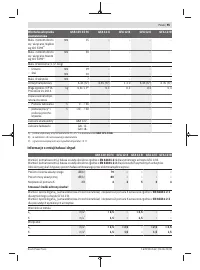
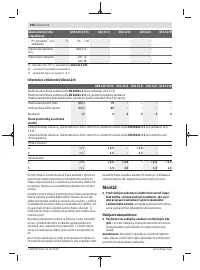
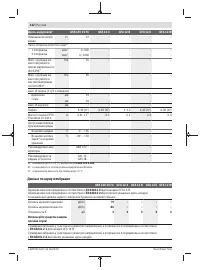
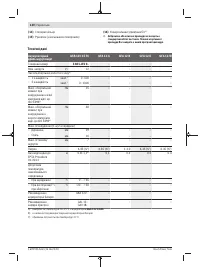
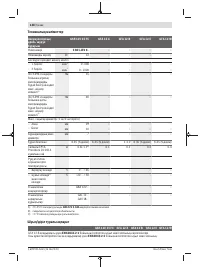
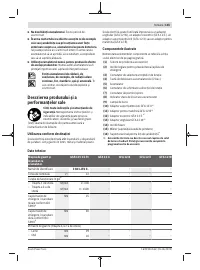
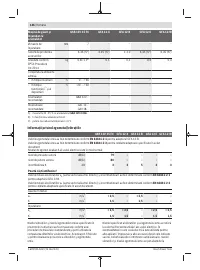
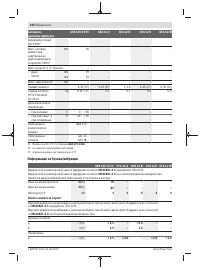
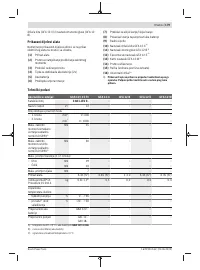
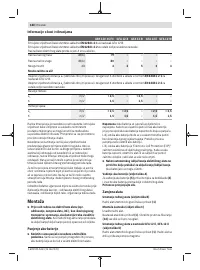
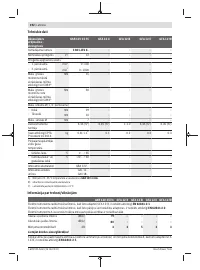
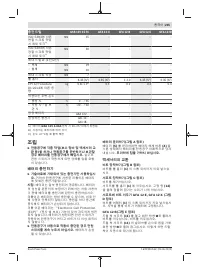
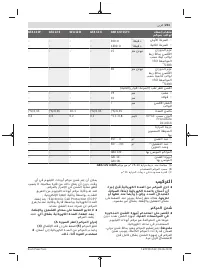
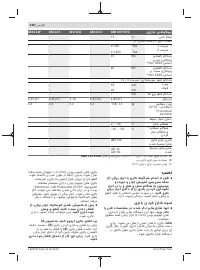
Характеристики

Остались вопросы?Не нашли свой ответ в руководстве или возникли другие проблемы? Задайте свой вопрос в форме ниже с подробным описанием вашей ситуации, чтобы другие люди и специалисты смогли дать на него ответ. Если вы знаете как решить проблему другого человека, пожалуйста, подскажите ему :)


