
Шуруповерты Black+DECKER KR 554 CRESKT - инструкция пользователя по применению, эксплуатации и установке на русском языке. Мы надеемся, она поможет вам решить возникшие у вас вопросы при эксплуатации техники.
Если остались вопросы, задайте их в комментариях после инструкции.
"Загружаем инструкцию", означает, что нужно подождать пока файл загрузится и можно будет его читать онлайн. Некоторые инструкции очень большие и время их появления зависит от вашей скорости интернета.


7
ENGLISH
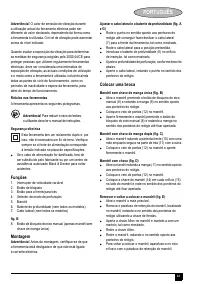
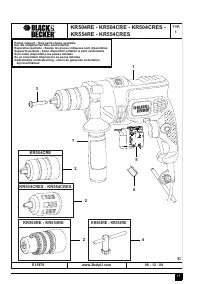
Features
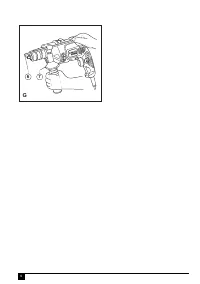
1. Variable speed switch
2. Lock-on button
3. Forward/reverse button
4. Drilling mode selector
5. Chuck
6. Depth stop (not all models)
7. Side handle (not all models)
fig. B
8. Manual spindle lock button (single sleeve keyless
chuck only)
Assembly
Warning!
Before assembly, make sure that the tool is
switched off and unplugged.
Fitting the side handle and depth stop (fig. A & G)
Turn the grip counter clockwise until you can slide the
side handle (7) onto the front of the tool as shown.
Rotate the side handle into the desired position.
Insert the depth stop (6) into the mounting hole as
shown.
Set the drilling depth as described below.
Tighten the side handle by turning the grip clockwise.
Fitting a drill bit
Single sleeve keyless chuck (fig. B)
Open the chuck by pressing the manual spindle lock
button (8) and turning the sleeve (9) counter clockwise.
Insert the bit shaft (12) into the chuck.
Firmly tighten the chuck by pressing the manual spindle
lock button (8) and turning the sleeve clockwise until it
is tight.
Two sleeve keyless chuck (fig. C)
Open the chuck by turning the front part (10) with one
hand while holding the rear part (11) with the other.
Insert the bit shaft (12) into the chuck and firmly tighten
the chuck.
Keyed chuck (fig. D)
Open the chuck by turning the sleeve (11) counter
clockwise.
Insert the bit shaft (12) into the chuck.
Insert the chuck key (14) into each hole (15) in the side
of the chuck and turn clockwise until tight.
Removing and refitting the chuck (fig. E)
Open the chuck as far as possible.
Remove the chuck retaining screw, located in the
chuck, by turning it clockwise using a screwdriver.
Tighten an Allen key into the chuck and strike it with a
hammer as shown.
Remove the Allen key.
Remove the chuck by turning it counter clockwise.
To refit the chuck, screw it onto the spindle and secure
it with the chuck retaining screw.
Residual risks
Additional residual risks may arise when using the tool which
may not be included in the enclosed safety warnings. These
risks can arise from misuse, prolonged use etc.
Even with the application of the relevant safety regulations
and the implementation of safety devices, certain residual
risks cannot be avoided. These include:
Injuries caused by touching any rotating/moving parts.
Injuries caused when changing any parts, blades or
accessories.
Injuries caused by prolonged use of a tool. When using
any tool for prolonged periods make sure you take
regular breaks.
Impairment of hearing.
Health hazards caused by breathing dust developed
when using your tool (example:- working with wood,
especially oak, beech and MDF).
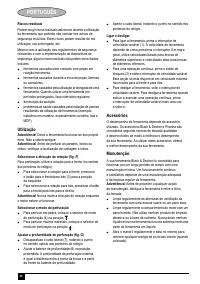
Use
Warning!
Let the tool work at its own pace. Do not overload.
Warning!
Before drilling into walls, floors or ceilings, check
for the location of wiring and pipes.
Selecting the direction of rotation (fig. F)
For drilling
,
use forward (clockwise) rotation.
To select forward rotation, push the forward/reverse
button (3) to the left position.
To select reverse rotation, push the forward/reverse
button to the right.
Warning!
Never change the direction of rotation while the
motor is running.
Selecting the drilling mode
For drilling in masonry, set the drilling mode selector (4)
to the position.
For drilling in other materials, set the drilling mode
selector to the position.
Setting the drilling depth (fig. G)
Slacken the side handle (7) by turning the grip counter
clockwise.
Set the depth stop (6) to the desired position. The
maximum drilling depth is equal to the distance between
the tip of the drill bit and the front end of the depth stop.
Tighten the side handle by turning the grip clockwise.


