
Штроборезы Makita SG1251J - инструкция пользователя по применению, эксплуатации и установке на русском языке. Мы надеемся, она поможет вам решить возникшие у вас вопросы при эксплуатации техники.
Если остались вопросы, задайте их в комментариях после инструкции.
"Загружаем инструкцию", означает, что нужно подождать пока файл загрузится и можно будет его читать онлайн. Некоторые инструкции очень большие и время их появления зависит от вашей скорости интернета.


9
NOTE:
• When the handle cannot be moved easily, loosen the
bolts furthermore.
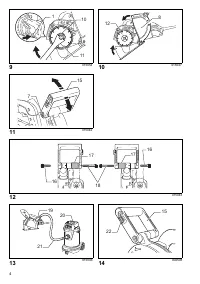
Shifting the front handle sideways (Fig. 12)
Remove the two bolts on both sides of the front handle
with the hex wrench. Change the position of the cam.
Insert the longer bolt to the side close to the cam and the
shorter one to the opposite side. Tighten the two bolts
firmly.
Connecting to vacuum cleaner (Fig. 13)
When using Makita dust collector, connect the hose for
the vacuum cleaner directly to the dust nozzle.
NOTE:
• The dust nozzle can be rotated freely so that you can
use it at any angle according to your operation.
Hex wrench storage (Fig. 14)
When not in use, store the hex wrench to keep it from
being lost.
OPERATION
CAUTION:
• Be sure to pull the tool when cutting a workpiece.
• Use this tool for straight line cutting only. Cutting curves
can cause stress cracks or fragmentation of the
diamond wheels resulting in possible injury to persons
in the vicinity.
• After operation, always switch off the tool and wait until
the diamond wheels come to a complete stop before
putting the tool down.
• Hold the tool firmly with one hand on the switch handle
and the other hand on the front grip when performing
the tool.
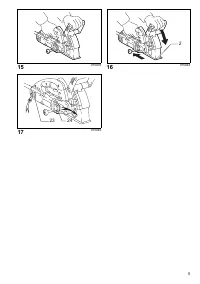
Hold the tool firmly with both hands. First keep the
diamond wheels without making any contact with a
workpiece. Then turn the tool on and wait until the
diamond wheels attain full speed.
(Fig. 15)
To cut a workpiece, pull the tool toward you (not by
pushing away from you). Align the notch on the base with
your cutting line. Push down the front handle gently until
it stops and then pull the tool slowly.
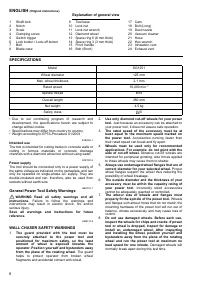
(Fig. 16)
Before finishing cutting operation and raising the tool,
switch it off first. Wait until the diamond wheels stop
completely and then raise the tool.
Remove the remaining portion between the two blade
passages by other appropriate tools.
MAINTENANCE
CAUTION:
• Always be sure that the tool is switched off and
unplugged before attempting to perform inspection or
maintenance.
• Never use gasoline, benzine, thinner, alcohol or the
like. Discoloration, deformation or cracks may result.
The tool and its air vents have to be kept clean. Regularly
clean the tool’s air vents or whenever the vents start to
become obstructed.
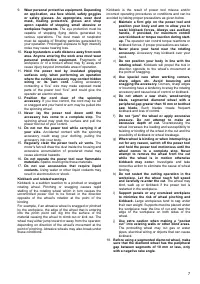
(Fig. 17)
Dressing diamond wheel
If the cutting action of the diamond wheel begins to
diminish, use an old discarded coarse grit bench grinder
wheel or concrete block to dress the diamond wheel. To
do this, tightly secure the bench grinder wheel or
concrete block and cut in it.
To maintain product SAFETY and RELIABILITY, repairs,
carbon brush inspection and replacement, any other
maintenance or adjustment should be performed by
Makita Authorized Service Centers, always using Makita
replacement parts.
OPTIONAL ACCESSORIES
CAUTION:
• These accessories or attachments are recommended
for use with your Makita tool specified in this manual.
The use of any other accessories or attachments might
present a risk of injury to persons. Only use accessory
or attachment for its stated purpose.
If you need any assistance for more details regarding
these accessories, ask your local Makita Service Center.
• Diamond wheels
NOTE:
• Some items in the list may be included in the tool
package as standard accessories. They may differ from
country to country.
ENG905-1
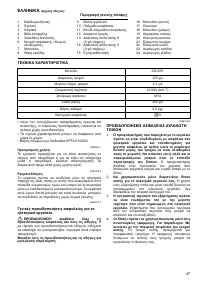
Noise
The typical A-weighted noise level determined according
to EN60745:
Sound pressure level (L
pA
): 97 dB (A)
Sound power level (L
WA
): 108 dB (A)
Uncertainty (K): 3 dB (A)
Wear ear protection
ENG900-1
Vibration
The vibration total value (tri-axial vector sum) determined
according to EN60745:
Work mode: concrete cutting
Vibration emission (a
h
): 5.0 m/s
2
Uncertainty (K): 1.5 m/s
2
ENG901-1
• The declared vibration emission value has been
measured in accordance with the standard test method
and may be used for comparing one tool with another.
• The declared vibration emission value may also be
used in a preliminary assessment of exposure.
WARNING:
• The vibration emission during actual use of the power
tool can differ from the declared emission value
depending on the ways in which the tool is used.
• Be sure to identify safety measures to protect the
operator that are based on an estimation of exposure in
the actual conditions of use (taking account of all parts
of the operating cycle such as the times when the tool
is switched off and when it is running idle in addition to
the trigger time).
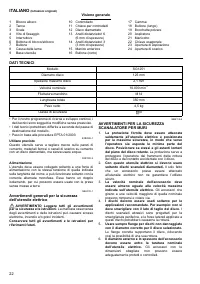
Характеристики

Остались вопросы?Не нашли свой ответ в руководстве или возникли другие проблемы? Задайте свой вопрос в форме ниже с подробным описанием вашей ситуации, чтобы другие люди и специалисты смогли дать на него ответ. Если вы знаете как решить проблему другого человека, пожалуйста, подскажите ему :)


