
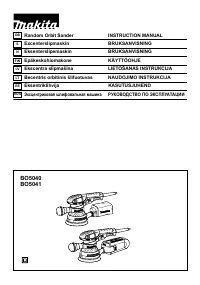
Шлифмашины Makita BO5041K - инструкция пользователя по применению, эксплуатации и установке на русском языке. Мы надеемся, она поможет вам решить возникшие у вас вопросы при эксплуатации техники.
Если остались вопросы, задайте их в комментариях после инструкции.
"Загружаем инструкцию", означает, что нужно подождать пока файл загрузится и можно будет его читать онлайн. Некоторые инструкции очень большие и время их появления зависит от вашей скорости интернета.


6
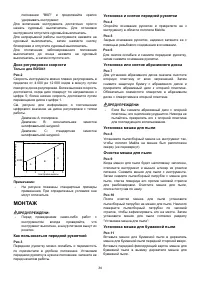
ASSEMBLY
CAUTION:
•
Always be sure that the tool is switched off and
unplugged before carrying out any work on the tool.
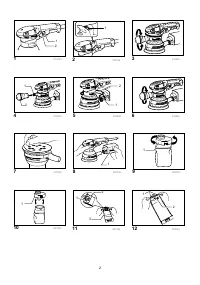
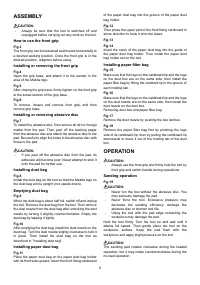
How to use the front grip
Fig.3
The front grip can be loosened and moved horizontally to
a desired working position. Once the front grip is in the
desired position, retighten before using.
Installing or removing the front grip
Fig.4
Open the grip base, and attach it to the sander in the
area of the Makita logo.
Fig.5
After closing the grip base, firmly tighten on the front grip
to the screw section of the grip base.
Fig.6
To remove, loosen and remove front grip, and then
remove grip base.
Installing or removing abrasive disc
Fig.7
To install the abrasive disc, first remove all dirt or foreign
matter from the pad. Then peel off the backing paper
from the abrasive disc and attach the abrasive disc to the
pad. Be careful to align the holes in the abrasive disc with
those in the pad.
CAUTION:
•
If you peel off the abrasive disc from the pad, its
adhesion will become poor. Never attempt to stick it
onto the pad for further use.
Installing dust bag
Fig.8
Install the dust bag on the tool so that the Makita logo on
the dust bag will be upright (not upside down).
Emptying dust bag
Fig.9
When the dust bag is about half full, switch off and unplug
the tool. Remove the dust bag from the tool. Then remove
the dust nozzle from the dust bag after unlocking the dust
nozzle by turning it slightly counterclockwise. Empty the
dust bag by tapping it lightly.
Fig.10
After emptying the dust bag, install the dust nozzle on the
dust bag. Turn the dust nozzle slightly clockwise to lock it
in place. Then install the dust bag on the tool as
described in "Installing dust bag".
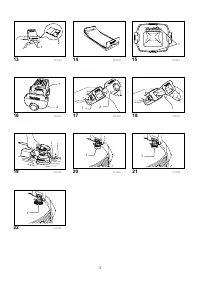
Installing paper dust bag
Fig.11
Place the paper dust bag on the paper dust bag holder
with its front side upward. Insert the front fixing cardboard
of the paper dust bag into the groove of the paper dust
bag holder.
Fig.12
Then press the upper part of the front fixing cardboard in
arrow direction to hook it onto the claws.
Fig.13
Fig.14
Insert the notch of the paper dust bag into the guide of
the paper dust bag holder. Then install the paper dust
bag holder set on the tool.
Installing paper filter bag
Fig.15
Make sure that the logo on the cardboard lip and the logo
on the dust box are on the same side, then install the
paper filter bag by fitting the cardbord lip in the groove of
each holding tab.
Fig.16
Make sure that the logo on the cardboard lip and the logo
on the dust nozzle are on the same side, then install the
dust nozzle on the dust box.
Removing dust box and paper filter bag
Fig.17
Remove the dust nozzle by pushing the two latches.
Fig.18
Remove the paper filter bag first by pinching the logo
side of its cardboard lip, then by pulling the cardboard lip
downwards to move it out of the holding tab of the dust
box.
OPERATION
CAUTION:
•
Always use the front grip and firmly hold the tool by
front grip and switch handle during operations.
Sanding operation
Fig.19
CAUTION:
•
Never run the tool without the abrasive disc. You
may seriously damage the pad.
•
Never force the tool. Excessive pressure may
decrease the sanding efficiency, damage the
abrasive disc or shorten tool life.
•
Using the tool with the pad edge contacting the
workpiece may damage the pad.
Hold the tool firmly. Turn the tool on and wait until it
attains full speed. Then gently place the tool on the
workpiece surface. Keep the pad flush with the
workpiece and apply slight pressure on the tool.
CAUTION:
The sanding pad rotates clockwise during the loaded
operation, but it may rotate counterclockwise during the
no-load operation.
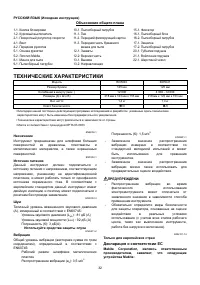
Характеристики

Остались вопросы?Не нашли свой ответ в руководстве или возникли другие проблемы? Задайте свой вопрос в форме ниже с подробным описанием вашей ситуации, чтобы другие люди и специалисты смогли дать на него ответ. Если вы знаете как решить проблему другого человека, пожалуйста, подскажите ему :)


