Роутеры TENDA 4G06 N300 - инструкция пользователя по применению, эксплуатации и установке на русском языке. Мы надеемся, она поможет вам решить возникшие у вас вопросы при эксплуатации техники.
Если остались вопросы, задайте их в комментариях после инструкции.
"Загружаем инструкцию", означает, что нужно подождать пока файл загрузится и можно будет его читать онлайн. Некоторые инструкции очень большие и время их появления зависит от вашей скорости интернета.
Quick Installation Guide
N300 Wi-Fi 4G VoLTE Router
4G06
Package contents
4G VoLTE Router x 1
Power adapter x 1
Detachable antenna x 2
Telephone cable x 1
Ethernet cable x 1
Quick installation guide x 1
For product or function details, please go to www.tendacn.com to download the user guide.
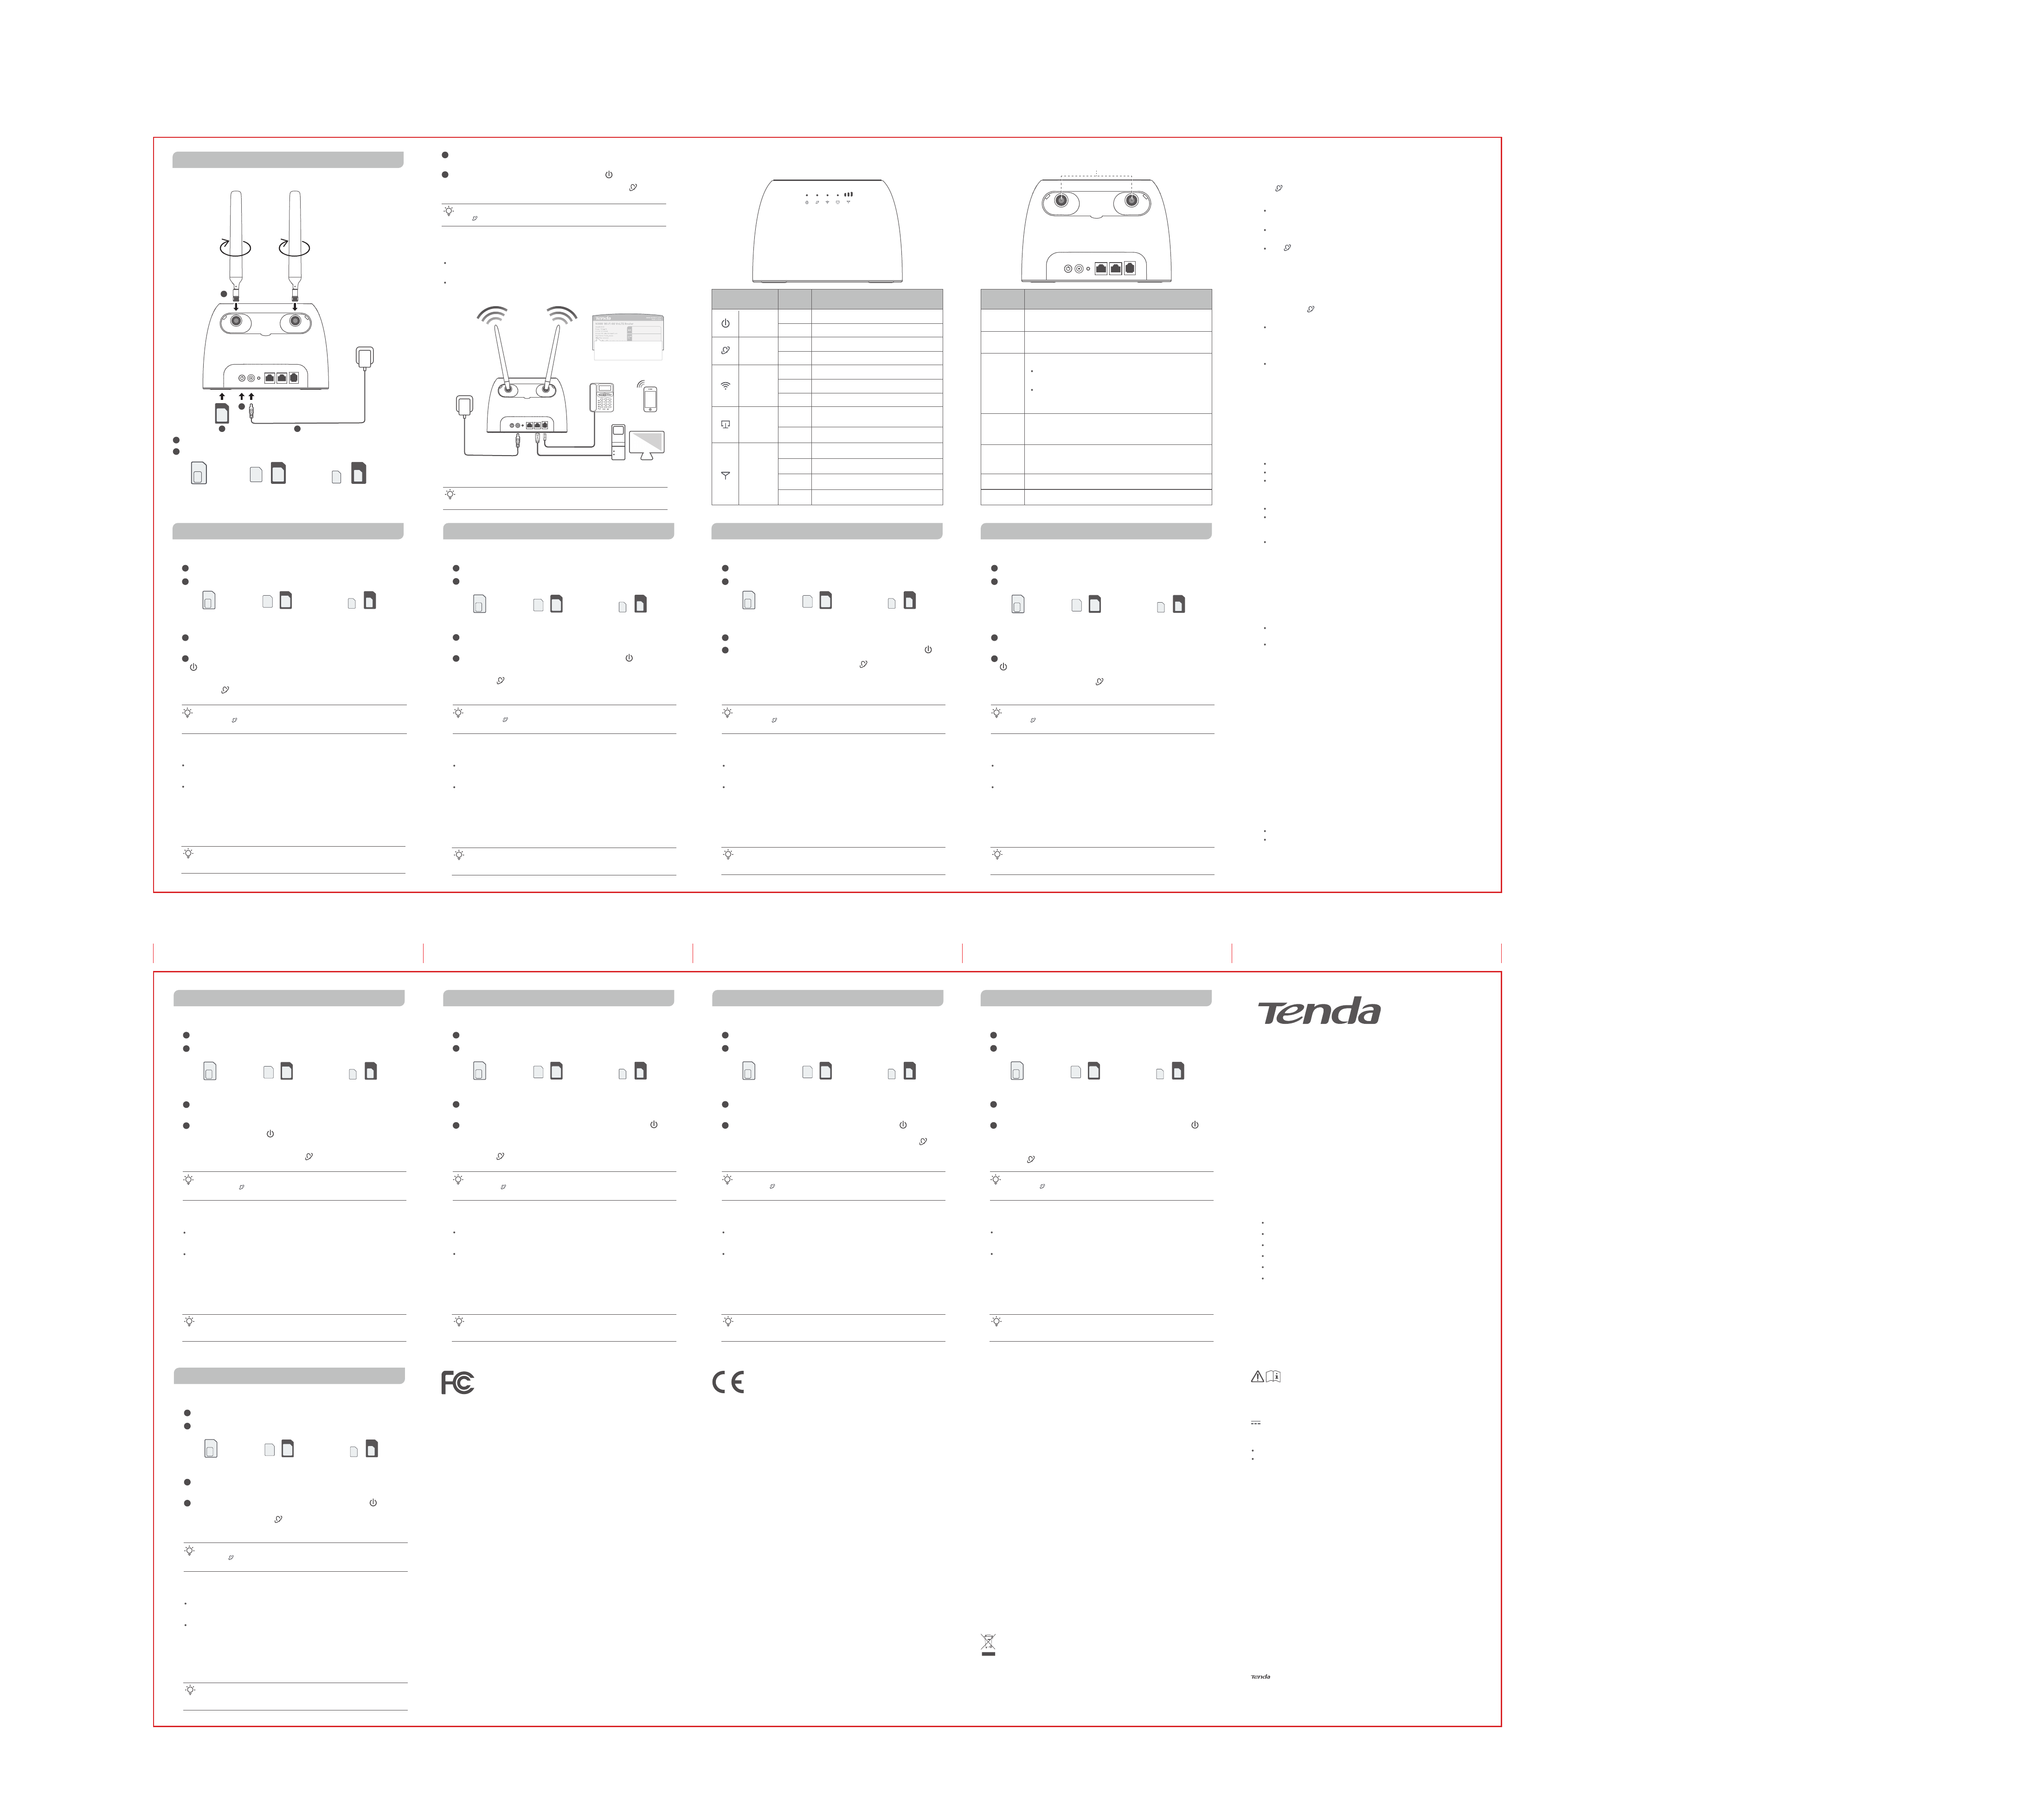
LED indicator
Status
Description
Solid on
Power LED
indicator
Internet LED
indicator
Wi-Fi LED
indicator
LAN LED
indicator
Signal strength
LED indicator
The router is powered on properly.
Solid on
Solid on
The router is connected to the internet.
Blinking
Solid on
3 bars
Excellent signal.
No device is connected to any LAN port of the router.
2 bars
Good signal.
1 bar
Off
No signal.
Off
Off
The Wi-Fi network is disabled.
Off
No internet access is available.
The Wi-Fi network is enabled.
Off
The router is powered off or not powered on properly.
The router is ready for WPS negotiation.
Fair signal.
At least one device is connected to a LAN port of
the router.
FAQ
II. Access the internet
LED indicators
Ports & Buttons
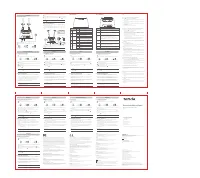
Connect your wired device, such as a computer, to the
WAN/LAN
or
LAN
port of
the router using an Ethernet cable.
Connect your wireless device, such as a smart phone, to the Wi-Fi network of the
router using the
Wi-Fi Name
and
Wi-Fi Key
labeled on the bottom panel of the
router.
To further configure the router, log in to the web UI of the router by visiting
tendawifi.com
on a connected device.
① Insert a SIM card into the slot on the bottom panel of the router.
2
① Attach the antennas to the router.
1
Q2: I cannot access the internet after the configuration. What should I do?
For wired devices, such as computers:
− Ensure that your computer is connected to port
WAN/LAN
or
LAN
properly.
− Ensure that your computer is set to obtain an IP address automatically and
obtain DNS server address automatically.
For wireless devices, such as smart phones:
− Ensure that your wireless device connects to the Wi-Fi network of the router
with the Wi-Fi name you set.
− Log in to the web UI and change your Wi-Fi name and Wi-Fi password on
Wi-Fi Settings > Wi-Fi Name & Password
page. Then try again.
A2:
Ensure that the LED indicator lights solid on. If not, refer to
Q1
.
If the problem persists, try the following methods:
Ensure that the wireless function is enabled. If not, enabled it and save the setting.
Search for the Wi-Fi signal again on your phone.
Ensure that the
Hide
function is disabled. If not, disable it and save the setting.
Search for the Wi-Fi signal again on your phone.
Q4: Why cannot I find the Wi-Fi signal of the router?
A4:
Connect your computer to port
WAN/LAN
or
LAN
of the router to log in to the web
UI. Navigate to
Wi-Fi Settings > Wi-Fi Name & Password
:
Q5: How to change my Wi-Fi name and password?
A5:
Log in to the web UI of the router on your wired or wireless device, navigate to
Wi-Fi Settings > Wi-Fi Name & Password
and customize your Wi-Fi name and
password.
Q6: Why cannot I access the internet with a SIM card under the wireless router
mode?
A6:
The 3G/4G router mode and the wireless router mode are two different operating
modes. You can only use the SIM card to access the internet under the 3G/4G
router mode.
Q7: I cannot make and receive phone calls with my telephone connected to the
router?
A7:
Try the following solutions:
Ensure that your telephone is connected to the TEL port of the router properly.
Ensure that your router is working under 3G/4G router mode with a SIM card
inserted.
Español
Port/Button
Description
ON/OFF
PWR
RST/WPS
WAN/LAN
LAN
Power button.
Used to turn on or off the router.
Power jack.
Used to connect to a power source to supply power for the router.
Used to reset the router, or start WPS negotiation of the router.
It can serve as a WAN port or a LAN port.
By default, the router is under 3G/4G router mode and it serves as a LAN port.
When the router is set to the wireless router mode, it serves as a WAN port.
It is a LAN port used to connect to wired devices, such as a computer.
When the IPTV function is enabled under the wireless router mode, it serves
as the IPTV port to connect to the set top box.
TEL
It is a telephone port, used to connect to a landline phone for voice service.
Antenna socket
Reset: Hold down the button for about 8 seconds, and release it when all
LED indicators light off and then light up. The router is reset.
WPS: Press the button, and the Wi-Fi LED indicator blinks. Configure
WPS-enabled wireless devices within 2 minutes to start WPS negotiation
with the router.
Used to connect external antennas, which enhance the signal strength.
12345A
6789
+
+
Mini SIM card
Nano SIM card + adapter
Micro SIM card + adapter
✓
✓
✓
English
I. Set up the router
Tips:
If the LED indicator does not light up, refer to
Q1
in
FAQ
.
Tips:
If you cannot log in to the web UI of the router, refer to
Q3
in
FAQ
.
Dicas:
Se você não conseguir fazer login na interface do usuário pela web do roteador, consulte
Q3
em
FAQ
(perguntas mais frequentes).
Wi-Fi Name: Tenda_xxxxxx
Wi-Fi Key: xxxxxxxx
Technical Support
Shenzhen Tenda Technology Co., Ltd.
6-8 Floor, Tower E3, NO.1001, Zhongshanyuan Road, Nanshan District,
Shenzhen, China. 518052
USA hotline: 1-800-570-5892
Toll Free: 7 x 24 hours
Canada hotline: 1-888-998-8966
Toll Free: Mon - Fri 9 am - 6 pm PST
Hong Kong hotline: 00852-81931998
Global hotline: +86 755-2765 7180 (China Time Zone)
Website: www.tendacn.com
E-mail: support@tenda.com.cn
Copyright
© 2020 Shenzhen Tenda Technology Co., Ltd. All rights reserved.
is a registered trademark legally held by Shenzhen Tenda Technology
Co., Ltd. Other brand and product names mentioned herein are trademarks or
registered trademarks of their respective holders. Specifications are subject to
change without notice.
RECYCLING
This product bears the selective sorting symbol for Waste electrical and electronic
equipment (WEEE). This means that this product must be handled pursuant to
European directive 2012/19/EU in order to be recycled or dismantled to minimize its
impact on the environment.
User has the choice to give his product to a competent recycling organization or to the
retailer when he buys new electrical or electronic equipment.
Español
DECLARACIÓN UE DE CONFORMIDAD SIMPLIFICADA
Por la presente, SHENZHEN TENDA TECHNOLOGY CO., LTD., declara que e1 tipo de equipo radioelectrico 4G06 es
conforme con 1a Directiva 2014/53/UE.
El texto completo de la declaratión UE de conformidad está disponible en la direcctión Internet siguiente:
http://www.tendacn.com/en/service/download-cata-101.html
Čeština
ZJEDNODUŏENÉ EU PROHLÁŏENÍ O SHODč
Tímto SHENZHEN TENDA TECHNOLOGY CO., LTD., prohlaŐuje, Ŭe typ rádiového zaňízení 4G06 je v souladu se smĎrnicí
2014/53/EU.
Úplné znĎní EU prohláŐení o shodĎ je k dispozici na této internetové adrese:
http://www.tendacn.com/en/service/download-cata-101.html
Deutsch
VEREINFACHTE EU-KONFORMITÄTSERKLÄRUNG
Hiermit erklärt SHENZHEN TENDA TECHNOLOGY CO., LTD., dass der Funkanlagentyp 4G06 der Richtlinie 2014/53/EU
entspricht.
Der vollständige Text der EU-Konformitätserklärung ist unter der folgenden Internetadresse verfügbar:
http://www.tendacn.com/en/service/download-cata-101.html
Français
DECLARATION UE DE CONFORMITE SIMPLIFIEE
Le soussigné, SHENZHEN TENDA TECHNOLOGY CO., LTD., déclare que l'équipement radioélectrique du type 4G06
est conforme à la directive 2014/53/UE.
Le texte complet de la déclaration UE de conformité est disponible à l'adresse internet suivante:
http://www.tendacn.com/en/service/download-cata-101.html
Italiano
DICHIARAZIONE DI CONFORMITÀ UE SEMPLIFICATA
Il fabbricante, SHENZHEN TENDA TECHNOLOGY CO., LTD., dichiara che il tipo di apparecchiatura radio 4G06 è
conforme alla direttiva 2014/53/UE.
Il testo completo della dichiarazione di conformità UE è disponibile al seguente indirizzo Internet:
http://www.tendacn.com/en/service/download-cata-101.html
Polski
UPROSZCZONA DEKLARACJA ZGODNOŚCI UE
SHENZHEN TENDA TECHNOLOGY CO., LTD. niniejszym oświadcza, że typ urządzenia radiowego 4G06 jest zgodny z
dyrektywą 2014/53/UE.
Pełny tekst deklaracji zgodności UE jest dostępny pod następującym adresem internetowym:
http://www.tendacn.com/en/service/download-cata-101.html
Português
DECLARAÇÃO UE DE CONFORMIDADE SIMPLIFICADA
O(a) abaixo assinado(a) SHENZHEN TENDA TECHNOLOGY CO., LTD. declara que o presente tipo de equipamento
de rádio 4G06 está em conformidade com a Diretiva 2014/53/UE.
O texto integral da declaração de conformidade está disponível no seguinte endereço de Internet:
http://www.tendacn.com/en/service/download-cata-101.html
Русский
Декларация соответствия
Настоящим, SHENZHEN TENDA TECHNOLOGY CO. LTD. заявляет, что радиооборудование типа 4G06
соответствует Директиве 2014/53 / ЕС.
Полный текст декларации соответствия ЕС доступен по следующему интернет-адресу:
http://www.tendacn.com/en/service/download-cata-101.html
Română
DECLARAŢIA UE DE CONFORMITATE SIMPLIFICATĂ
Prin prezenta, SHENZHEN TENDA TECHNOLOGY CO., LTD. declară că tipul de echipamente radio 4G06 este în
conformitate cu Directiva 2014/53/UE.
Textul integral al declaraţiei UE de conformitate este disponibil la următoarea adresă internet:
http://www.tendacn.com/en/service/download-cata-101.html
CE Mark Warning
This is a Class B product. In a domestic environment, this product may cause radio
interference, in which case the user may be required to take adequate measures.
This equipment should be installed and operated with minimum distance 20cm
between the device and your body.
NOTE:
(1) The manufacturer is not responsible for any radio or TV interference caused
by unauthorized modifications to this equipment. (2) To avoid unnecessary radiation
interference, it is recommended to use a shielded RJ45 cable.
Declaration of Conformity
Hereby, SHENZHEN TENDA TECHNOLOGY CO., LTD. declares that the radio
equipment type 4G06 is in compliance with Directive 2014/53/EU.
The full text of the EU declaration of conformity is available at the following internet
address: http://www.tendacn.com/en/service/download-cata-101.html
Operating Frequency:
2.4 GHz: EU/2400-2483.5MHz (CH1-CH13)
EIRP Power (Max.):
2.4 GHz < 20dBm
Software Version: V16.03.07.X
Operating Environment
Temperature: 0°C-40°C
Humidity: (10 - 90) %RH, non-condensing
Caution
:
Manufacturer: SHENZHEN HEWEISHUN NETWORK TECHNOLOGY CO., LTD.
Adapter Model: BN037-A12012E, BN037-A12012B
Input: 100-240V AC 50/60Hz 0.4A
Output: 12V/1A
: DC Voltage
FCC Statement
This equipment has been tested and found to comply with the limits for a Class B
digital device, pursuant to Part 15 of the FCC Rules. These limits are designed to
provide reasonable protection against harmful interference in a residential installation.
This equipment generates, uses and can radiate radio frequency energy and, if not
installed and used in accordance with the instructions, may cause harmful interference
to radio communications. However, there is no guarantee that interference will not
occur in a particular installation. If this equipment does cause harmful interference to
radio or television reception, which can be determined by turning the equipment off
and on, the user is encouraged to try to correct the interference by one or more of the
following measures:
— Reorient or relocate the receiving antenna.
— Increase the separation between the equipment and receiver.
— Connect the equipment into an outlet on a circuit different from that to which the
receiver is connected.
— Consult the dealer or an experienced radio/TV technician for help.
Operation is subject to the following two conditions: (1) this device may not cause
harmful interference, and (2) this device must accept any interference received,
including interference that may cause undesired operation.
Radiation Exposure Statement
This device complies with FCC radiation exposure limits set forth for an uncontrolled
environment and it also complies with Part 15 of the FCC RF Rules.
This equipment should be installed and operated with minimum distance 20cm
between the device and your body.
Caution:
Any changes or modifications not expressly approved by the party responsible for
compliance could void the user's authority to operate this equipment.
This transmitter must not be co-located or operating in conjunction with any other
antenna or transmitter.
Operating frequency: 2412-2462MHz
NOTE:
(1) The manufacturer is not responsible for any radio or TV interference caused
by unauthorized modifications to this equipment. (2) To avoid unnecessary radiation
interference, it is recommended to use a shielded RJ45 cable.
I. Configurar o roteador
Português (Brasil)
Conecte as antenas ao roteador.
1
③ Use the included power adapter to connect the
PWR
jack of the router to a power
source.
④ Press the
ON/OFF
button down to turn on the router. The LED indicator lights up.
Wait a few seconds. The router is connected to the internet when the LED indicator
lights up.
3
4
Q1: The LED indicator does not light up. What should I do?
If you are required to enter a PIN code to unlock the SIM card, contact your ISP
for the PIN code.
If you are required to enter APN parameters manually, enter these parameters
provided by your ISP.
If the LED indicator is still off after you finish the Quick Setup Wizard, your
SIM card may run out of money.
A1:
Start a web browser, and access
tendawifi.com
:
If the problem persists, contact your ISP for help.
Q3: I cannot access the web UI of the router by visiting tendawifi.com. What
should I do?
Ensure that your wireless device is connected to the Wi-Fi network of the router.
Disable the cellular network of your wireless device.
Clear the cache of your web browser or change another web browser and try
again.
Ensure that the computer has connected to the router properly.
Ensure that the IP address of your computer is 192.168.0.X (X ranges from 2 to
254). If not, unplug and replug one end of the Ethernet cable between the router
and the computer, and try again.
Clear the cache of your web browser or change another web browser and try
again.
A3:
Try the following solutions.
If you log in with a wireless device:
If you log in with a wired device:
If the problem persists, reset the router (hold down the
RST/WPS
button for about
8 seconds) and configure it again.
II. Acessar a internet
Insira um cartão SIM na abertura no painel inferior do roteador.
Aguarde alguns instantes. O roteador será conectado com êxito à Internet quando o
indicador LED acender.
Para configurar melhor o roteador, como realizar a alteração do nome e da chave
WiFi, efetue o login na interface do usuário da web do roteador acessando
tendawifi.com
por meio de um dispositivo conectado.
Use o adaptador de alimentação incluído para ligar o
PWR
do roteador a uma
fonte de energia.
Pressione o botão
ON/OFF
(Ligar/Desligar) para ligar o roteador. O LED indicador
acende uma luz.
Conecte seu dispositivo com fio, como um computador, à porta
WAN/LAN
ou
LAN
do roteador usando um cabo Ethernet.
Conecte seu dispositivo sem fio, como um smartphone à rede Wi-Fi do roteador
usando o
Wi-Fi Name
e a
Wi-Fi Key
localizados no painel inferior do roteador.
2
3
4
12345A
6789
+
+
Cartão Mini SIM
Cartão Nano SIM + adaptador
Cartão Micro SIM + adaptador
✓
✓
✓
Dicas:
Se o indicador não se acender, consulte a
Q1
na
FAQ
para encontrar uma solução.
Podłącz anteny do routera.
1
Polski
Wskazówki:
Jeśli nie można się zalogować do interfejsu przeglądarki internetowej routera, należy
zapoznać się z
Q3
w
FAQ
.
I. Konfiguracja routera
II. Połącz się z Internetem
Włóż kartę SIM do gniazda na dolnym panelu routera.
Poczekaj kilka sekund. Zapalenie się kontrolek LED oznacza, że router został
pomyślnie podłączony do Internetu.
Aby dokonać dalszej konfiguracji routera, na przykład zmiany nazwy Wi-Fi i klucza
Wi-Fi, zaloguj się do interfejsu przeglądarki internetowej routera odwiedzając
witrynę
tendawifi.com
na połączonym urządzeniu.
Użyj dołączonego zasilacza, by podłączyć wtyczkę
PWR
routera do zasilania.
Naciśnij przycisk
ON/OFF
aby włączyć router. Włączy się kontrolka LED .
Podłącz urządzenie przewodowe, takie jak komputer, do portu
WAN/LAN
lub
LAN
routera za pomocą kabla Ethernet.
Podłącz urządzenie przewodowe, jak smartfon, do sieci Wi-Fi routera, używając
Wi-Fi Name
i
Wi-Fi Key
umieszczonych na etykiecie na spodniej ściance
routera.
2
3
4
12345A
6789
+
+
Karta mini-SIM
Karta nano-SIM + zasilacz
Karta micro-SIM + zasilacz
✓
✓
✓
Wskazówki:
Jeśli kontrolka nie zapali się, należy zapoznać się z
Q1
w
FAQ
, by znaleźć
rozwiązanie.
Befestigen Sie die Antennen am Router.
1
Deutsch
Tipps:
Wenn Sie sich nicht bei der Web-Benutzeroberfläche des Routers anmelden können, lesen
Sie in den
FAQ
unter
Q3
nach.
I. Konfigurieren Sie den Router
II. Zugriff auf das Internet
Stecken Sie eine SIM-Karte in den Steckplatz auf der Unterseite des Routers.
Warten Sie einige Sekunden. Wenn die -LED-Anzeige aufleuchtet, ist der Router
erfolgreich mit dem Internet verbunden.
Für weitere Einstellungen, wie z. B. den WLAN-Namen und das WLAN-Passwort
zu ändern, melden Sie sich bei der Web-Benutzeroberfläche des Routers an,
indem Sie die Seite
tendawifi.com
mit einem angeschlossenen Gerät aufrufen.
Verwenden Sie das mitgelieferte Netzteil, um die
PWR
-Buchse des Routers mit
einer Stromquelle zu verbinden.
Drücken Sie die
ON/OFF
-Taste nach unten, um den Router einzuschalten. Die
LED-Anzeige beginnt zu leuchten.
Schließen Sie Ihr kabelgebundenes Gerät, z. B. einen Computer, mit einem
Ethernet-Kabel an den
WAN/LAN
- oder
LAN
-Port des Routers an.
Verbinden Sie Ihr drahtloses Gerät, z. B. ein Smartphone, mit dem
WLAN-Netzwerk des Routers indem Sie den
Wi-Fi Name
und das
Wi-Fi Key
,
die auf der Unterseite des Routers angegeben sind verwenden.
2
3
4
12345A
6789
+
+
Mini-SIM-Karte
Nano-SIM-Karte + Adapter
Mikro-SIM-Karte + Adapter
✓
✓
✓
Tipps:
Wenn die -Kontrollleuchte nicht leuchtet, lesen Sie
Q1
in den
FAQ
, um eine Lösung
zu finden.
Подключите антенну к роутеру.
1
Русский
Советы:
Если вы не можете выполнить вод в систему веб-интерфейса маршрутизатора,
обратитесь к
Q3
в
FAQ
(Часто задаваемы вопроса).
I. Настройка маршрутизатора
II. Доступ в Интернет
Вставьте SIM-карту в разъем в нижней панели роутера.
Подождите несколько секунд. Маршрутизатор успешно подключен к
интернету, если светодиодный индикатор горит.
Чтобы изменить имя Wi-Fi, пароль от Wi-Fi и прочие настройки, с помощью
подключенного устройства выполните вод в систему веб-интерфейса
через сайт
tendawifi.com
.
Используйте водящий в комплект адаптер питания для подключения
разъема
PWR
маршрутизатора к источнику питания.
Нажмите кнопку
ON/OFF
, чтобы отключить маршрутизатор. Загорается
светодиодный индикатор .
Подключите свой компьютер или другое проводное устройство к
WAN/LAN
-порту или
LAN
-порту на роутере по кабелю Ethernet.
Подключите свой смартфон или другое беспроводное устройство к Wi-Fi
роутеру, используя
Wi-Fi Name
и
Wi-Fi Key
, указанные на нижней панели
роутера.
2
3
4
12345A
6789
+
+
Мини-SIM-карта
Нано-SIM-карта + адаптер
Микро-SIM-карта + адаптер
✓
✓
✓
Советы:
Если индикатор не загорается, обратитесь к
Q1
в разделе
FAQ
, чобы решить
эту проблему.
Consejos:
Si no puede iniciar sesión en la web UI del router, consulte con la pregunta
Q3
en
FAQ
(Preguntas frecuentes).
I. Configurar su Router
II. Acceso a Internet
Inserte una tarjeta SIM en la ranura del panel inferior del rúter.
Espere unos segundos. Cuando el router se haya conectado con éxito a Internet las
luces LED de se encenderán.
Para continuar configurando el router, como cambiar el nombre del Wi-Fi y su
clave, inicie sesión en la web UI del router visitando la página
tendawifi.com
del
dispositivo conectado.
Utilice el adaptador de corriente suministrado para conectar el conector
PWR
del
router a una toma de corriente.
Pulse el botón
ON/OFF
para encender el router. Los indicadores LED de se
encienden.
Conecte el dispositivo con cable, por ejemplo, un ordenador a un puerto
WAN/LAN
o
LAN
del router mediante un cable Ethernet.
Conecte su dispositivo inalámbrico, como un smartphone, a la red Wi-Fi del route
utilizando para ello el
Wi-Fi Name
y la
Wi-Fi Key
de la etiqueta en la parte
trasera del panel del router.
2
3
4
12345A
6789
+
+
Tarjeta mini-SIM
Tarjeta nano-SIM + Adaptador
Tarjeta micro-SIM + Adaptador
✓
✓
✓
Consejos:
Si el indicador no se ilumina, consulte la
Q1
en la sección
FAQ
para encontrar una
solución.
Italiano
Suggerimenti:
Nel caso in cui non si riesca ad accedere all'interfaccia utente Web del router, fare
riferimento a
Q3
nelle
FAQ
.
I. Configurare il router
II. Accedere ad internet
Inserire una scheda SIM nello slot sul pannello inferiore del router.
Aspettare qualche secondo. Il router è collegato correttamente a Internet quando
l'indicatore LED si accende.
Per configurare ulteriormente il router, ad esempio modificando il nome Wi-Fi e la
chiave Wi-Fi, accedere all'interfaccia utente Web del router visitando
tendawifi.com
tramite un dispositivo collegato.
Utilizzare l'alimentatore in dotazione per collegare il jack
PWR
del router a una
fonte di alimentazione.
Premere il tasto
ON/OFF
per accendere il router. La spia LED si accende.
Collegare il proprio dispositivo cablato, per esempio un computer, alla porta
WAN/LAN
o
LAN
del router utilizzando un cavo Ethernet.
Collegare il proprio dispositivo wireless, per esempio uno smartphone, alla rete
Wi-Fi del router usando
Wi-Fi Name
e
Wi-Fi Key
riportati sull'etichetta sul
pannello inferiore del router.
2
Collegare le antenne al router.
1
3
4
12345A
6789
+
+
Scheda Mini SIM
Scheda Nano SIM + adattatore
Scheda Micro SIM + adattatore
✓
✓
✓
Suggerimenti :
Se l'indicatore non si illumina, fare riferimento a
Q1
nelle
FAQ
per trovare una soluzione.
Français
Astuces:
Si vous n'arrivez pas à vous connecter à l'interface utilisateur Web du routeur, se référer à la
Q3
dans la section
FAQ
.
I. Régler le routeur
II. Accès à Internet
Insérez une carte SIM dans la fente du panneau inférieur du routeur.
Patienter quelques secondes. Le routeur est connecté avec succès à internet lorsque
l’indicateur LED clignote.
Pour continuer à configurer le routeur, notamment en changeant le nom du Wi-Fi et
la touche Wi-Fi, se connecter à l’IU web du routeur en visitant
tendawifi.com
sur
un appareil connecté.
Utiliser l'adaptateur secteur fourni pour connecter la prise
PWR
du routeur à une
source d'alimentation.
Appuyer sur le bouton
ON/OFF
pour allumer le routeur. Le voyant LED
s'allume.
Connecter votre appareil filaire, notamment un ordinateur au port
WAN/LAN
ou
LAN
du routeur à l’aide d’un câble Ethernet.
Connecter votre appareil sans fil, notamment un smartphone au réseau Wi-Fi du
routeur grâce au
Wi-Fi Name
et la
Wi-Fi Key
mentionnés sur le panneau inférieur
du routeur.
2
3
4
12345A
6789
+
+
Mini carte SIM
Carte Nano SIM + Adaptateur
Micro carte SIM + Adaptateur
✓
✓
✓
Astuces:
Si l’indicateur ne s'allume pas, se référer à la question
Q1
de
FAQ
pour trouver une
solution.
Fixez les antennes au routeur.
1
Bahasa Indonesia
Tips:
Jika Anda tidak dapat login ke UI web router, lihat
Q3
di
FAQ
.
I. Setel router
II. Mengakses internet
Masukkan kartu SIM ke dalam slot di panel bawah router.
Tunggu sebentar. Router berhasil terhubung ke internet jika indikator LED
menyala.
Untuk mengonfigurasi router lebih lanjut, seperti mengubah Wi-Fi name dan Wi-Fi
key, login ke UI web UI router dengan mengunjungi
tendawifi.com
pada
perangkat yang tersambung.
Gunakan adaptor daya yang disertakan untuk menghubungkan jek
PWR
router
ke sumber daya.
Tekan tombol
ON/OFF
untuk menyalakan router. Indikator LED menyala.
Sambungkan perangkat berkabel Anda, seperti komputer, ke port
WAN/LAN
atau
LAN
router menggunakan kabel Ethernet.
Sambungkan perangkat nirkabel Anda, seperti ponsel pintar, ke jaringan Wi-Fi
router menggunakan
Wi-Fi Name
dan
Wi-Fi Key
yang berlabel di panel bawah
router.
2
3
4
12345A
6789
+
+
Kartu SIM Mini
Kartu SIM Nano + adaptor
Kartu SIM Mikro + adaptorL
✓
✓
✓
Tips:
Jika indikator tidak menyala, baca
Q1
di
FAQ
untuk menemukan solusi.
Memasang antena ke router.
1
Tiếng việt
Lời khuyên:
Nếu bạn không thể đăng nhâp vào giao diện người dùng web của bộ định tuyến, tham khảo
Q3
trong
FAQ
(Các Câu Hỏi Thường Gặp).
I. Thiết lập bộ định tuyến
II. Truy cập vào internet
Lắp thẻ SIM vào khe trên bảng dưới cùng của bộ định tuyến.
Chờ vài giây. Khi đèn LED chỉ báo sáng thì có nghĩa là bộ định tuyến được kết nối
internet thành công.
Để cấu hình thêm bộ định tuyến, chẳng hạn như thay đổi tên Wi-Fi và khóa Wi-Fi,
đăng nhập vào giao diện người dùng web của bộ định tuyến bằng cách truy cập
vào
tendawifi.com
trên một thiết bị được kết nối.
Sử dụng bộ chuyển đổi điện đi kèm để kết nối giắc cắm
PWR
của bộ định tuyến
vào nguồn điện.
Ấn nút
ON/OFF
(BẬT/TẮT) để bật bộ định tuyến. Đèn LED chỉ báo sáng.
Kết nối thiết bị có dây của bạn, chẳng hạn như máy tính với cổng
WAN/LAN
hoặc
LAN
của bộ định tuyến sử dụng cáp Ethernet.
Kết nối thiết bị không dây của bạn, chẳng hạn như điên thoại thông minh với
mạng Wi-Fi của bộ định tuyến sử dụng
Wi-Fi Name
và
Wi-Fi Key
được dán
nhãn ở bảng điều khiển dưới của bộ định tuyến.
2
3
4
12345A
6789
+
+
Thẻ SIM Mini
Thẻ SIM Nano + bộ chuyển đổi
Thẻ SIM Micro + bộ chuyển đổi
✓
✓
✓
Lời khuyên:
Nếu chỉ báo không sáng đèn, tham khảo
Q1
trong phần
FAQ
(Các Câu Hỏi Thường Gặp)
để tìm giải pháp.
Gắn ăng-ten vào bộ định tuyến.
1
Conecte las antenas al rúter.
1
1
2
3
4
ON/OFF PWR RST/WPS WAN/LAN
LAN
TEL
ON/OFF PWR RST/WPS WAN/LAN
LAN
TEL
ON/OFF PWR RST/WPS WAN/LAN
LAN
TEL
(
Optional
)
Antenna sockets
Характеристики

Остались вопросы?Не нашли свой ответ в руководстве или возникли другие проблемы? Задайте свой вопрос в форме ниже с подробным описанием вашей ситуации, чтобы другие люди и специалисты смогли дать на него ответ. Если вы знаете как решить проблему другого человека, пожалуйста, подскажите ему :)


