Радиоприемники Telefunken TF-1586 - инструкция пользователя по применению, эксплуатации и установке на русском языке. Мы надеемся, она поможет вам решить возникшие у вас вопросы при эксплуатации техники.
Если остались вопросы, задайте их в комментариях после инструкции.
"Загружаем инструкцию", означает, что нужно подождать пока файл загрузится и можно будет его читать онлайн. Некоторые инструкции очень большие и время их появления зависит от вашей скорости интернета.


Instruction manual
3
Important safeguards
•
The instruction manual contains important
operating and maintenance instructions. For
your safety, it is necessary to refer to the
manual. Keep the manual for future use.
• Do not hit or drop the unit
• Do not
e
xpose the unit to vibration, direct
sunlight, too high or low temperatures or
humidity.
• Do not disassemble the unit yourselves
Refer servicing to qualified service personnel
All the illustrations in this manual are
schematic images, which may differ from
actual objects.
Power supply
Battery operation
•
This unit has a built-in
CR2032 battery
.
Your set will not work normally from the
battery supply, but there is the advantage that,
in case of a mains current failure or power
outage, your clock will continue to work. The
clock display will not light up, the clock time
and alarm setting will be held in the clock
memory by the battery back-up system.
This enables you to move the set from place
to place without re-setting the clock every time.
The battery back-up system is only meant to
be used for short-term power failures. For
longer durations the battery may become
exhausted or there may be some deviation in
accuracy.
DС operation
• The appliance is for household use only.
• Before the first connecting of the appliance
check that the voltage indicated on the rating
label corresponds to the mains voltage in your
location.
• Insert the plug into the electrical outlet.
• The set is now working as an electronic
clock.
will start to flash. Choose 24h or 12h display mode.
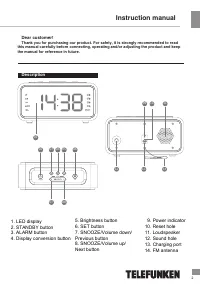
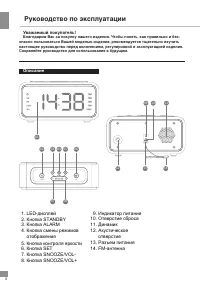
General operations
Setting the clock
•
Press and hold the SET button. The time
Press VOL+/- buttons to adjust the hour setting.
•
Press the SET button. Hour digits will flash.
button again to confirm.
•
Press the SET button. Minute digits will flash.
Press VOL+/- buttons to adjust the minute setting.
•
Once time is set correctly, press the SET
Setting the alarm
•
Press the STANDBY button
to turn the unit on.
to enter the alarm clock mode, use VOL+/-
buttons to select the alarm number (ALA1 - ALA4).
•
Short press the STANDBY button
with VOL+/- buttons select the alarm signal:
BEEP (standard buzzer ringing), rAd (the last
listened FM radio station) or OFF (alarm is
disabled).
•
Press the SET button again and then
•
Press the SET button again, the hour
digits will flash. Use the VOL+/- buttons to adjust
the alarm hours.
the unit on. Press and hold this button to turn the
unit off.
Turning On and Off
•
Press
the STANDBY button to turn
Backlight brightness
•
By default, the LED display backlight is set
to the highest level. Press the
button to
choose the medium or low backlight. If there
is no operation within 10 seconds, the unit will
switch back to the clock mode.
•
This device supports up to 4 alarms
.
Operations are as follows:
•
Press the SET button again, the minute
digits will flash. Use the VOL+/- buttons to adjust
the alarm minutes.
•
Once the alarm setting is finished, press
the STANDBY button to return to the clock
mode.


