Радиоприемники Ritmix RRC-1005 - инструкция пользователя по применению, эксплуатации и установке на русском языке. Мы надеемся, она поможет вам решить возникшие у вас вопросы при эксплуатации техники.
Если остались вопросы, задайте их в комментариях после инструкции.
"Загружаем инструкцию", означает, что нужно подождать пока файл загрузится и можно будет его читать онлайн. Некоторые инструкции очень большие и время их появления зависит от вашей скорости интернета.
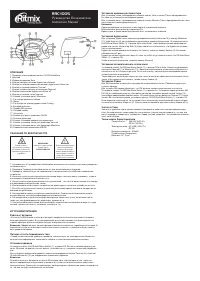
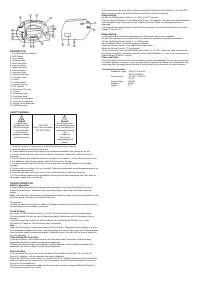

DESCRIPTION
1. On/Off/Auto/Alarm selector
2. LED Display
3. Auto indicato
4. Snooze button
5. Alarm set button
6. Time set button
7. Sleep set button
8. Alarm off button
9. Hour set button
10. Minute set button
11. Volume control
12. Focus
13. Tuning control
14. Battery back-up
15. FM antenna
16. Main plug (AC cord)
17. Pointer
18. Projection on/off
19. Projection head
20. Time set for projection
21. Hour set for projection
22. Minute set for projection
23. AM/FM selector
SAFETY MANUAL
Lightning mark
The lightning flash
within the triangle
is a warning sign
alerting you of
“dangerous voltage”
inside the product
CAUTION
Risk of electric shock!
DO NOT OPEN
Exclamation mark
The exclamation point
within the triangle is a
warning sign alerting
you
of important
instructions
accompanying the
product
1. Study the manual. It’s necessary to study all the points of safety manual.
2. Keep the safety of manual for future use.
3. Check whether the electricity supply in the sockets corresponds to the voltage of the unit.
4. Do not use the unit near water such us bathtub, wash bowl, kitchen sink, laundry tub or wet
basement.
5. Do not overload wall outlets or extension cords as this can result in a risk of fire or electric shock.
6. For additional safety during lighting, switch off the unit from the plug.
7. In case you are not going to use the unit for along time, remove the batteries to avoid their
leakage.
8. Do not remove the cover of the unit yourself. Technical maintenance should be performed only by
qualified service personnel.
9. Keep the unit away from heat sources, such as heat registers, radiators, stoves etc.
10. The ventilation should not be impeded by covering the ventilation openings with items such as
newspaper, table-cloths, curtains etc.
POWER OPERATION
Battery operation
• Insert 1x9В battery into battery compartment; preferably to use long-life batteries. In case of
temporary power failure, the battery will store time settings, even if time will not be shown on
display.
Note: The affectivity of this feature totally depends on battery charge. Otherwise if the battery is old
or of bad quality, the unit will not show correct time.
AC operation
• Before the connection of the unit, check that voltage indicated in the list of technical characteristics
corresponds to mains voltage in your home.
Clock Setting
Set button On/Off/Auto/Alarm Switch (1) to Off. Connect the Mains Cord to the power supply.
The clock display will flash on and off indicating a power interruption and that the display time is
incorrect.
To set the correct time, press the Time Set Button (6) and Minute Set Button (10), or Hour
Set Button (9), together, until the correct time is displayed.
Note:
Open the Clock Battery Compartment door and fit 9V battery. The purpose of this battery is to store
the information relating to alarm time, and to keep the clock functioning in the event of disconnection
from the mains supply or power interruption. Should this occur, the clock will continue to keep time,
but will not display.
Time setting for Projection
To preset the Hours, press simultaneously the Hour button and Time button. And keep them
depressed until the hour digits to be preset are displayed.
To preset the Minutes, press simultaneously the Minute button and Time button and keep them
depressed until the hour digits to be preset are displayed.
Alarm Setting
To set the alarm time, press the Alarm Set Button (5) and Minute Set Button (10), or Hour Set
Button (9), together, until the required alarm time is displayed.
Switch the On/Off/Auto/Alarm Switch (1) to either ‘AUTO’ or ‘ALARM’ position for choice of wake by
radio or wake by buzzer respectively. The Auto Indicator (3) will illuminate and alarm is now set to
activate at the required time.
The alarm can be temporarily stopped for 9 minutes by pressing the Snooze/Sleep Off Button (4).
This can be repeated up to 5 times.
The alarm will activate again after 24 hours unless the On/Off/Auto/Alarm Switch (1) is set to ‘OFF’.
When the alarm works, just press the Alarm off button to end alarm working.
Sleep Setting
Set the On/Off/Auto/Alarm Switch (1) to ‘OFF’ or ‘AUTO’ position.
Press the Sleep Set Button (7) and Minute Set Button (10) together. The sleep time will be displayed
and count down from 59 minutes to zero. Release the button when the required sleep time is
displayed.
The radio will now operate until the sleep time has elapsed or may be switched off by pressing the
Snooze Off Button (4).
Radio Setting
The AM bands use an internal directional serial. Rotate the radio for best reception.
For best FM reception ensure that the FM cord antenna is completely unrolled and extended.
Set the On/Off/Auto/Alarm Switch (1) to ‘ON’ position.
Set the AM/FM Switch (23) to the required waveband.
Adjust the Tuning Control (13) to select the desired station.
Adjust the Volume Control (11) as required.
To turn off the radio, set the On/Off/Auto/Alarm Switch (1) to ‘OFF’. If the radio does not switch off
this may be caused by inadvertent operation of the Sleep Set Button (7). To cancel this presses the
Snooze/Sleep Off Button (4) once.
Clean and Care
Clean the cabinet with a soft cloth moistened with water or mild detergent. Do not use solvents such
as alcohol, benzene or thinner, as the may damage the cabinet finish. Make sure to disconnect the
mains lead from the supply before cleaning. Please retain these instructions for future reference.
Technical Characteristics
Frequency range: AM 530-1600 KHz
FM 64-108 MHz
Power source: AC 220V, 50/60 Hz
DC 9V
Power output: 300mW
Stabilizer: Quarts
Display: 0,6”


