
Пылесос Brayer BR4222 - инструкция пользователя по применению, эксплуатации и установке на русском языке. Мы надеемся, она поможет вам решить возникшие у вас вопросы при эксплуатации техники.
Если остались вопросы, задайте их в комментариях после инструкции.
"Загружаем инструкцию", означает, что нужно подождать пока файл загрузится и можно будет его читать онлайн. Некоторые инструкции очень большие и время их появления зависит от вашей скорости интернета.


10
11
EN
EN
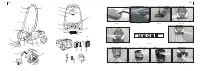
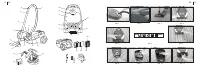
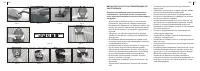
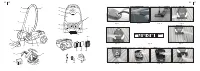
• Install the dustbag (15) into the holder (14).
• Put the dustbag holder (14) with the dustbag (15)
installed into the dustbag compartment body.
• Close the dustbag compartment lid (13) and slightly
press on the lid (13) until the lock (11) clicks.
Notes:
- do not try to close the lid (13) without the dustbag
holder (14) installed, otherwise you can damage the
lock or the lid (13);
- before closing the lid (13), always make sure that
the dustbag holder (14) and the dustbag (15 or
disposable paper dustbag 29) are installed properly.
Cleaning the filters
The vacuum cleaner operation efficiency depends on the
filters (16, 23, 24) condition. Clean the filters (16, 23, 24)
at least 4-5 times a year.
Cleaning the inlet filter (16)
•
Switch the vacuum cleaner off by pressing the on/off
button (17) and unplug it.
• Open the dustbag compartment lid (13) by pressing the
lid lock (11) (pic. 8).
• Remove the dustbag holder (14) with the dustbag (15)
(pic. 9).
•
Take a hold of the inlet filter (16) and remove it by
pulling upwardsc (pic. 10).
•
Wash the inlet filter (16) with warm water and soft
detergent, rinse and dry the filter (16) thoroughly, then
install the filter (16) back to its place.
Notes:
before installing the inlet filter (16), make sure that
it is clean and dry.
• Install the dustbag holder (14) with the installed dustbag
(15 or disposable paper dustbag 29) in place.
• Close the dustbag compartment lid (13) and slightly
press on the lid (13) until the lock (11) clicks.
Outlet HEPA filter (23) and the foam filter (24) cleaning
•
Switch the vacuum cleaner off by pressing the on/off
button (17) and unplug it.
•
Remove the outlet filter grid (25) by pressing the
clamps (26) (fig. 11), take the HEPA filter (23) and the
foam filter (24) out.
•
Wash the HEPA filter (23), the foam filter (24) and the
grid (25) under a lukewarm water jet; do not wash the
HEPA filter (23), the foam filter (24) and the grid (25) in
a dishwashing machine.
•
Dry the HEPA filter (23) and the foam filter (24).
• Do not use a hair dryer or any other similar devices to
dry the HEPA filter (23) and the foam filter (24).
•
Place the HEPA filter (23) and the foam filter (24) back
to their places.
•
Install the outlet filter grid (25) back to its place.
Note:
before installing the HEPA filter (23) and the foam
filter (24) make sure they are clean and dry.
Vacuum cleaner body
• Clean the vacuum cleaner body with a soft, slightly
damp cloth, and then wipe it dry. Provide that no liquid
gets inside the vacuum cleaner body.
• Do not use solvents or abrasives for cleaning the
vacuum cleaner body and the attachments.
• Do not immerse the vacuum cleaner body, the power
cord and the power plug into water or any other
liquids.
OVERHEATING PROTECTION
• If the electric motor gets too hot during the operation,
the overheating protection system will be set off.
• If during cleaning the vacuum cleaner has switched
off, press the on/off button (17) and unplug the unit.
• Let the vacuum cleaner cool down for 30-40 minutes
and switch it on again. The cool-down time can
differ from the given value, depending on the room
temperature.
• If the vacuum cleaner does not switch on, it may be
caused by another malfunction. In this case apply to
a service center.
STORAGE
• Before a long-period storage of the the vacuum
cleaner clean the vacuum cleaner body, the dustbag
(15), the HEPA filter (23), the foam filter (24) and the
inlet filter (16).
• For easy storing of the vacuum cleaner, use the
brush storage (22).
• Store attachments in the attachment compartment.
• Keep the vacuum cleaner in a dry cool place out of
reach of children and disabled persons.
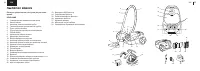
DELIVERY SET
1.
Vacuum cleaner with the dust bin and filters
installed – 1 pc.
2.
Flexible hose – 1 pc.
3.
Telescopic extension pipe – 1 pc.
4.
Universal pneumatic brush – 1 pc.
5.
Crevice nozzle – 1 pc.
6. Furniture/furniture upholstery brush - 1 pc.
7.
Disposable paper dustbags – 3 pcs.
8.
Instruction manual – 1 pc.
SPECIFICATIONS
• Power supply: 220-240 V ~ 60 Hz
• Rated input power: 2200 W
• Suction power: 450 W
•
Dustbag capacity – 4 l
Характеристики

Остались вопросы?Не нашли свой ответ в руководстве или возникли другие проблемы? Задайте свой вопрос в форме ниже с подробным описанием вашей ситуации, чтобы другие люди и специалисты смогли дать на него ответ. Если вы знаете как решить проблему другого человека, пожалуйста, подскажите ему :)


