
Пылесос Vitek VT-8136(GY) - инструкция пользователя по применению, эксплуатации и установке на русском языке. Мы надеемся, она поможет вам решить возникшие у вас вопросы при эксплуатации техники.
Если остались вопросы, задайте их в комментариях после инструкции.
"Загружаем инструкцию", означает, что нужно подождать пока файл загрузится и можно будет его читать онлайн. Некоторые инструкции очень большие и время их появления зависит от вашей скорости интернета.


6
ENGLISH
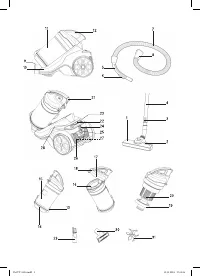
Attachment holder (31)
For easy storing of attachments (29, 30), the set
includes an attachment holder (31).
Install the holder (31) on the telescopic pipe (4) and
install the attachments (29, 30) into it.
Dust bin (11)
The dust bin (11) is equipped with a cyclonic filter,
which sifts out garbage and dust from the intake
air, while the filter block (16) retains the finest dust
particles.
Note:
- provide that the filter block (16) is always
clean, because the overall performance of the vac-
uum cleaner depends on it.
USING THE VACUUM CLEANER
Safety measures
•
Do not use the vacuum cleaner near hot sur-
faces, such as ashtrays and in places where
inflammable liquids are stored.
•
Take sharp objects away from the floor before
cleaning to prevent the unit damage.
•
If the suction power of the vacuum cleaner
decreases rapidly while cleaning, switch it off
immediately and check the telescopic pipe (4)
and the flexible hose (7) for obstruction. Switch
the vacuum cleaner off, then unplug it, remove
the obstruction and only after that continue
cleaning.
USING THE VACUUM CLEANER
Attention!
You may switch the vacuum cleaner on
only with the dust bin (11), with the filter block (16)
and the outlet HEPA filter (27) installed in the
dust bin. Before switching the vacuum cleaner
on, always make sure that the filters (16, 27) are
installed properly.
•
Before using the unit, unwind the power cord to
the required length and insert the power plug
into the mains socket.
•
The yellow mark on the power cord indicates the
maximum cord length. Do not unwind the power
cord further than the red mark.
•
Press the ON/OFF button (28) to switch the vac-
uum cleaner on.
•
During the operation you can control the suc-
tion power using the suction power control (22)
or the manual suction power control (6) on the
flexible hose handle (5).
•
After room cleaning switch the vacuum cleaner
off by pressing the ON/OFF button (28) and
unplug the unit.
•
To wind the power cord, press the button (23),
hold the winding cord with your hand to avoid its
whipping and damage.
•
During breaks in cleaning, you can place the
brush (1) in the brush storage (24).
Note:
- before replacing the brush (1), setting the
attachments (29, 30) or cleaning the dust bin (11),
switch the vacuum cleaner off and take the power
plug out of the mains socket.
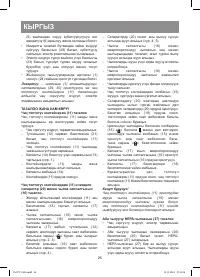
CLEANING AND CARE
Cleaning the dust bin (11)
Remove garbage and dust from the dust bin (11)
after every room cleaning.
–
Switch the vacuum cleaner off and unplug it.
–
Take the handle (12), press the lock (21) and
remove the dust bin (11).
–
Place the dust bin (11) over a garbage bin.
–
Pull the lock (13) to release the lid (14) (pic. 1)
–
Remove accumulated dust and garbage from
dust bin (11).
–
Close the lid (14).
–
Install the dust bin (11) back to its place.
Cleaning the separator (20) and the filter
block (16) installed in the dust bin (11)
–
First remove dust and garbage from the dust
bin (11) as described above.
–
Pull the lock (18) and open the lid (17).
–
Remove the filter block (16), take the microfoam
filter out of the filter block (16).
–
Close the lid (17), take the handle (12) and turn
the cyclonic filter counterclockwise “ ” and
remove it (pic. 2, 3).
–
Turn the lock ring (19) counterclockwise
(“open”) and remove it (pic. 4).
–
Remove the separator (20) and wash it under a
warm water jet (pic. 4, 5).
–
Clean the filter block (16) and the microfoam fil-
ter from dust and garbage and wash them under
warm water jet.
–
Do not wash filters in a dishwashing machine.
–
Dry the filter block (16) and the microfoam filter
thoroughly.
–
Do not dry filters with a hairdryer.
–
Wash the dust bin flask (15), wipe it and dry.
–
Install the separator (20) back to its place
matching the grooves on the separator (20) with
the ledges on the cyclonic filter.
–
Install the lock ring (19) back to its place and turn
it clockwise (“close”) as far as it will go.
–
Install the cyclonic filter into the flask (15)
matching the mark on the cyclonic filter with
IM VT-8136.indd 6
13.12.2018 17:22:36
Характеристики

Остались вопросы?Не нашли свой ответ в руководстве или возникли другие проблемы? Задайте свой вопрос в форме ниже с подробным описанием вашей ситуации, чтобы другие люди и специалисты смогли дать на него ответ. Если вы знаете как решить проблему другого человека, пожалуйста, подскажите ему :)


