Пылесос VITEK VT-8117 BK - инструкция пользователя по применению, эксплуатации и установке на русском языке. Мы надеемся, она поможет вам решить возникшие у вас вопросы при эксплуатации техники.
Если остались вопросы, задайте их в комментариях после инструкции.
"Загружаем инструкцию", означает, что нужно подождать пока файл загрузится и можно будет его читать онлайн. Некоторые инструкции очень большие и время их появления зависит от вашей скорости интернета.


6
ENGLISH
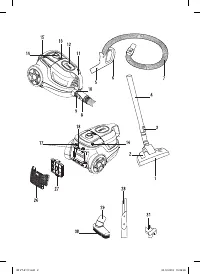
The crevice nozzle is intended for cleaning of
radiators, chinks, corners and spaces between
cushions. If necessary, extend the telescopic
part of the attachment (28) to full length.
Brush attachment for furniture 2 in 1 (29, 30)
Use the attachment (29) for cleaning fabric sur-
faces of upholstered furniture. To collect dust
from polished furniture surface, install the brush
(30) on the attachment (29), the pile on the brush
(30) prevents damage to polished furniture sur-
face.
Attachment holder (31)
For easy storing of attachments (28, 29) there
is an attachment holder (31) included. Fix the
holder on the telescopic pipe (4) and install the
attachments (28) and (29) on it.
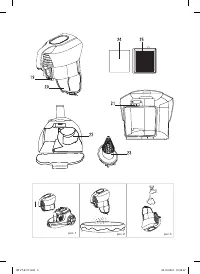
Dust bin (12)
The dust bin (12) is equipped with the cyclonic fil-
ter (23) which eliminates garbage and dust from
the air, and the foam (24) and HEPA (25) filters
retain the finest dust particles.
Note:
–
provide that the filters (24, 25) are always
clean, because the overall performance of
the vacuum cleaner depends on it; the dust
bin (12) is equipped with the blocking device
preventing the dust bin (12) installation with-
out the filters (24, 25). Always make sure
that the filters (24, 25) are installed prop-
erly before setting the dust bin (12) back to
its place.
USING THE VACUUM CLEANER
Safety measures
•
Do not use the vacuum cleaner near hot sur-
faces, such as ashtrays and in places where
inflammable liquids are stored.
•
Take sharp objects away from the floor before
cleaning to prevent unit damage.
•
If the suction power of the vacuum cleaner
decreases rapidly while cleaning, switch it off
immediately and check the telescopic pipe
(4) and the flexible hose (7) for obstruction.
Switch the vacuum cleaner off, then unplug
it, remove the obstruction and only after that
continue cleaning.
OPERATION
AT TENTION! You may switch the vacuum
cleaner on only with the dust bin (12) installed
and with the filters (24, 25) and the outlet HEPA
filter (27) installed in the dust bin. Always make
sure that the filters (24, 25, 27) are installed
properly.
•
Before using the unit, unwind the power cord
to the required length and insert the power
plug into the mains socket.
•
The yellow mark on the power cord indicates
the maximum cord length. Do not unwind the
power cord further than the red mark.
•
Press the ON/OFF knob (14) to switch the vac-
uum cleaner on.
•
During the operation of the unit you can con-
trol the suction power by turning the control
knob (14). After room cleaning switch the
vacuum cleaner off by pressing the on/off
knob (14) and unplug the unit.
•
Power cord winding button (16) is situated
under the carrying handle (15), to wind the
cord press the cord winding button (16) or
the handle (15), hold the winding cord with
your hand to avoid its whipping and dam-
age.
•
During the breaks you can place the brush (1)
in the brush storage (18).
CLEANING AND CARE
Cleaning the dust bin (12)
Remove garbage and dust from the dust bin (12)
after every room cleaning.
–
Switch the vacuum cleaner off and unplug it.
–
Holding the handle (11), press the lock (13)
and remove the dust bin (12) from the vacuum
cleaner body pulling upwards (pic. 1).
–
Place the dust bin (12) over a garbage bin.
–
Press the lock button (19) and open the dust
bin lid (20).
–
Remove accumulated dust and garbage from
dust bin (12) (pic. 2).
–
Close the lid (20).
–
Install the dust bin (12) back to its place.
C
leaning the filters (23, 24, 25) installed
in the dust bin (12)
–
Preliminarily remove dust and garbage from
the dust bin (12) as described above.
–
Remove the HEPA filter (25).
–
Remove the foam filter (24).
–
Remove the cyclonic filter (23) having prelimi-
nary opened the dust bin lid (20).
–
To remove the cyclonic filter (23), turn it coun-
terclockwise and remove the filter (23) from
the installation place (22).
IM VT-8117.indd 6
30.12.2016 15:29:47


