Пылесос VITEK VT-1811 B/SR - инструкция пользователя по применению, эксплуатации и установке на русском языке. Мы надеемся, она поможет вам решить возникшие у вас вопросы при эксплуатации техники.
Если остались вопросы, задайте их в комментариях после инструкции.
"Загружаем инструкцию", означает, что нужно подождать пока файл загрузится и можно будет его читать онлайн. Некоторые инструкции очень большие и время их появления зависит от вашей скорости интернета.


6
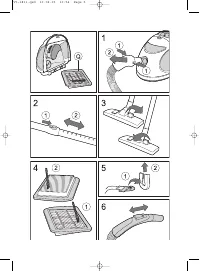
use. Attach it by inserting the plastic tips of the strap
into their corresponding places on the bottom of the
vacuum cleaner and fix them in place by moving them
up (drawing 4).
Brush for cleaning the HEPA filters:
This special brush makes cleaning the HEPA filters
easy. It is attached on the inner side of the main HEPA
filter (drawing 5).
Turning on the vacuum cleaner:
- Before using the vacuum, pull the power cord out to
the desired length and insert the plug into an outlet.
The yellow mark on the power cord warns you when
to stop pulling. Never pull the power cord past the
red mark.
- Insert the power plug into the outlet.
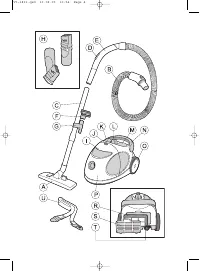
- Turn on the vacuum cleaner by pressing the on/off
button (M).
- While using the vacuum, you can control the suction
power by moving the handle (L) or by opening the
hatch (D) on the hose handle (drawing 6).
- After you are finished, turn off the vacuum cleaner
by pressing the on/off button (M), then unplug it
from the power outlet.
- Press the power cord rewind button (K) to rewind
the power cord, guiding it with your hands to avoid
entanglement and damage.
Cleaning the dust container (drawing 7)
Turn off the vacuum cleaner and unplug it from the
power outlet.
- Remove the flexible hose from the vacuum cleaner.
- Holding the vacuum cleaner by the dust container
handle with one hand, press the fixator button of the
dust container (J) and remove the dust container
(drawing 7-A).
- Simultaneously press the buttons located in the
lower part of the dust container to remove trash
(drawing 7-B).
- Empty the dust container.
- Disconnect the main HEPA filter, holding it by the
plastic flange (drawing 7-C).
- For thorough cleaning of the container, rinse it with
clean water and dry it completely.
- Set the main HEPA filter in the original position.
- Set the dust container in place.
Note: we recommend cleaning the dust container after
every use of the vacuum cleaner.
Caring for the filters
- To ensure proper operation of the vacuum cleaner,
you should clean and replace the NERA filters regu-
larly whenever they need it.
- Always unplug the vacuum cleaner from the power
outlet before replacing attachments or cleaning it.
Main HEPA filter
- We recommend cleaning the main HEPA filter after
every use or at least once a month.
- Remove the dust container and then the HEPA filter
(drawing 7-C).
- Clean the inside surface of the filter with a brush
(drawing 5), then lightly tap the hard part of the fil-
ter to remove the dust from it.
- After cleaning the HEPA filter, set it in place or
replace it with a new one.
- Set the dust container in place.
HEPA air filter (drawing 8)
- To remove the grating of the air filter, press the
flange and remove the grating (drawing 8-A).
- Remove the HEPA air filter (drawing 8-B).
- Clean the dust from it using a brush or by tapping it
lightly.
- After cleaning it, set the HEPA filter in place or
replace it with a new one.
- Set the air filter grating in place.
- Make sure that it is set properly.
Replacing the filters
- This vacuum cleaner can be effectively used for 100
hours without changing the filters. A reduction of
suction power after 100 hours of operation means
that the filters need to be replaced.
- We recommend replacing the main HEPA filter once
a year.
- The HEPA air filter should be replaced once a year.
- Changing the filter: see "Caring for the filters."
Cleaning
Before cleaning the vacuum cleaner, unplug it from the
power outlet.
- Wipe the housing of the vacuum cleaner with a
damp cloth.
- Do not let any liquid get inside the housing of the
vacuum cleaner.
- Never use solvents or abrasive cleaning products to
clean the housing of the vacuum cleaner.
Breakage and repair
If the vacuum cleaner fails to work properly, don't try to
repair it yourself. Contact an authorized service center.
TECHNICAL DATA:
Power source:
220/230 V ~ 50 Hz
Power consumption:
1600 W
Suction power:
300 W
Dust container capacity:
1 l
Specifications subject to change without prior notice.
MINIMUM SERVICE LIFE - 5 YEARS
GUARANTEE
Details regarding guarantee conditions can be
obtained from the dealer from whom the appliance was
purchased. The bill of sale or receipt must be produced
when making any claim under the terms of this guaran-
tee.
This product conforms to the EMC-
Requirements as laid down by the Council
Directive 89/336/EEC and to the Low
Voltage Regulation (73/23 EEC)
ENGLISH
Vt-1811.qxd 10.02.05 10:54 Page 6


