Пылесос Philips FC8206 - инструкция пользователя по применению, эксплуатации и установке на русском языке. Мы надеемся, она поможет вам решить возникшие у вас вопросы при эксплуатации техники.
Если остались вопросы, задайте их в комментариях после инструкции.
"Загружаем инструкцию", означает, что нужно подождать пока файл загрузится и можно будет его читать онлайн. Некоторые инструкции очень большие и время их появления зависит от вашей скорости интернета.
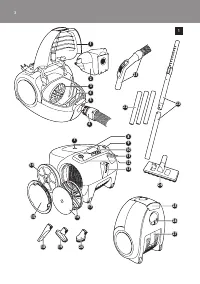


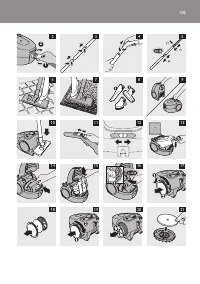

- To clean carpet, push the rocker switch on the other side to make the brush strips disappear
into the housing (Fig. 7).
Crevice nozzle, small nozzle and brush nozzle
Your vacuum cleaner comes with one or more of these three accessories.
1
Connect the small nozzle, crevice nozzle or brush nozzle directly to the handgrip or to the
tube (Fig. 8).
1 Use the small nozzle to vacuum clean small areas, e.g. the seats of chairs and sofas.
2 Use the crevice nozzle to clean narrow corners or hard-to-reach places.
3 Use the small brush nozzle to clean computers, bookshelves etc.
using the appliance
vacuum cleaning
- You can carr y the vacuum cleaner by the handle at the front or on top of the appliance (Fig. 9).
1
Pull the cord out of the appliance and insert the mains plug into the wall socket.
2
Press the on/off button on top of the appliance with your foot to switch on the appliance.
- If you want to pause for a moment, inser t the ridge on the nozzle into the parking slot to park
the tube in a convenient position (Fig. 10).
adjusting suction power
You can adjust the suction power with:
- the suction power slide on the handgrip (Fig. 11)
- the electronic suction power control on the vacuum cleaner (specific types only) (Fig. 12)
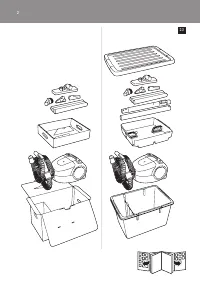
replacement
replacing the dustbag
Always unplug the appliance before you replace the dustbag.
Replace the dustbag as soon as the dustbag-full indicator on top of te appliance has changed colour
permanently.
1
Open the cover (Fig. 13).
2
Push the cardboard tag of the dustbag backwards (Fig. 14).
3
Pull the cardboard tag upwards to lift the dustbag out of the appliance (Fig. 15).
,
The dustbag is sealed automatically.
4
Place the bottom edge of the new dustbag in front of the ridge on the bottom of the
appliance (1). Pull the cardboard front of the dustbag towards you (‘click’) (2) (Fig. 16).
5
Close the cover.
replacing filters
Always unplug the appliance before you replace a filter.
Your vacuum cleaner is equipped with either a micro filter or a HEPA filter.
Micro filter (specific types only)
Replace the micro filter ever y 6 months.
1
To remove the filter grille, turn it anticlockwise (1) and pull it out (2) (Fig. 17).
2
Remove the filter holder from the grille.
English
8
Содержание
- 64 Перед первым использованием; - Подсоединяйте и отсоединяйте насадки аналогичным образом.
- 65 Одна или несколько насадок поставляются в комплекте.; Эксплуатация прибора; Мощность всасывания можно регулировать с помощью:; запчасти; мешка, расположенного в верхней части прибора.
- 66 замена фильтров; Пылесос оснащен либо микрофильтром, либо фильтром HEPA.; Фильтр защиты электродвигателя; Заменяйте фильтр защиты электродвигателя раз в год.; Очистка
- 67 пластиковом контейнере.; аксессуары; Сила всасывания недостаточна.


