
Пылесос Philips FC6718/01 - инструкция пользователя по применению, эксплуатации и установке на русском языке. Мы надеемся, она поможет вам решить возникшие у вас вопросы при эксплуатации техники.
Если остались вопросы, задайте их в комментариях после инструкции.
"Загружаем инструкцию", означает, что нужно подождать пока файл загрузится и можно будет его читать онлайн. Некоторые инструкции очень большие и время их появления зависит от вашей скорости интернета.

- Make sure to wash the filter at least once every two weeks by hand only,
to ensure best performance. Squeeze until the water is clean. Let the
filter dry for 24 hours before reuse.
- Do not clean the filter with scouring pads or abrasive cleaning agents.
- Always use the vacuum cleaner with the filter assembled.
- If you clean the filter with water, make sure that it is completely dry
before you put it back into the dust container. Do not dry the filter in
direct sunlight, on the radiator or in the tumble dryer.
- Replace the filter if it can no longer be cleaned properly or if it is
damaged (see 'Ordering accessories').
- Never use any accessories or parts from other manufacturers or that
Philips does not specifically recommend. If you use such accessories or
parts, your warranty becomes invalid.
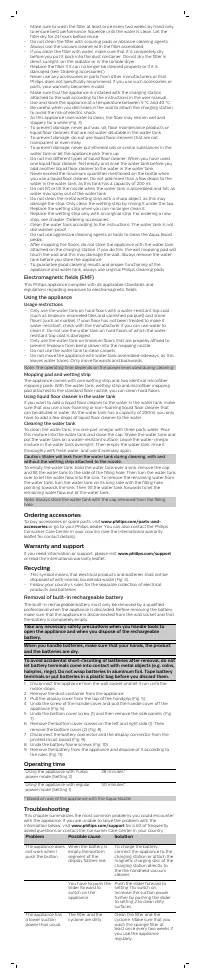
- Make sure that the appliance is installed with the charging station
attached to the wall according to the instructions in the user manual.
- Use and store the appliance at a temperature between 5
°C and 40
°C.
- Be careful when you drill holes in the wall to attach the charging station,
to avoid the risk of electric shock.
- As this appliance uses water to clean, the floor may remain wet and
slippery for a while (Fig. 3).
- To prevent damage, never put wax, oil, floor maintenance products or
liquid floor cleaners that are not water-dilutable in the water tank.
- To prevent damage, do not use liquid floor cleaners that are not
transparent or even milky.
- To prevent damage, never put ethereal oils or similar substances in the
water tank or let the appliance pick them up.
- Do not mix different types of liquid floor cleaner. When you have used
one liquid floor cleaner, first empty and rinse the water tank before you
add another liquid floor cleaner to the water in the water tank.
- Never exceed the maximum quantities mentioned on the bottle when
you use a liquid floor cleaner. Do not add more than a few drops to the
water in the water tank, as this tank has a capacity of 200
ml.
- Do not lift or tilt the nozzle when the water tank is assembled and full, as
water may spray out of the water tank.
- Do not clean the metal wetting strip with a sharp object, as this may
damage the strip. Only clean the wetting strip by rinsing it under the tap.
Replace the wetting strip when you can no longer clean it.
- Replace the wetting strip only with an original strip. For ordering a new
strip, see chapter 'Ordering accessories'.
- Clean the water tank according to the instructions. The water tank is not
dishwasher-proof.
- Do not use aggressive cleaning agents or tools to clean the Aqua Boost
pedal.
- After mopping the floors, do not store the appliance with the water tank
attached on the charging station. If you do this, the wet mopping pad will
touch the wall and this may damage the wall. Always remove the water
tank before you store the appliance.
- To guarantee good cleaning results and proper functioning of the
appliance and water tank, always use original Philips cleaning pads.
Electromagnetic fields (EMF)
This Philips appliance complies with all applicable standards and
regulations regarding exposure to electromagnetic fields.
Using the appliance
Usage restrictions
- Only use the water tank on hard floors with a water-resistant top coat
(such as linoleum, enameled tiles and varnished parquet) and stone
floors (such as marble). If your floor has not been treated to make it
water-resistant, check with the manufacturer if you can use water to
clean it. Do not use the water tank on hard floors of which the water-
resistant top coat is damaged.
- Only use the water tank on linoleum floors that are properly affixed to
prevent linoleum from being drawn into the mopping nozzle.
- Do not use the water tank to clean carpets.
- Do not move the appliance with water tank assembled sideways, as this
leaves water traces. Only move forwards and backwards.
Note: The operating time depends on the power level used during cleaning.
Mopping pad and wetting strip
The appliance comes with one wetting strip and two identical microfiber
mopping pads. With the water tank, wetting strip and microfiber mopping
pad attached to the standard floor nozzle, you can clean hard floors.
Using liquid floor cleaner in the water tank
If you want to add a liquid floor cleaner to the water in the water tank, make
sure that you use a low-foaming or non-foaming liquid floor cleaner that
can be diluted in water. As the water tank has a capacity of 200ml, you only
have to add a few drops of liquid floor cleaner to the water.
Cleaning the water tank
To clean the water tank, mix one part vinegar with three parts water. Pour
this mixture into the water tank and close the cap. Shake the water tank and
put the water tank on a water-resistant surface. Leave the water-vinegar
mixture in the water tank overnight. Then empty the water tank, rinse it
thoroughly with fresh water, and use it normally again.
Caution: Water will leak from the water tank during cleaning, with and
without the wetting strip attached to the nozzle.
To empty the water tank, hold the water tank over a sink, remove the cap
and tilt the water tank to the side of the filling hole. Then turn the water tank
over to let the water flow into the sink. To remove the remaining water from
the water tank, turn the water tank on its long side with the filling hole
pointing towards the sink. Then tilt the water tank forwards to let the
remaining water flow out of the water tank.
Note: Always store the water tank with the cap removed from the filling
hole.
Ordering accessories
To buy accessories or spare parts, visit
www.philips.com/parts-and-
accessories
or go to your Philips dealer. You can also contact the Philips
Consumer Care Center in your country (see the international warranty
leaflet for contact details).
Warranty and support
If you need information or support, please visit
www.philips.com/support
or read the international warranty leaflet.
Recycling
- This symbol means that electrical products and batteries shall not be
disposed of with normal household waste (Fig. 4).
- Follow your country’s rules for the separate collection of electrical
products and batteries.
Removal of built-in rechargeable battery
The built-in rechargeable battery must only be removed by a qualified
professional when the appliance is discarded. Before removing the battery,
make sure that the appliance is disconnected from the wall socket and that
the battery is completely empty.
Take any necessary safety precautions when you handle tools to
open the appliance and when you dispose of the rechargeable
battery.
When you handle batteries, make sure that your hands, the product
and the batteries are dry.
To avoid accidental short-circuiting of batteries after removal, do not
let battery terminals come into contact with metal objects (e.g. coins,
hairpins, rings). Do not wrap batteries in aluminum foil. Tape battery
terminals or put batteries in a plastic bag before you discard them.
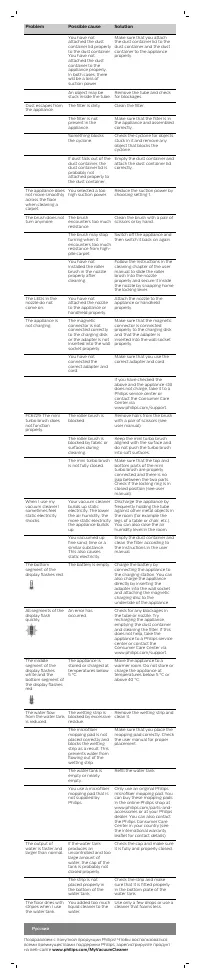
1 Disconnect the appliance from the wall socket and let it run until the
motor stops.
2 Remove the dust container from the appliance.
3 Pull the display cover from the top of the handgrip (Fig. 5).
4 Undo the screw of the handle cover and pull the handle cover off the
appliance (Fig. 6).
5 Undo the bottom cover screw (1) and then remove the side panels. (Fig.
7)
6 Remove the bottom cover screws on the left and right side (1). Then
remove the bottom cover (2) (Fig. 8).
7 Disconnect the battery connector and the display connector from the
printed circuit board (Fig. 9).
8 Undo the battery frame screws (Fig. 10).
9 Remove the battery from the appliance and dispose of it according to
the rules (Fig. 11).
Operating time
Using the appliance with Turbo
power mode (Setting 2)
28 minutes*
Using the appliance with regular
power mode (Setting 1)
50 minutes*
* Based on use of the appliance with the Aqua Nozzle
Troubleshooting
This chapter summarizes the most common problems you could encounter
with the appliance. If you are unable to solve the problem with the
information below, visit
www.philips.com/support
for a list of frequently
asked questions or contact the Consumer Care Center in your country.
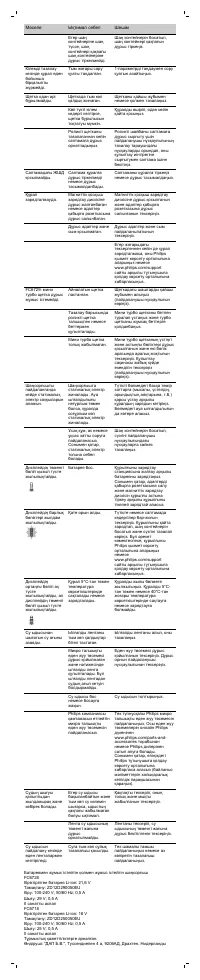
Problem
Possible cause
Solution
The appliance does
not work when I
push the button.
When the battery is
empty,the bottom
segment of the
display flashes red.
To charge the battery,
connect the appliance to the
charging station or attach the
magnetic charging disc of the
charging station directly to
the the handheld vacuum
cleaner.
You have to push the
slider forward to
switch on the
appliance.
Push the slider forward to
setting 1 to switch on.
Increase the suction power
further by pushing the slider
to setting 2 to clean dirty
surfaces.
The appliance has
a lower suction
power than usual.
The filter and the
cyclone are dirty.
Clean the filter and the
cyclone. Make sure that you
wash the sponge filter at
least once every two weeks if
you use the appliance
regularly.


