Пылесос Hoover TE70_TE75011 - инструкция пользователя по применению, эксплуатации и установке на русском языке. Мы надеемся, она поможет вам решить возникшие у вас вопросы при эксплуатации техники.
Если остались вопросы, задайте их в комментариях после инструкции.
"Загружаем инструкцию", означает, что нужно подождать пока файл загрузится и можно будет его читать онлайн. Некоторые инструкции очень большие и время их появления зависит от вашей скорости интернета.


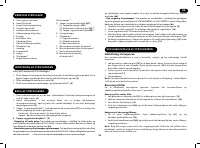

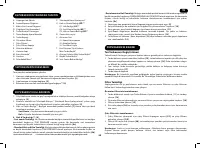
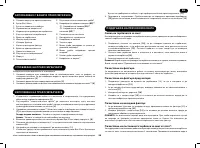

GET TING TO KNOW YOUR CLEANER
ASSEMBLING YOUR CLEANER
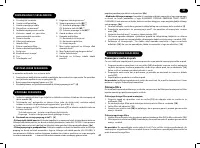
Remove all components from the packaging.
1. Connect the hose to the cleaner main body, ensuring it clips and locks into position. To
release the hose: simply press the two latches on the hose end and pull.
[2]
2. Connect the handle to the upper tube end.
[3]
3. Connect the tube lower end to the carpet and floor nozzle**.
[4]
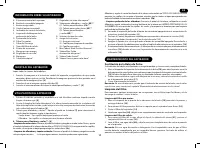
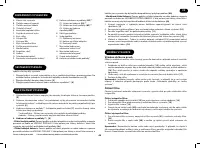
A. Cleaner main body
B. On/Off Button
C. Cord Rewind Button
D. Variable Power Control*
E. Bag Check Indicator
F. Bag Door Release Latch
G. Bag Door
H. Pre-motor Filter
I. Exhaust Filter
J. Exhaust Filter Cover
K. Accessories door
L. Hose Handle
M. Suction Regulator*
N. Hose
O. Telescopic Tube*
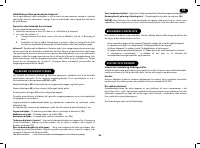
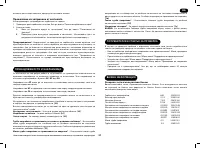
CLEANER MAINTENANCE
Replacing the Dust Bag
If the Bag Check Indicator is illuminated please check and if necessary, replace the dust bag.
1. Lift the bag door release latch
[15]
to open the bag door, close the bag to avoid dust
escaping by pulling the tongue and remove the bag.
[16]
The full dust bag should be
disposed of correctly and carefully.
2. Fold a new bag as shown on the bag and fit by inserting the collar into the bag holder
[17]
.
3. Close the bag door.
Remember:
The bag check indicator may be red if an obstruction has occurred. In this
case, refer to ‘Removing a Blockage From the System’.
Cleaning the Filter
To maintain optimum performance of your cleaner, please wash the pre-motor filter and
exhaust filter after each 5 bag changes.
Cleaning the pre-motor filter:
1. Lift the Bag Door Release latch
[15]
to open the bag door and remove the bag.
[16]
2. To remove the pre-motor filter slide the pre-motor filter frame from the cleaner.
[18]
3. Remove the filter from the holder.
[19]
4. Wash it in hand warm water,
[20]
and allow it to dry thoroughly before replacing it in
the cleaner.
Cleaning the exhaust filter:
1. To remove the exhaust filter, unclip the exhaust filter cover
[21]
and remove the exhaust
filter pack.
[22]
2. Wash the filter in hand warm water
[20]
and allow it to dry thoroughly before replacing
in the cleaner.
Remember:
Do not use hot water or detergents. In the unlikely event of the filters
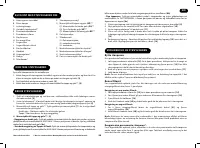
USING YOUR CLEANER
*Certain Models Only ** Certain models only, nozzles may vary according to model
P. Telescopic Tube Adjuster*
Q. Carpet and Floor nozzle (
GP
)**
Q1. Carpet Nozzle (
CA
)**
Q2. Hard Floor Nozzle (
HF
)**
Q3. Carpet and Floor nOzzle(
GP
)**
R. Floor type selector
S. Accessory set
S1. Crevice Tool
S2. Furniture Nozzle
S3. Dusting Brush
T. Pet Hair Remover Mini Turbo Nozzle*
U. Allergy Remover Mini Turbo Nozzle*
V. Grand Turbo Nozzle*
W. Hard Floor Caresse Nozzle*
2
1. Extract Power Cord and plug it into the power supply. Do not pull the cord beyond the
red marker.
[5]
2. Adjust the Telescopic Tube* to the desired height by moving the Telescopic Tube
Adjusters* up and raise or lower the handle to the most comfortable cleaning position.
[6]
3. Carpet and Floor Nozzle**: Press the floor type selector pedal on the nozzle
[7]
to select
the ideal cleaning mode for the floor type.
Hard Floor – Brushes are lowered to protect the floor.
Carpet – Brushes are raised for the deepest clean.
4. Carpet & Floor Nozzle**: [8]
- Hard floor Cleaning:
Press the pedal on the nozzle on Hard Floor mode and adjust the slider
on the nozzle on ALL FLOORS. In this position brushes, wheels and wiper blade are lowered to
protect hard floors.
[8a]
- Standard Carpet & Rugs Cleaning:
Press the pedal on the nozzle on Carpet mode and adjust
the slider on the nozzle on ALL FLOORS. In this position brushes and wiper blade are raised while
wheels are lowered to allow a perfect ease of movement on such surfaces.
[8b]
- Deep Carpet Cleaning:
Press the pedal on the nozzle on Carpet mode and adjust the slider
on the nozzle on DEEP CARPET CLEANING. In this position brushes, wheels and wiper blade are
raised for a deeper cleaning of your carpet.
[8c]
5. Switch the cleaner on by pressing the On/Off button on the cleaner main body.
[9]
6. Slide the Variable Power Control* to increase or decrease the suction.
[10]
7. Adjust the suction regulator* to the desired level.
[11]
8. Switch off at the end of use by pressing the On/Off button. Unplug and press the Cord
Rewind Button to wind the power cord back into the cleaner.
[12]
9. Parking and Storage - The tube can be parked for temporary storage
[13]
while in use,
or in the storage position when not in use.
[14]
GB
Характеристики

Остались вопросы?Не нашли свой ответ в руководстве или возникли другие проблемы? Задайте свой вопрос в форме ниже с подробным описанием вашей ситуации, чтобы другие люди и специалисты смогли дать на него ответ. Если вы знаете как решить проблему другого человека, пожалуйста, подскажите ему :)


