
Пылесос COOLFORT СF-3051 - инструкция пользователя по применению, эксплуатации и установке на русском языке. Мы надеемся, она поможет вам решить возникшие у вас вопросы при эксплуатации техники.
Если остались вопросы, задайте их в комментариях после инструкции.
"Загружаем инструкцию", означает, что нужно подождать пока файл загрузится и можно будет его читать онлайн. Некоторые инструкции очень большие и время их появления зависит от вашей скорости интернета.


4
ENGLISH
ELECTRIC SAFETY
•
The unit is intended for car mains with voltage
of 12 V.
•
Do not connect the unit to the car mains with
other voltage.
•
If the car cigarette lighter socket is de-energized
by turning the ignition off or removing the key,
do not turn the ignition off or remove the key, for
reference refer to the car manual.
•
The voltage on the contacts of the unit does not
exceed 12 V and is not dangerous for the user.
BEFORE THE FIRST USE
After unit transportation or storage at low tem-
perature keep it for at least 3 hours at room
temperature before switching on.
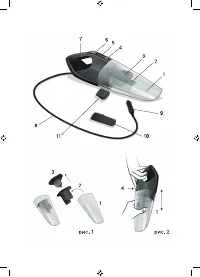
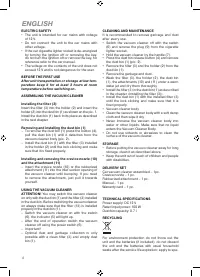
ASSEMBLING THE VACUUM CLEANER
Installing the filter (3)
Insert the filter (3) into the holder (2) and insert the
holder (2) into the dust bin (1) as shown on the pic. 1.
Install the dust bin (1) back to its place as described
in the next chapter.
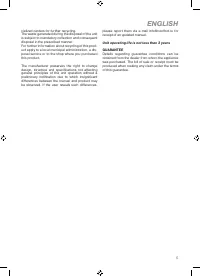
Removing and installing the dust bin (1)
– To remove the dust bin (1) press the button (4),
pull the dust bin (1) until it detaches from the
vacuum cleaner body (pic. 2).
– Install the dust bin (1) with the filter (3) installed
in the holder (2) until the lock clicking and make
sure that it is fixed properly.
Installing and removing the crevice nozzle (10)
and the attachment (11)
– Insert the crevice nozzle (10) or the rubberized
attachment (11) into the inlet suction opening of
the vacuum cleaner until bumping. If you need
to remove the attachment, just pull it towards
yourself.
USING THE VACUUM CLEANER
ATTENTION! You may switch the vacuum cleaner
on only with the dust bin (1) and the filter (3) installed
in the dust bin. Before switching the vacuum cleaner
on always make sure that the filter (13) is installed
properly in the dust bin (1).
– Switch the vacuum cleaner on with the switch
(6), the indicator (5) will light up.
– After the end of operation switch the vacuum
cleaner off using the power switch (6).
– Important!
– Optimal dust and garbage collection is only
possible with a clean filter (3) and empty dust
bin (1).
CLEANING AND MAINTENANCE
It is recommended to remove garbage and dust
after every use.
•
Switch the vacuum cleaner off with the switch
(6) and remove the plug (9) from the cigarette
lighter socket.
•
Hold the vacuum cleaner by the handle (7).
•
Press the dust bin release button (4) and remove
the dust bin (1) (pic. 2).
•
Remove the filter (3) and the holder (2) from the
dust bin (1).
•
Remove the garbage and dust.
•
Wash the filter (3), the holder (2), the dust bin
(1), the attachments (10) and (11) under a warm
water jet and dry them thoroughly.
•
Install the filter (3) in the dust bin (1) as described
in the chapter «Installing the filter (3)».
•
Install the dust bin (1) with the installed filter (3)
until the lock clicking and make sure that it is
fixed properly.
•
Vacuum cleaner body
•
Clean the vacuum cleaner body with a soft damp
cloth and then wipe it dry.
•
Never immerse the vacuum cleaner body into
water or other liquids. Make sure that no liquid
enters the Vacuum Cleaner Body.
•
Do not use solvents or abrasives to clean the
surface of the vacuum cleaner.
STORAGE
•
Before putting the vacuum cleaner away for long
storage, clean it as described above.
•
Keep the unit out of reach of children and people
with disabilities.
DELIVERY SET
Car vacuum cleaner assembled – 1pc.
Crevice nozzle – 1 pc.
Rubberized attachment – 1 pc.
Manual – 1 pc.
Warranty card – 1 pc.
TECHNICAL SPECIFICATIONS
Power supply: DC 12 V
Rated input power: 100 W
Dust bin capacity: 0.7 l
RECYCLING
For environment protection do not throw out the
unit and the batteries (if included), do not discard
the unit and the batteries with usual household
waste after the service life expiration; apply to spe-


