Пылесос Bosch BGL 2B1328 - инструкция пользователя по применению, эксплуатации и установке на русском языке. Мы надеемся, она поможет вам решить возникшие у вас вопросы при эксплуатации техники.
Если остались вопросы, задайте их в комментариях после инструкции.
"Загружаем инструкцию", означает, что нужно подождать пока файл загрузится и можно будет его читать онлайн. Некоторые инструкции очень большие и время их появления зависит от вашей скорости интернета.


38
Th
e
us
e
of inf
e
rior-quality dust bags (
e
.g. pap
e
r
bags) can hav
e
a n
e
gativ
e
e
ff
e
ct on th
e
s
e
r vic
e
lif
e
and p
e
r for
m
anc
e
of your applianc
e
. Using unsuitabl
e
or inf
e
rior-quality dust bags can also da
m
ag
e
your
vacuu
m
cl
e
an
e
r.
S
uch da
m
ag
e
is not cov
e
r
e
d by our
guarant
ee
.
You can find
m
or
e
infor
m
ation about this at
www.bosch-ho
me
.co
m
/dust-bag. You can ord
e
r our
original vacuu
m
cl
e
an
e
r bags h
e
r
e
.
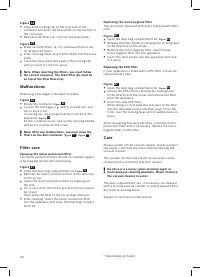
B
EPA filter BBZ156HF
Additional filt
e
r for cl
e
an
e
r
e
xhaust air.
Re
co
mme
nd
e
d for all
e
rg y suff
e
r
e
rs.
Re
plac
e
onc
e
a
y
e
ar.
C H
a
rd
-
floor tool BBZ123HD
For vacuu
m
ing hard floors
(parqu
e
t
,
til
e
s
,
t
e
rracotta
,
e
tc.)
Before u
s
ing for the fir
s
t ti
m
e
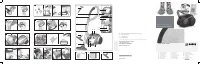
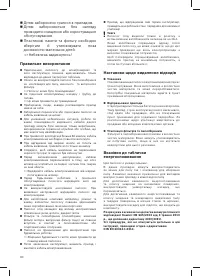
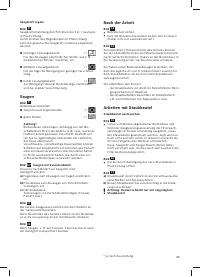
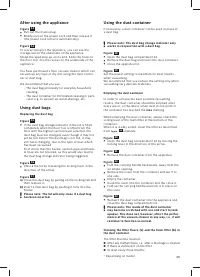
Figure
1
Push th
e
handl
e
onto th
e
fl
e
xibl
e
hos
e
and lock it
in plac
e
.
Initi
a
l u
s
e
Figure
2
a
)
Push th
e
fl
e
xibl
e
hos
e
conn
e
cting pi
e
c
e
into th
e
air
intak
e
op
e
ning in th
e
lid until it locks in plac
e
.
b)
To r
em
ov
e
th
e
fl
e
xibl
e
hos
e,
pr
e
ss th
e
two locking
catch
e
s tog
e
th
e
r and pull out th
e
hos
e
.
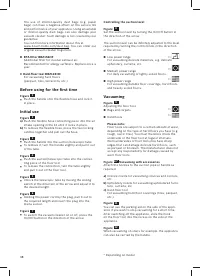
Figure
3
Push th
e
handl
e
into th
e
suction/t
e
l
e
scopic tub
e
.
To r
em
ov
e
it
,
turn th
e
handl
e
slightly and pull it out
of th
e
tub
e
.
Figure
4
Push th
e
suction/t
e
l
e
scopic tub
e
into th
e
conn
e
c-
ting pi
e
c
e
of th
e
floor tool.
To r
e
l
e
as
e
th
e
conn
e
ction
,
turn th
e
tub
e
slightly
and pull it out of th
e
floor tool.
Figure
5
Unlock th
e
t
e
l
e
scopic tub
e
by
m
oving th
e
sliding
switch in th
e
dir
e
ction of th
e
arrow and adjust it to
th
e
d
e
sir
e
d l
e
ngth.
Figure
6
Holding th
e
pow
e
r cord by th
e
plug
,
pull it out to
th
e
r
e
quir
e
d l
e
ngth and ins
e
r t th
e
plug into th
e
m
ains sock
e
t.
Figure
7
To switch th
e
vacuu
m
cl
e
an
e
r on or off
,
pr
e
ss th
e
On/Off button in th
e
dir
e
ction of th
e
arrow.
Controlling the
s
uction level
Figure
8
Se
t th
e
suction l
e
v
e
l by turning th
e
On/Off button in
th
e
dir
e
ction of th
e
arrow.
Th
e
suction l
e
v
e
l can b
e
infinit
e
ly adjust
e
d to th
e
l
e
v
e
l
r
e
quir
e
d by turning th
e
control knob in th
e
dir
e
ction
of th
e
arrow.
Low pow
e
r rang
e
=>
For vacuu
m
ing d
e
licat
e
m
at
e
rials
,
e
.g. d
e
licat
e
upholst
e
r y
,
cur tains
,
e
tc.
M
e
diu
m
pow
e
r rang
e
=>
For daily vacuu
m
ing of lightly soil
e
d floors.
High pow
e
r rang
e
=>
For vacuu
m
ing durabl
e
floor cov
e
rings
,
hard floors
and h
e
avily soil
e
d floors.
V
a
cuu
m
ing
Figure
9
Adjusting th
e
floor tool:
R
ugs and carp
e
ts
=>
Hard floors
=>
Ple
as
e note:
Floor tools ar
e
subj
e
ct to a c
e
r tain a
m
ount of w
e
ar
,
d
e
p
e
nding on th
e
typ
e
of hard floors you hav
e
(
e
.g.
rough
,
rustic til
e
s). You
m
ust th
e
r
e
for
e
ch
e
ck th
e
und
e
rsid
e
of th
e
floor tool at r
e
gular int
e
r vals.
Worn und
e
rsid
e
s of floor tools
m
ay hav
e
sharp
e
dg
e
s that can da
m
ag
e
d
e
licat
e
hard floors
,
such
as parqu
e
t or linol
e
u
m
. Th
e
m
anufactur
e
r do
e
s not
acc
e
pt any r
e
sponsibility for da
m
ag
e
caus
e
d by
worn floor tools.
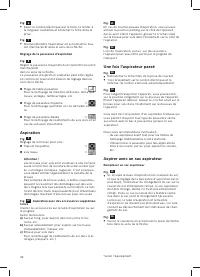
Figure
10*
V
a
cuu
m
ing with
a
cce
ss
orie
s
Attach th
e
nozzl
e
s to th
e
suction pip
e
or handl
e
as
r
e
quir
e
d:
a
)
C
r
e
vic
e
nozzl
e
for vacuu
m
ing cr
e
vic
e
s and corn
e
rs
,
e
tc.
b)
Upholst
e
r y nozzl
e
for vacuu
m
ing upholst
e
r
e
d furni-
tur
e,
cur tains
,
e
tc.
c)
Hard-floor tool
For vacuu
m
ing hard floor cov
e
rings (til
e
s
,
parqu
e
t
,
e
tc.)
Figure
11
You can us
e
th
e
parking aid on th
e
sid
e
of th
e
appli-
anc
e
if you wish to stop vacuu
m
ing for a shor t ti
me
.
Aft
e
r switching off th
e
applianc
e,
slid
e
th
e
hook
on th
e
floor tool into th
e
r
e
c
e
ss on th
e
sid
e
of th
e
applianc
e
.
Figure
12
Wh
e
n vacuu
m
ing on stairs for
e
xa
m
pl
e,
th
e
applianc
e
can also b
e
carri
e
d by th
e
handl
e
.
* D
e
p
e
nding on
m
od
e
l


