Плита Gorenje G51101AW - инструкция пользователя по применению, эксплуатации и установке на русском языке. Мы надеемся, она поможет вам решить возникшие у вас вопросы при эксплуатации техники.
Если остались вопросы, задайте их в комментариях после инструкции.
"Загружаем инструкцию", означает, что нужно подождать пока файл загрузится и можно будет его читать онлайн. Некоторые инструкции очень большие и время их появления зависит от вашей скорости интернета.

6
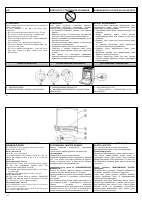
burner ar still in operation.
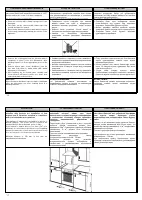
The maximum baking pan load inserted in guides is
3kg, and the maximum baking pan load placed on a
grid is 7kg.
The baking plates and roasting pans are not
designed for a long-term storage of food (exceeding
48 hours). For longer storage use convenient dishes.
(
48
)ғ
ғ
-
ң
ұ
(
48
) ү і
ғ
ұ
ү і
ү і ә
ң ғ
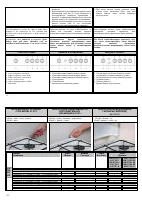
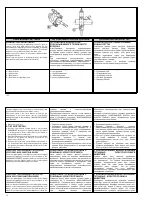
C O O K I N G H O B
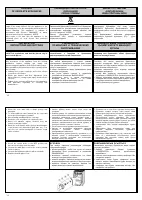
L I G H TI N G T H E H O B B U R N E R S
Press the appropriate burner control knob slightly
towards the appliance and turn it anti-clockwise to the
„MAБIMUM POАER“ ЩШЬТЭТШЧғ L
ight the gas using a
match or any gas ignition device.
«
»
ғ
І І
–
І
І
«
і
» ұ
ұ ң
,
і ің
ұ
ң ғ
L I G H TI N G T H E B U R N E R S W I TH H I G H
V O L T AG E G AS I G N I TI O N K N O B
Press the appropriate burner control knob slightly
towards the appliance and turn it anti-clockwise to the
„MAБIMUM POАER“ ЩШЬТЭТШЧғ
Now use another hand
and press the gas ignition knob on the control panel
and keep it pressed until it ignites the flame.
Ө
«
»ғ
,
,
ғ
І
І
,
«
і
» ұ
ұ
ғ і
і
ұ
,
і і
і
,
ұ
ұ
ң
і
і ұ
ұ
і ұ
ұ
ғ
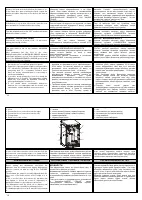
L I G H TI N G T H E B U R N E R S W I TH F F D
H I G H V O L T AG E I G N I TI O N K N O B
Press the appropriate burner control knob slightly
towards the appliance and turn it anti-clockwise to the
„MAБIMUM POАER“ ЩШЬТЭТШЧғ
Now use another hand and press the knob high voltage
ignition on the control panel device starts firing the
burner. Hold the knob pressed to the limit position for
about 5 seconds after the flame appears to allow the
flame sensor scanner to heat up.
Release the knob and check whether the burner is on.
If the flame dies after releasing the knob, repeat the
ignition procedure. After that set the knob to the desired
position.
C
ё
“
”ғ
ё,
, 5
,
ғ
,
,
ғ
,
,
,
-
“
”
“
”ғ
Ө
-
І І
ң ү
і ің
ұ
-
ә
" ң
"
ң
ғ
-
ұ
ұ
-
,
, 5
,
ң
ң
і і
ғ
і
ұ
-
-
і ің
ң
ң
і і
-
,
ғ
-
і
і ,
ң
-
ұ
,
,
ү
ің
-
" ң
"
"
"
-.
S H U T TI N G TH E H O B B U R N E R S O F F
TЮЫЧ ЭСО ЬОХОМЭОН kЧШЛ ЭШ ЭСО “OFF” ЩШЬТЭТШЧ КЧН МСОМk
whether the flame is extinct
“
”ғ
-
ғ
І
І
і
і
ұ
«
і і
»
ү ң ғ і
і і
і
ң ғ
23
CONNECTION TO THE MAINS POWER
The appliance is fitted with power cord plug for
connection to the mains.
Power socket to which the appliance is connected must
be accessible at all times.
Faulty power cord must be immediately replaced with a
new one.
,
ғ
ң
ң
і
ң
і і і і
і ә
ғ
C AU TI O N :
Make sure that the power cord is installed in such way
to avoid touching hot parts of the cooker (exhaust at the
back side, bottom part of the hob). High temperature
could cause damage to the insulation.
!
,
(
),
ғ
!
і
і
ң
і
і
(
ң
ұ ү і і ә
і і ү
і ің
і
і і)
ң ,
ң
ү і ғ
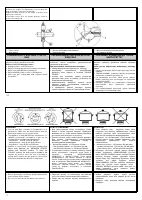
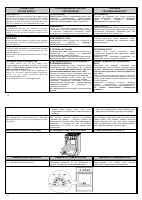
LEVELING THE APPLIANCE
І І І
(certain models only)
Cooker hob must be leveled in horizontal position by
means of 4 leveling screws supplied with the appliance.
ё
4-
,
ғ
ң
і і і
ң
-
і
і
4
і ұ
і
ғ
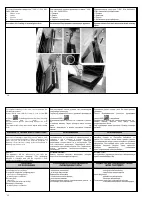
P R O C E D U R E :
open the cover the range receptacle;
Tilt the cooker on one side;
Screw plastic screws into the bottom crossbar front
and rear openings on one side;
Tilt the cooker on the opposite side and fix the
screws into the openings on the other side;
Level the cooker using a screwdriver from the
receptacle area, or by turning the leveling screw with
a hexagon wrench;
The procedure is less complicated if performed by
using leveling screws.
Өұ
,
,
,
,
ё
ё
,
ғ
Өұ
ң
-
ә і і
ң
,
і
ң
іңі
,
і
ұ
і ің
ң ә
ң
ұ
ң
,
ң
іңі ,
ә і і
ү
ұ
ң
і
і
ұ
ң
,
ң
,
ң
-
ә і і
ңі і
ұ
і
ң
ңі ғ
N O TE :
Leveling screws are unnecessary if the appliance
height and horizontal position are acceptable.
ұ
х
й
ұ
і і і
і
і
ә
і
ғ
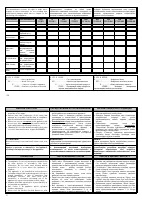
Характеристики

Остались вопросы?Не нашли свой ответ в руководстве или возникли другие проблемы? Задайте свой вопрос в форме ниже с подробным описанием вашей ситуации, чтобы другие люди и специалисты смогли дать на него ответ. Если вы знаете как решить проблему другого человека, пожалуйста, подскажите ему :)


