
Обогреватели Timberk TOR 31.1606 QT - инструкция пользователя по применению, эксплуатации и установке на русском языке. Мы надеемся, она поможет вам решить возникшие у вас вопросы при эксплуатации техники.
Если остались вопросы, задайте их в комментариях после инструкции.
"Загружаем инструкцию", означает, что нужно подождать пока файл загрузится и можно будет его читать онлайн. Некоторые инструкции очень большие и время их появления зависит от вашей скорости интернета.


www.timberk.com • electric oil filled radiator
5
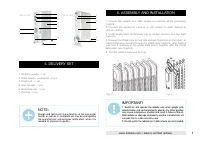
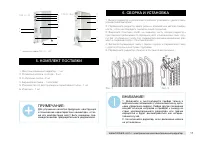
1. Oil-filled radiator - 1 pc
2. Roller wheels, assembled - 2 pcs
4. Finger nut - 1 set
5. User manual - 1 pcs
6. Guarantee slip - 1 pcs
7. Packing - 1 pcs
5. DELIVERY SET
1. Unpack the radiator and roller wheels and remove all the packaging
material.
2. Overturn the radiator on a mat or no soft surface, to avoid damage to
lacquer coating.
3. Install wheel plates on the lower part of radiator sections, into two fixed
supports.
4. Draw up two finger nuts on one side and two finger nuts on the other - in
clamp extensions passed through the wheel plate supports, after making
sure that 2 openings in the wheel plate match together with the clamp
extensions (see Figure 3).
5. Turn the radiator back and tip it up.
6. ASSEMBLY AND INSTALLATION
NOTE:
Design and technical characteristics of the convector
heater, as well as its complete set may be changed by
the manufacturer without prior notification, when it is
needed to improve its quality.
Fig. 2
Fig. 3
IMPORTANT!
1. Switch on and operate the radiator only when upright (with
wheels below and control elements above). Any other position
may cause a dangerous situation and result in failure of the oil-
filled radiator or damage of property and the manufacturer will
consider this as a non-warranty case.
2. Do not switch the radiator on, if roller wheels are not installed.
6
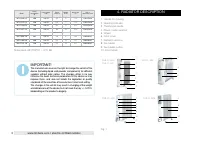
10
7
5
2
4
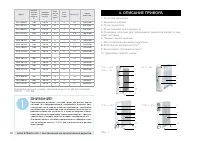
TOR 21...SLX
6
8
9
10
7
5
2
4
3
1
TOR 31...QT
Содержание
- 8 Уважаемый покупатель!; МЕРЫ ПРЕДОСТОРОЖНОСТИ
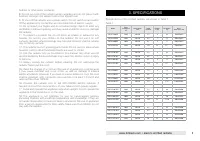
- 9 ТЕХНИЧЕСКИЕ ХАРАКТЕРИСТИКИ
- 10 Корректированный уровень звуковой мощности, Дб (для моделей
- 11 СБОРКА И УСТАНОВКА; Выньте радиатор и роликовые колёса из упаковки и удалите весь
- 12 ЭКСПЛУАТАЦИЯ ПРИБОРА
- 13 УСТРАНЕНИЕ НЕИСПРАВНОСТЕЙ
- 15 Гарантийные обязательства; гарантийный талон
- 17 Гарантийные обязательства Изготовителя не распространяют-
- 18 Бланк гарантийного талона.; Заполняется фирмой-продавцом; Без подписи покупателя Гарантийный талон является недей-; ности (если прибор проверялся в его присутствии при продаже) приоб-


