
Обогреватели Timberk T-CH1.2-A11 - инструкция пользователя по применению, эксплуатации и установке на русском языке. Мы надеемся, она поможет вам решить возникшие у вас вопросы при эксплуатации техники.
Если остались вопросы, задайте их в комментариях после инструкции.
"Загружаем инструкцию", означает, что нужно подождать пока файл загрузится и можно будет его читать онлайн. Некоторые инструкции очень большие и время их появления зависит от вашей скорости интернета.


IM2021
17
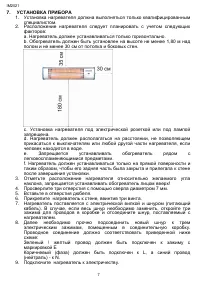
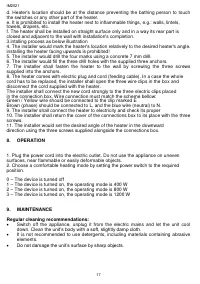
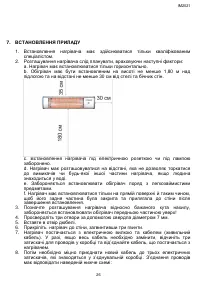
d. Heater's location should be at the distance preventing the bathing person to touch
the switches or any other part of the heater.
e. It is prohibited to install the heater next to inflammable things, e.g.: walls, lintels,
towels, drapers, etc.
f. The heater shall be installed on straight surface only and in a way its rear part is
closed and adjacent to the wall with installation's completion.
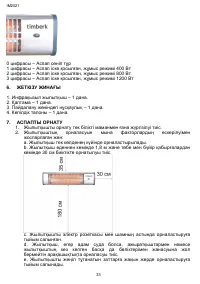
3.intalling process as below illustration
4. The installer would mark the heater's location relativel y to the desired heater's angle.
installing the heater facing upwards is prohibited!
5. The installer would drill the four marks using a concrete 7 mm drill.
6. The installer would fill the three drill holes with the supplied three anchors.
7. The installer shall fasten the heater to the wall by screwing the three screws
supplied into the anchors.
8. The heater comes with electric plug and cord (feeding cable). In a case the whole
cord has to be replaced, the installer shall open the three wire clips in the box and
disconnect the cord supplied with the heater.
The installer shall connect the new cord strongly to the three electric clips placed
in the connection box. Wire connection must match the scheme bellow:
Green / Yellow wire should be connected to the clip marked E
Brown (phase) should be connected to L, and the blue wire (neutral) to N.
9. The installer shall connect the heater to electricity and check its proper
10. The installer shall return the cover of the connections box to its place with the three
screws.
11. The installer would set the desired angle of the heater in the downward
direction using the three screws supplied alongside the connections box.
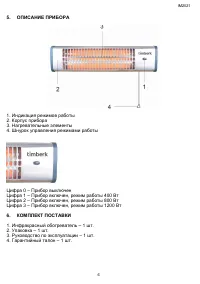
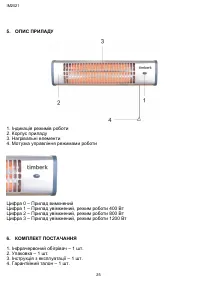
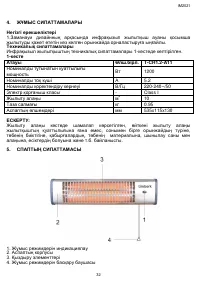
8.
OPERATION
1. Plug the power cord into the electric outlet. Do not use the appliance on uneven
surfaces, near flammable or easily deformable objects.
2. Choose a comfortable heating mode by setting the power switch to the required
position.
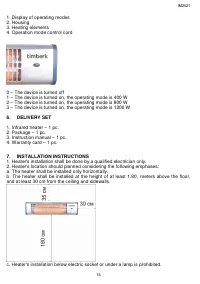
0
– The device is turned off
1
– The device is turned on, the operating mode is 400 W
2
– The device is turned on, the operating mode is 800 W
3
– The device is turned on, the operating mode is 1200 W
9.
MAINTENANCE
Regular cleaning recommendations:
Switch off the appliance, unplug it from the electric mains and let the unit cool
down. Clea
n the unit’s body with a soft, slightly damp cloth.
It is not recommended to use detergents, including materials containing abrasive
elements.
Do not damage the unit’s surface by sharp objects.


