
Обогреватели FRICO AD315A - инструкция пользователя по применению, эксплуатации и установке на русском языке. Мы надеемся, она поможет вам решить возникшие у вас вопросы при эксплуатации техники.
Если остались вопросы, задайте их в комментариях после инструкции.
"Загружаем инструкцию", означает, что нужно подождать пока файл загрузится и можно будет его читать онлайн. Некоторые инструкции очень большие и время их появления зависит от вашей скорости интернета.


Thermozone AD300A/E, 400A/E
26
General recommendations
Carefully read this instruction manual before installation
and use of the AD 300/400A/E
unit. Keep these instruc-
tions in a safe place for future reference.
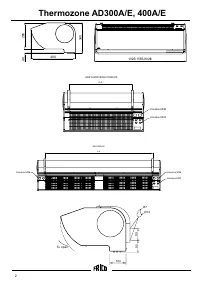
Application area
The Thermozone AD 300/400A/E air curtains are
intended for stationary/permanent installation above
entrances and industrial doors with a height from 2 up to
4.5 meters, but can also be used for industrial heating
and drying. The unit can be mounted above a doorway
or recessed into a ceiling. Protection class: IP20.
Operation
The air is drawn in at the top of the unit and blown out at
high velocity across the doorway, providing a protective
air shield. The air shield minimises cold draughts and
reduces heat loss through open doorways. For best
efficiency, the air curtain(s) should cover the whole width
of the opening.
The air director/grille is adjustable and is normally ang-
led outwards (5-10°) to achieve the best protection.
The airflow can be adjusted by use of the fan speed
selector (CB30/CB32/RPE)
The efficiency of the air curtain(s) depends on the air
temperature and pressure differences across the door-
way and any wind pressure.
NOTE! Negative pressure in the building considerably
reduces the efficiency of the air curtain. Ventilation
should therefore be balanced.
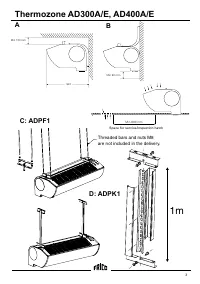
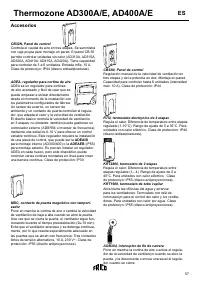
Mounting
The units may only be installed horizontally over a
doorway with the air-stream directed downwards. For
the protection of wider doorways, several units can be
mounted next to each other.
For optimal performance it is recommended that a mini-
mum gap of 120mm is maintained above the air-curtain.
The units can be fitted to the wall or suspended from the
ceiling. Two or three mounting consoles are included
with the air-curtain. NOTE: all 2 m wide units must be
fixed using three points of attachment (one on each
side and one in the middle), when suspended from the
ceiling or mounted on the wall.
The M8 bolts (2 or 3) which slot into the to the alumini-
um profile on top of the unit can slide sideways, allowing
the consoles to be mounted at different distances from
each other.
(see details page 2.)
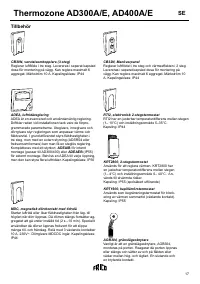
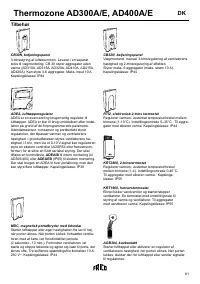
Fitted on the wall or beam
1. Mount the consoles to the wall/beam, see fig. A or B,
page 3
2. Loosen the nuts on the upper side of the air curtain
to be able to fit the consoles between the nut and
the unit.
3. Mount the unit on to the consoles and tighten the
nuts.
Suspended from the ceiling
1. Mount the consoles to pendulums (ordered separa-
tely) to obtain a suspension from the ceiling. (See
fig. C on page 3)
GB
2. Threaded bars and nuts for this kind of mounting are
not included in the delivery.
Alternative mounting is to use the suspension set
ADPK1 (see fig. D on page 3)
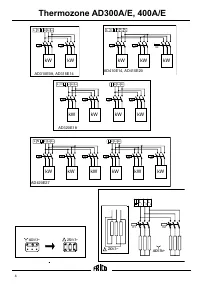
Electrical installation
The air-curtain(s) should only be wired by a competent
electrician, and in accordance with national regulations.
1. Remove the front plate by pressing a screwdriver
or similar in to the two holes (Ø 5mm) underneath
the edge of the front plate. Press until it clicks and the
front plate can be openedand removed. See fig. on
page. 3
2. Remove the lid of the connection box by removing
the two screws placed on the right side of the unit.
Remove the knockouts on top of the unit (4xØ23mm,
2xØ38mm) for routing of electrical supply and remote
switching cables.
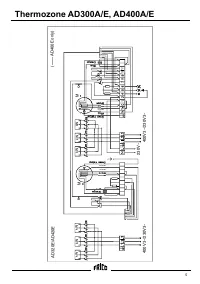
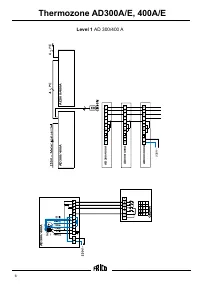
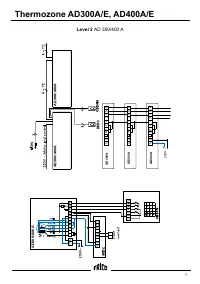
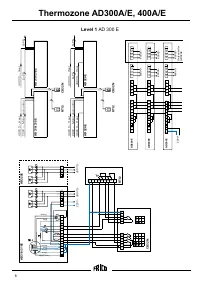
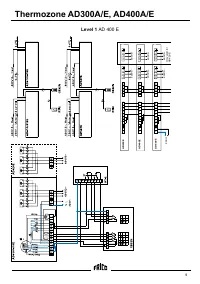
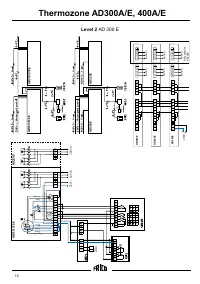
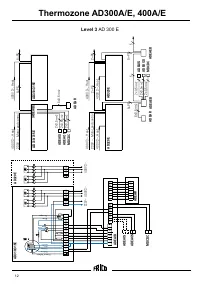
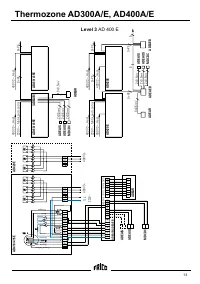
Different combinations of fan speed and heat output
are detailed in the wiring diagrams on pages 5-9. The
cable-glands used must guarantee the protection class
requirements!
For the units with electrical heating, the power and
voltage can be supplied in different connection areas
(see wiring diagram). In the distribution board it is to
be indicated that ”the air curtains can be supplied from
more than one connection”.
Note! It is not advisable to put electrical cables above
the air intake at the top of the unit, due to high tempe-
ratures.
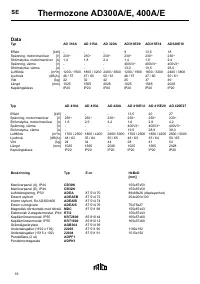
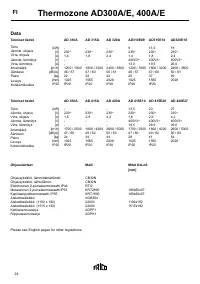
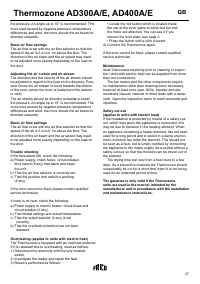
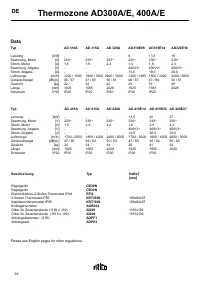
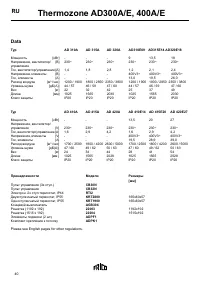
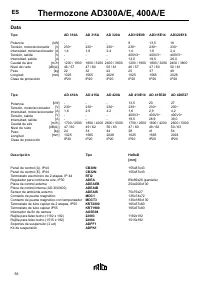
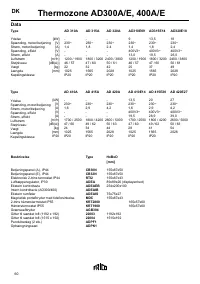
Type
Output
Voltage
Min. area
kW
V
mm
2
All manouver -
230V~
1,5
AD 310E09 9
400V3~
2,5
AD 315E14 13,5
400V3~
4
AD 320E18 18(9+9)
400V3~ 10(2,5+2,5)
AD 410E14 13,5
400V3~
4
AD 415E20 20
400V3~
10
AD 420E27 27(13,5+13,5) 400V3~
16(4+4)
Safety
• Ensure that the area around the intake and
exhaust grille is kept free from material
which could prevent the air to flow through
the unit!
• During operation the surfaces of the unit are hot!
• The unit must not be covered fully or
partially with clothes, or similar materials,
as overheating can result in a fire risk!
Adjusting the air curtain and air stream
The direction and the velocity of the air stream should
be adjusted in regard to the load on the doorway. Pres-
sure forces the air stream to bend towards the interior
of the room (when the room is heated and the exterior
is cold).
The air stream should be directed outwards to resist


