Настольные часы VITEK VT-6608 BK - инструкция пользователя по применению, эксплуатации и установке на русском языке. Мы надеемся, она поможет вам решить возникшие у вас вопросы при эксплуатации техники.
Если остались вопросы, задайте их в комментариях после инструкции.
"Загружаем инструкцию", означает, что нужно подождать пока файл загрузится и можно будет его читать онлайн. Некоторые инструкции очень большие и время их появления зависит от вашей скорости интернета.


6
ENGLISH
•
Before switching the clock radio on, make sure that the
operating voltage of the adapter corresponds to the
voltage of your mains.
•
The unit is equipped with a backup power supply system
battery that allows saving current time, alarm settings
and programmed radio stations in case of power failure.
Once the mains voltage is restored, the unit is switched
to the mains power supply.
Note: The alarm sound signal will be on only if there is
power in the mains.
•
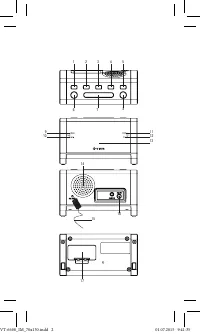
Open the battery compartment lid (17). Insert two AAA
batteries (not supplied), following the polarity.
•
Close the battery compartment lid (17).
•
To connect the unit to the mains insert the power
adapter plug into the «
DC IN
» socket (16) and plug the
adapter in.
ATTENTION!
Batteries leakage can cause injuries or unit damage. To avoid
the unit damage, follow the instructions given below:
– insert the batteries following the polarity;
– remove the batteries if you are not planning to use the
unit for a long time.
– do not dismantle the batteries, do not expose them to
high temperatures;
– replace the batteries in time.
TIME SETTING
•
Plug the unit into the mains.
•
Press and hold the button (6) «
CLK/MEM
», blinking
time indications will appear on the display.
•
Consequently press or hold the button (2) «
TUN.UP
/
HOUR»
, to set the necessary hour.
•
Consequently press or hold the button (1) «
TUN.DP/
MIN»
to set the minutes.
•
To finish the setup procedure, press the button (6)
«
CLK/MEM
».
Note:
If the buttons (2)
«
TUN.UP
/
HOUR»
or (1)
«
TUN.DP/
MIN»
are not pressed within 10 seconds during the setup
process, the unit will be switched to the current time mode.
Alarm setup (AL.1 and AL.2)
•
To view the alarm time, press the button (4) «
AL2/VOL
–»
or the button (5) «
AL1/VOL+
» respectively. The alarm
VT-6608_IM_70x130.indd 6
01.07.2015 9:41:35
Содержание
- 12 МЕРЫ БЕЗОПАСНОСТИ
- 13 Не используйте устройство вне помещений.
- 14 Перевозите устройство только в заводской упаковке.; ПОДКЛЮЧЕНИЕ ПИТАНИЯ
- 15 DC IN; Если в течение 10 секунд во время уста-; не будут нажаты, произойдёт возврат в режим
- 16 выбрать радио, то предварительно настройтесь
- 17 – Срабатывание сигнала будильника возможно только
- 20 ТЕХНИЧЕСКИЕ ХАРАКТЕРИСТИКИ; Срок службы устройства – 3 года


