Настольные часы VITEK VT-3516 BK - инструкция пользователя по применению, эксплуатации и установке на русском языке. Мы надеемся, она поможет вам решить возникшие у вас вопросы при эксплуатации техники.
Если остались вопросы, задайте их в комментариях после инструкции.
"Загружаем инструкцию", означает, что нужно подождать пока файл загрузится и можно будет его читать онлайн. Некоторые инструкции очень большие и время их появления зависит от вашей скорости интернета.


6
ENGLISH
Auto tuning:
press and hold the buttons (8)
and (9) for more than 2 seconds. The tuner shall
begin scanning and automatically stops after
finding the closest strong radio station signal.
3.
Press the button (11) to switch the radio off.
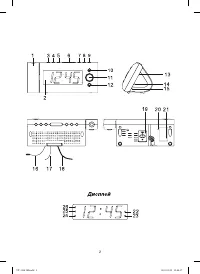
Antenna (17)
Select the antenna (17) position for quality
reception of radio signal.
Volume level adjusting
Use buttons (10) “+” and (12) “-” to set up the
desired volume level.
Radio stations recording
You can set up and save 10 radio station in FM
band.
1.
Tune to the station you want to record.
2.
Press the «MEM.SET» button (3) until a flash-
ing symbol of «Р--» appears.
3.
Use the buttons (8) and (9) to select the
number of the programming cell.
4.
Press the «MEM.SET» button (3) again to
save settings.
5.
Repeat steps 1–4 for all radio stations which
you wish to save in the clock radio memory.
6.
To select the preliminary recorded radio sta-
tions press the «MEM.SET» button (3) conse-
quently in radio mode.
Automatic radio switch off
You can set up the radio switch off time.
1.
Press the “SNOOZE/SLEEP” button (6).
“90” symbols will appear on the display that
means automatic switching off in 90 minutes.
2.
Set up the necessary auto switch off time
(90, 60, 30 or 15 minutes) pressing the
“SNOOZE/SLEEP” button (6) repeatedly.
3.
To cancel this function press the «SNOOZE/
SLEEP» button (6) repeatedly until “OFF”
symbol appears on the display (2) or switch
off the radio by pressing the button (11).
“RESET” button (20)
Use a toothpick to press the “RESET” button (20)
when replacing the battery or if the unit malfunc-
tions, the settings will return to the default ones,
all the stored data (current time, alarms and radio
settings) will be lost.
Image projection
1.
Switch on the projector by pressing the
«PROJECTION ON/OFF» button (15), select
the required projector position.
2.
To focus the projected image, rotate the
control “FOCUS” (13). To rotate the projected
image to 180° press the “180° FLIP” button
(14).
3.
To switch off the projector press the
“PROJECTION ON/OFF” button (15).
Note: The unit projects the image on ceiling or
wall of darkened room. The projection distance
is 90-270 cm.
Note: Electromagnetic interferences can influ-
ence the unit operation. In this case disconnect
the unit from the power sources, and then con-
nect again. If necessary move or relocate the
unit.
CLEANING AND CARE
–
Disconnect the unit from power supply line
before cleaning.
–
Use a soft cloth to clean the unit.
–
Do not use liquid or aerosol substances for
cleaning.
Storage
–
Clean the unit before taking it away for stor-
age.
–
Store the unit in a cool dry place away from
children.
Delivery set
Clock radio – 1 pc.
Instruction manual – 1 pc.
SPECIFICATIONS
Power supply: 220-240 V ~50 Hz
Reserve power supply: CR2032 battery, 3 V
FM frequency range: 87,5–108 MHz.
Maximal rated input: 5 W
The manufacturer preserves the right to change
specifications of the unit without preliminary
notification.
Unit operating life is 3 years.
Guarantee
Details regarding guarantee conditions can be
obtained from the dealer from whom the appli-
ance was purchased. The bill of sale or receipt
must be produced when making any claim under
the terms of this guarantee.
This product conforms to the EMC-
Requirements as laid down by the
Council Directive 89/336/EEC and to
the Low Voltage Regulation (73/23 EEC)
VT-3516 IM.indd 6
26.01.2012 12:48:27


