Мясорубки VITEK VT-3620 ST - инструкция пользователя по применению, эксплуатации и установке на русском языке. Мы надеемся, она поможет вам решить возникшие у вас вопросы при эксплуатации техники.
Если остались вопросы, задайте их в комментариях после инструкции.
"Загружаем инструкцию", означает, что нужно подождать пока файл загрузится и можно будет его читать онлайн. Некоторые инструкции очень большие и время их появления зависит от вашей скорости интернета.


6
ENGLISH
6.
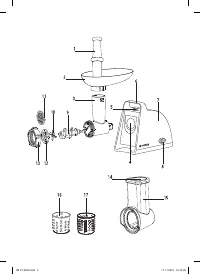
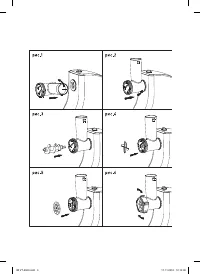
Select one required plate (11 or 12) and set it
over the blade (10), matching the ledges on
the grate with the grooves on the meat grinder
head body (3) (pic. 5)
7.
Install the nut (13) and fasten it clockwise with
a slight effort (pic. 6).
Attention!
–
Face the blade cutting side to the grate. If
the blade is installed improperly, it will not
grind the products.
–
The coarse cutting plate (11) is for pro-
cessing raw meat, vegetables, dried fruit,
cheese, fish, etc.
–
Small grate (12) is suited for processing
both raw and cooked meat, fish etc.
8.
Install the food tray (2) on the meat grinder
head (3) feeding chute. Place a suitable bowl
under the meat grinder head (3).
9.
Insert the power plug into the mains socket.
10.
Switch the meat grinder on by setting the
switch (8) to the position «
ON
» (on).
11.
Slowly feed the meat pieces into the mouth
of the grinder head (3) using the pusher (1).
Notes:
–
For better meat processing slice it in cubes or
stripes. Defrost frozen meat thoroughly.
–
During the operation, use only the pusher sup-
plied with the unit; do not use any other objects
for pushing meat, do not push meat with your
hands.
12.
After you finish operating, switch the meat
grinder off, setting the switch (8) to the posi-
tion «
0
» and unplug the unit; after that you can
disassemble the unit.
13.
To remove the meat grinder head, press the
lock button (5), turn the meat grinder head (3)
clockwise and remove it.
14.
To disassemble the meat grinder head,
unscrew the nut (13) and take out the installed
plate (11 or 12), the blade (10) and the screw
(9) from the meat grinder head body.
VEGETABLE SLICER
1.
Press and hold the lock button (5).
2.
Insert the vegetable slicer attachment (15)
body into the meat grinder head setting place
(4) matching the ledges on the body (15)
with the openings in the setting place (4) and
release the button (5).
3.
Then turn the attachment body (15) counter-
clockwise until locking.
4.
Install the grating attachment (16), the slic-
ing attachment (17) into the vegetable slicer
attachment (15) body and turn it clockwise
until bumping.
5.
Insert the power plug into the mains socket.
6.
Switch the meat grinder on by setting the
switch (8) to the position «
ON
».
7.
During the operation use only the pusher (14)
supplied with the unit; do not use any other
objects to push vegetables, never push veg-
etables with your hands.
8.
After you finish operating, switch the meat
grinder off, setting the switch (8) to the posi-
tion «
0
» and unplug the unit; after that you can
disassemble the unit.
9.
To remove the vegetable slicer attachment
(15) body, press the lock button (5), turn the
attachment clockwise and remove it.
10.
To remove the installed attachment (16, 17)
slightly turn it counterclockwise and remove
it from the vegetable slicer attachment (15)
body.
AUTO SWITCH-OFF FUNCTION
•
The meat grinder is equipped with an auto
switch-off function in case of motor unit over-
heating.
•
In case of overheating of the motor, the auto-
matic thermal switch will be on, and the meat
grinder will be switched off.
•
In this case immediately remove the power
plug from the mains socket.
•
Let the meat grinder cool down for approxi-
mately 50-60 minutes before switching it on
again.
•
Plug the meat grinder into the mains, switch
the unit on, if the meat grinder can not be
switched on, this may mean that it is otherwise
damaged. In this case contact the authorized
service center for repairing the meat grinder.
MEAT GRINDER CARE
•
After you finish operating, switch the meat
grinder off, setting the switch (8) to the posi-
tion «0», unplug the meat grinder and only
after that you can disassemble it.
•
Press the lock button (5), turn the meat
grinder head (3) or the vegetable slicer attach-
ment (15) body clockwise and remove the
head.
•
Unscrew the nut (13) and remove the
plates (11 or 12) and the blade (10) from the
screw (9), remove the screw (9) from the meat
grinder head (3), clean the screw (9) from
the remaining products or slightly turn the
IM VT-3620.indd 6
17.11.2016 12:14:30
Характеристики

Остались вопросы?Не нашли свой ответ в руководстве или возникли другие проблемы? Задайте свой вопрос в форме ниже с подробным описанием вашей ситуации, чтобы другие люди и специалисты смогли дать на него ответ. Если вы знаете как решить проблему другого человека, пожалуйста, подскажите ему :)


