Мультиварки Philips HD4731 - инструкция пользователя по применению, эксплуатации и установке на русском языке. Мы надеемся, она поможет вам решить возникшие у вас вопросы при эксплуатации техники.
Если остались вопросы, задайте их в комментариях после инструкции.
"Загружаем инструкцию", означает, что нужно подождать пока файл загрузится и можно будет его читать онлайн. Некоторые инструкции очень большие и время их появления зависит от вашей скорости интернета.
Specifications are subject to change without notice
© 2015 Koninklijke Philips N.V.
All rights reserved.
HD4731_HD4737_UM_v1.0
Register your product and get support at
www.philips.com/welcome
HD4731
HD4737
Мультиварка
Мультипісіргіш
English
1 Your multicooker
Congratulations on your purchase, and welcome to Philips!
To fully benefit from the support that Philips offers, register your
product at www.philips.com/welcome.
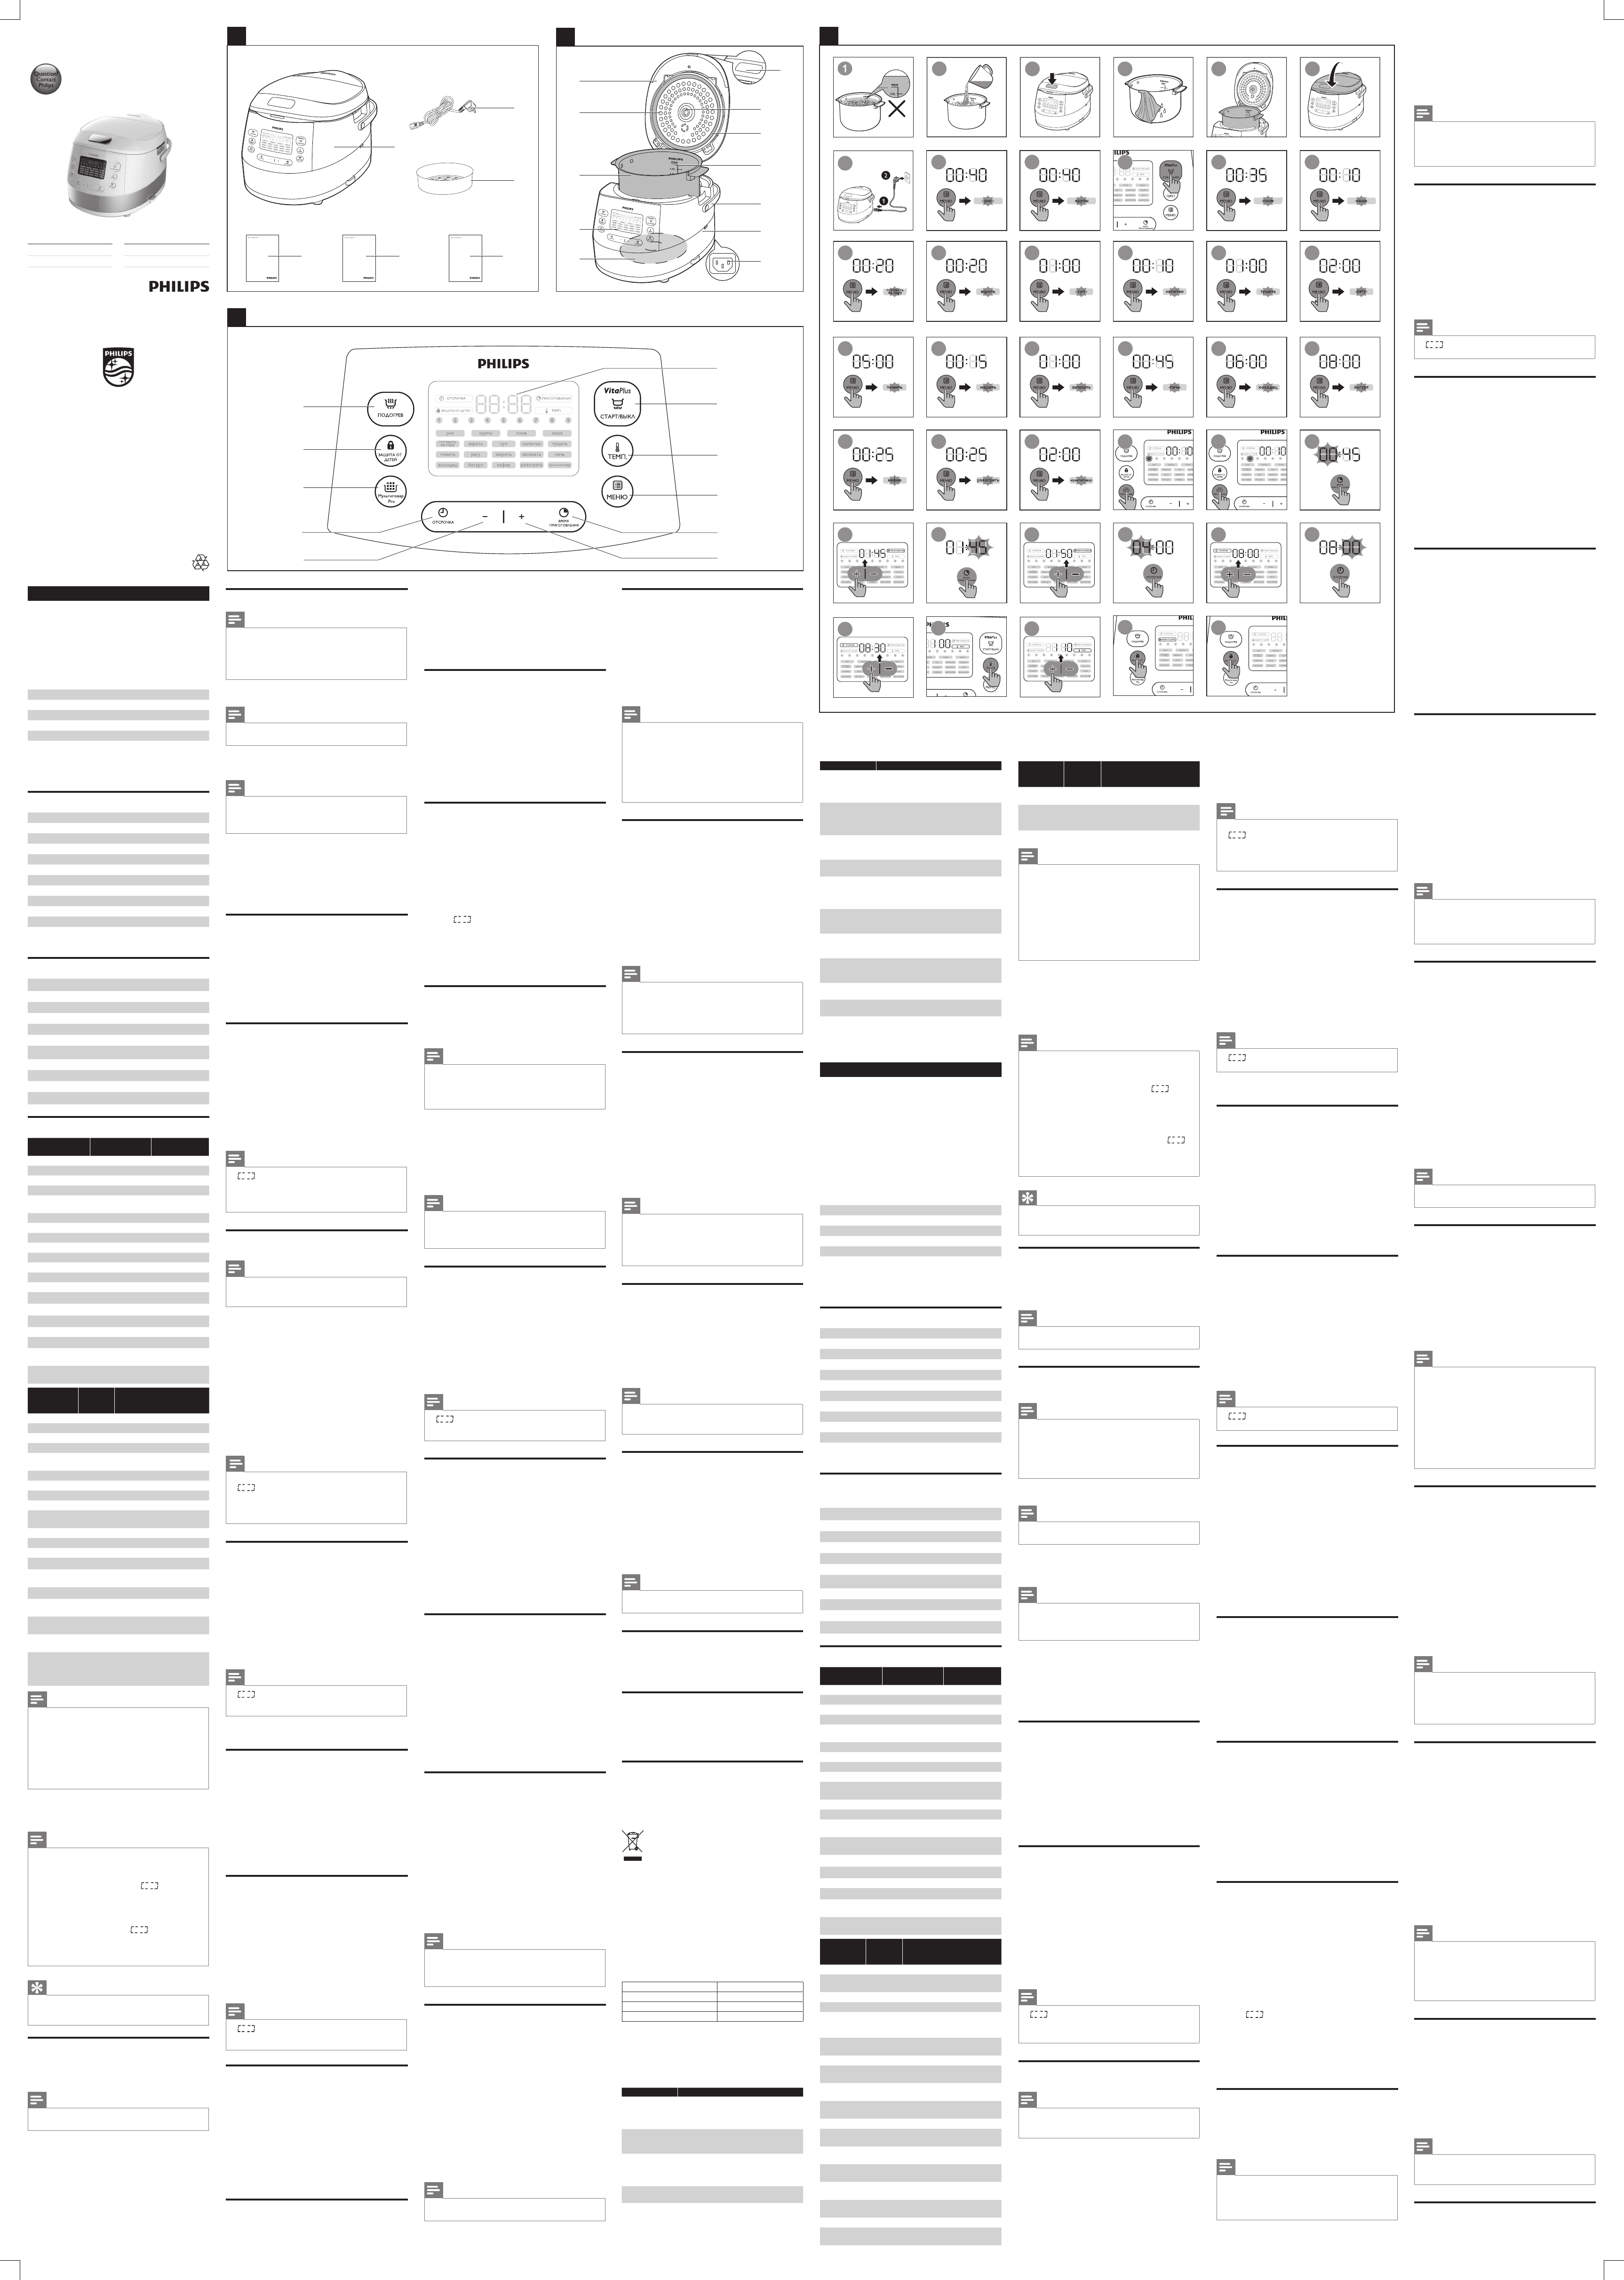
2 What’s in the box (fig. 1)
a
Multicooker main unit
b
Power cord
c
Steam basket
d
User manual
e
Recipe booklet
f
Warranty card
3 Overview
Product overview (fig. 2)
a
Top lid
b
Detachable inner lid
c
Inner pot
d
Control panel
e
Heating element
f
Power socket
g
Main unit
h
Cooker handle
j
Water level indications
j
Sealing ring
k
Detachable steam vent cap
l
Lid release button
Controls overview (fig. 3)
m
Keep-warm button
n
Child lock button
o
Multicook Pro button
p
Preset time button
q
Decrease button
r
Increase button
s
Cooking time button
t
Menu button
u
Temperature button
v
Start/Off button
w
Display screen
Menus overview
Menus
Default cooking time
Cooking time
regulating range
Rice (рис)
30-40 min
/
Grain (крупы)
30-40 min
/
Pilaf (плов)
35 min
/
Porridge (каша)
10 min
5 min - 2 hr
Steam (готовить на
пару)
20 min
5 min - 2 hr
Boil (варить)
20 min
5 min - 2 hr
Soup (суп)
1 hr
20 min-4 hr
Drinks (напитки)
10 min
5-40 min
Stew (тушить)
1 hr
20 min - 10 hr
Slow cook (томить)
5 hr
1-15 hr
Ragout (рагу)
2 hr
20 min - 10 hr
Fry (жарить)
15 min
5-60 min
Roast (запекать)
1 hr
/
Bake (печь)
45 min
20 min - 2 hr
Jelly meat (холодец)
6 hr
4-10 hr
Yogurt (йогурт)
8 hr
6-12 hr
Sour milk (кефир)
8 hr
6-12 hr
Reheat (разогреть)
25 min
5-60 min
Manual
(мультиповар)
2 hr
5 min - 10 hr
Multi-stage cooking
(Мультиповар Pro)
5 min
5 min - 15 hr
Menus
Preset time
Default cooking
temperature
Temperature
regulating
range
Rice (рис)
1-24 hr
130-140°C
/
Grain (крупы)
1-24 hr
130-140°C
/
Pilaf (плов)
1-24 hr
130-140°C
/
Porridge (каша)
1-24 hr
90-100°C
/
Steam (готовить
на пару)
1-24 hr
100°C
/
Boil (варить)
1-24 hr
100°C
/
Soup (суп)
1-24 hr
90-100°C
/
Drinks (напитки)
1-24 hr
100°C
/
Stew (тушить)
1-24 hr
95°C
/
Slow cook
(томить)
1-24 hr
80°C
/
Ragout (рагу)
1-24 hr
90°C
/
Fry (жарить)
/
145-160°C
/
Roast (запекать)
1-24 hr
120-130°C
/
Bake (печь)
/
130°C
40-160°C
Jelly meat
(холодец)
1-24 hr
90-100°C
/
Yogurt (йогурт)
1-24 hr
40±3°C
/
Sour milk
(кефир)
1-24 hr
40±3°C
/
Reheat
(разогреть)
/
85°C
/
Manual
(мультиповар)
1-24 hr
100°C
30-160°C
Multi-stage
cooking
(Мультиповар
Pro)
1-24 hr
100°C
30-160°C
Note
•
The cooking time for rice (
рис
), grain (
крупы
), and pilaf (
плов
) is
determined by the multicooker in accordance to the quantity of
ingredients put in the inner pot.
•
You can adjust the cooking temperature for bake (
печь
), manual
(
мультипова
р) and multicook Pro (
Мультиповар Pro
). For bake,
the temperature is available from 40°C to 160°C; for manual and
multicook Pro, the temperature is available from 30°C to 160°C.
•
After the cooking process has started, you can touch the Start/Off
button (
СТАРТ/ВЫКЛ
) to deactivate the current cooking process,
and the multicooker will switch to the standby mode.
4 Using the multicooker (fig. 4)
Note
•
For all menus, do not exceed the
MAX
indication on the inside of
the inner pot when putting ingredients and liquid in it, otherwise the
food may overflow during cooking (fig.
a
).
•
The cooking time does not display straight from the beginning for
rice (
рис
), grain (
крупы
) and pilaf (
плов
).
displays on the
screen during most of the cooking time as the multicooker needs
to detect the water/liquid and ingredient volume in the initial
preparation stage. When the multicooker detects the actual cooking
time needed, the remaining cooking time displays on the screen. For
porridge (
каша
), steam (
готовить на пару
), boil (
варить
), jelly meat
(
холодец
), and beverage (
напитки
),
displays on the screen
before the water/liquid is brought to boil. When the water/liquid
starts boiling, the set cooking time displays on the screen.
•
Refer to the recipe booklet for more details on cooking with each
menu.
Tip
•
To select a certain menu, touch "menu" (
МЕНЮ
) repeatedly. You
can also touch "menu" (
МЕНЮ
) once, and then touch increase (
+
)
or decrease (
-
) to do so.
Before first use
1
Take out all the accessories from the inner pot, and remove the
packaging material of the inner pot.
2
Clean all parts of the multicooker thoroughly before using it for
the first time (see chapter ‘Cleaning and Maintenance’).
Note
•
Make sure all parts are completely dry before you start using the
multicooker.
Always there to help you
Question?
Contact
Philips
Warm keeping
The multicooker provides you with easy control over the keep-warm
mode.
•
After you have touched “menu” (
МЕНЮ
) to select the cooking
function, if you touch and hold “start” (
СТАРТ/ВЫКЛ
) for
3 seconds directly, the keep-warm indicator will light up. After
the cooking is finished, the multicooker will switch to keep-warm
mode directly.
•
After you have touched “menu” (
МЕНЮ
) to select the cooking
function, if you touch “keep-warm” (
ПОДОГРЕВ
) first, and
then touch and hold “start” (
СТАРТ/ВЫКЛ
) for 3 seconds, the
keep-warm indicator will be off. After the cooking is finished, the
multicooker will be in standby mode.
Note
•
After the appliance turns into warm keeping, it remains at warm
keeping for 12 hours, after that it beeps and cease the warm
keeping process.
•
At standby mode, you can touch
"
keep-warm
"
(
ПОДОГРЕВ
)
to switch to warm keeping. The accumulated warm keeping time
displays on the screen. The appliance remains at warm keeping for
24 hours, after that it beeps and cease the warm keeping process.
•
In keep-warm mode, you can touch
"
keep-warm
"
(
ПОДОГРЕВ
) to
switch to standby..
Setting up the cooking time
You can adjust the cooking time for some menus. Refer to chapter
“Menus overview” and see which menus have the time regulation as
well as the regulating range.
1
Select the cooking menu you need.
2
Touch “cooking time” (
ВРЕМЯ ПРИГОТОВЛЕНИЯ
) (fig.
~
).
»
The hour unit starts flashing on the display.
3
Touch “increase” or “decrease” (
-
) to set the hour unit
(fig.
).
4
After the hour unit is set, touch “cooking time” (
ВРЕМЯ
ПРИГОТОВЛЕНИЯ
) again (fig.
€
).
»
The minute unit starts flashing on the display.
5
Touch “increase” or “decrease” (
-
) to set the minute unit
(fig.
).
6
Touch and hold “start”
(СТАРТ/ВЫКЛ
) for 3 seconds to
confirm and start cooking (fig.
j
).
Note
•
If the multicooker is left in idle for 15 seconds after "cooking time"
(
ВРЕМЯ ПРИГОТОВЛЕНИЯ
) is touched, it will turn to standby
mode.
•
For menus with a maximum cooking time of no more than
1 hour, the first time you touch “cooking time” (
ВРЕМЯ
ПРИГОТОВЛЕНИЯ
), the minute unit starts flashing on the display.
Preset time for delayed cooking
You can preset the delayed cooking time for some cooking menus.
Refer to chapter “Menus overview” and see which menus can be
preset.
1
Select the cooking menu you need.
2
Touch “preset time” (
ОТСРОЧКА
). (fig.
‚
)
»
The hour unit starts flashing on the display.
3
Touch “increase” or “decrease” (
-
) to set the hour unit
(fig.
ƒ
).
4
After the hour unit is set, touch “preset” (
ОТСРОЧКА
) again
(fig.
„
).
»
The minute unit starts flashing on the display.
5
Touch “increase” or “decrease” (
-
) to set the minute unit
(fig.
…
).
6
Touch and hold “start”
(СТАРТ/ВЫКЛ
) for 3 seconds to
confirm and start cooking (fig.
j
).
Note
•
If the multicooker is left in idle for 15 seconds after "preset"
(
ОТСРОЧКА
) is touched, it will turn to standby mode.
•
The cooking process will be finished when the preset time has
elapsed. For example, if you set a preset time of 8 hours at 10:00
in the morning, the cooking process will be finished 8 hours later at
18:00 in the evening.
Setting up the cooking temperature
You can adjust the cooking temperature for some menus. Refer
to chapter “Menus overview” and see which menus have the
temperature regulation as well as the regulating range.
1
Select the cooking menu you need.
2
Touch “temperature” (
ТЕМП.
) (fig.
†
).
»
The default cooking temperature displays on the screen.
3
Touch “increase” or “decrease” (
-
) to set the cooking
temperature (fig.
‡
).
4
Touch and hold “start”
(СТАРТ/ВЫКЛ
) for 3 seconds to
confirm and start cooking (fig.
j
).
Note
•
Instead of touching “increase” or “decrease” (-) to set the cooking
temperature, you can also touch “temperature” (ТЕМП.) repeatedly
to set the cooking temperature.
Setting up the child lock
To protect children from using the multicooker or to avoid any
misoperation, you can activate the child lock during a cooking process.
1
Touch and hold “child lock” (
ЗАЩИТА ОТ ДЕТЕЙ
) for
3 seconds to activate the child lock (fig.
ˆ
).
»
The child lock icon lights up on the display.
2
To unlock, touch and hold “child lock” (
ЗАЩИТА ОТ
ДЕТЕЙ
) for 3 seconds again (fig.
‰
).
»
The child lock icon lights off.
5 Cleaning and Maintenance
Note
•
Unplug the multicooker and wait until it has cooled down sufficiently
before cleaning.
Interior
Inside of the top lid and the main body; the heating element:
•
Wipe with a wrung out cloth.
•
Make sure to remove all the food residues stuck to the
multicooker.
Exterior
Surface of the top lid and outside of the main body:
•
Wipe with a cloth damped with soap water.
•
Only use soft and dry cloth to wipe the control panel.
•
Make sure to remove all the food residues around the control
panel.
Accessories
Inner pot, steam basket, and detachable steam vent cap:
•
Soak in hot water and clean with sponge.
6 Recycling
This symbol means that this product shall not be disposed
of with normal household waste (2012/19/EU).
Follow your country’s rules for the separate collection of
electrical and electronic products. Correct disposal helps
prevent negative consequences for the environment and
human health.
7 Guarantee and service
If you need service or information, or if you have a problem, visit the
Philips website at www.philips.com or contact the Philips Customer
Care Center in your country. You can find its phone number in the
worldwide guarantee leaflet. If there is no Customer Care Center in
your country, go to your local Philips dealer.
8 Specifications
Model Number
HD4731, HD4737
Rated voltage
220V-240V~
Rated power output
890W-1070W
Rated capacity
5.0L
9 Troubleshooting
If you encounter problems when using this multicooker, check the
following points before requesting service. If you cannot solve the
problem, contact the Philips Consumer Care Center in your country.
Problem
Solution
The light on the
button does not
go on.
There is a connection problem. Check if the
power cord is connected to the multicooker
properly and if the plug is inserted firmly into
the power outlet.
The light is defective. Take the appliance
to your Philips dealer or a service center
authorized by Philips.
The display does
not function.
The multicooker is not connected to the
power supply. If there is no power supply,
the power failure backup function does not
work and the display does not function.
The ingredients
are not cooked.
You did not touch and hold "start"
(
СТАРТ / ВЫКЛ
) for 3 seconds.
www.philips.com/welcome
User manual
www.philips.com/welcome
Warranty
1
3
2
http://www.philips.com/welcome
Recipe
k
a
b
c
d
e
f
j
g
f
l
h
c
a
b
d
e
i
m
o
q
n
p
v
w
u
t
r
s
2
4
5
6
3
7
8
9
11
12
13
10
3S
38
28
29
31
33
35
39
37
4
14
20
27
19
23
24
25
26
15
16
17
21
22
30
32
34
36
40
3S
41
3S
18
Problem
Solution
Make sure that there is no foreign residue on
the heating element and the outside of the
inner pot before switching the multicooker
on.
The heating element is damaged, or the
inner pot is deformed. Take the multicooker
to your Philips dealer or a service center
authorized by Philips.
The rice is too
dry and not well
cooked.
Add more water to the rice, and cook for a
bit longer.
The rice is
scorched.
You have not rinsed the rice properly. Rinse
the rice until the water runs clear.
The multicooker
does not turn into
warm keeping
automatically.
You might have touched “keep-warm”
(
ПОДОГРЕВ
) before starting the cooking
process. In this case the multicooker will be
in standby mode after the cooking is finished.
The temperature control is defective. Take
the appliance to your Philips dealer or a
service center authorized by Philips.
Water spills out
of the multicooker
during cooking.
Make sure that the ingredients you put in the
inner pot do not exceed the MAX indication.
I cannot get to the
desired cooking
function.
Touch "menu" (
МЕНЮ
) repeatedly to select
the desired function.
Dishes smell bad
after cooking
Clean the inner pot with some washing
detergent and warm water.
After cooking, make sure the steam vent cap,
inner lid and inner pot is cleaned thoroughly.
Error message
(E1, E2, E3, or E4)
appears on the
display.
There has been a power failure during
cooking. Take the appliance to your Philips
dealer or a service center authorized by
Philips.
Қазақша
1 Көп функциялы тағам
пісіргішіңіз
Сатып алғаныңыз құтты болсын және Philips компаниясына қош
келдіңіз!
Philips ұсынатын қолдауды толық пайдалану үшін, өнімді www.
philips.com/welcome торабында тіркеңіз.
2 Қорап ішіндегі
заттар (1-сурет)
a
Көп функциялы тағам пісіргіштің негізгі бөлігі
b
Тоқ сымы
c
Бу себеті
d
Пайдаланушы нұсқаулығы
e
Рецепт кітапшасы
f
Кепілдік картасы
3. Жалпы шолу
Өнімге жалпы шолу (2 -сурет)
a
Жоғарғы қақпақ
b
Алынатын ішкі қақпақ
c
Ішкі ыдысы
d
Басқару панелі
e
Қыздыру элементі
f
Қуат розеткасы
g
Негізгі бөлік
h
Тағам пісіргіштің тұтқасы
j
Су деңгейінің көрсеткіштері
j
Мөрлейтін сақина
k
Алынатын бу шығатын тесікше қақпағы
l
Қақпақты шешу түймесі
Басқару элементтеріне шолу
(3-сурет )
m
Жылы сақтау түймесі
n
Балалардан құлыптау түймесі
o
Көп функциялы тағам пісіргіш Pro түймесі
p
Уақытты алдын ала орнату түймесі
q
Азайту түймесі
r
Көбейту түймесі
s
Пісіру уақыты түймесі
t
Меню түймесі
u
Температура түймесі
v
Бастау/Өшіру түймесі
w
Дисплей экраны
Мәзірлерге жалпы шолу
Мәзірлер
Әдепкі пісіру
уақыты
Пісіру уақытын
реттеу ауқымы
Күріш (рис)
30-40 мин.
/
Жарма (крупы)
30-40 мин.
/
Палау (плов)
35 мин.
/
Ботқа (каша)
10 мин.
5 мин. - 2 сағ.
Буға пісіру (готовить
на пару)
20 мин.
5 мин. - 2 сағ.
Қайнату (варить)
20 мин.
5 мин. - 2 сағ.
Көже (суп)
1 сағ.
20 мин.-4 сағ.
Сусындар (напитки) 10 мин.
5-40 мин.
Бұқтыру (тушить)
1 сағ.
20 мин. - 10 сағ.
Демдеп пісіру
(томить)
5 сағ.
1-15 сағ.
Рагу (рагу)
2 сағ.
20 мин. - 10 сағ.
Қуыру (жарить)
15 мин
5-60 мин.
Қақтап пісіру
(запекать)
1 сағ.
/
Пеш ішінде пісіру
(печь)
45 мин.
20 мин. - 2 сағ.
Іркілдек (холодец)
6 сағ.
4-10 сағ.
Йогурт (йогурт)
8 сағ.
6-12 сағ.
Айран (кефир)
8 сағ.
6-12 сағ.
Жылыту (разогреть) 25 мин.
5-60 мин.
Қолмен
(мультиповар)
2 сағ.
5 мин. - 10 сағ.
Мультипісіргіш
(Мультиповар Pro)
5 мин.
5 мин. - 15 сағ.
Мәзірлер
Алдын ала
орнату
уақыты
Әдепкі пісіру
температурасы
Температураны
реттеу ауқымы
Күріш (рис)
1-24 сағ.
130-140°C
/
Жарма
(крупы)
1-24 сағ.
130-140°C
/
Палау (плов)
1-24 сағ.
130-140°C
/
Ботқа (каша)
1-24 сағ.
90-100°C
/
Буға пісіру
(готовить на
пару)
1-24 сағ.
100°C
/
Қайнату
(варить)
1-24 сағ.
100°C
/
Көже (суп)
1-24 сағ.
90-100°C
/
Сусындар
(напитки)
1-24 сағ.
100°C
/
Бұқтыру
(тушить)
1-24 сағ.
95°C
/
Демдеп пісіру
(томить)
1-24 сағ.
80°C
/
Рагу (рагу)
1-24 сағ.
90°C
/
Қуыру
(жарить)
/
145-160°C
/
Қақтап пісіру
(запекать)
1-24 сағ.
120-130°C
/
Пеш ішінде
пісіру (печь)
/
130°C
40-160°C
Іркілдек
(холодец)
1-24 сағ.
90-100°C
/
Йогурт
(йогурт)
1-24 сағ.
40±3°C
/
Айран (кефир) 1-24 сағ.
40±3°C
/
Жылыту
(разогреть)
/
85°C
/
Мәзірлер
Алдын ала
орнату
уақыты
Әдепкі пісіру
температурасы
Температураны
реттеу ауқымы
Қолмен
(мультиповар) 1-24 сағ.
100°C
30-160°C
Мультипісіргіш
(Мультиповар
Pro)
1-24 сағ.
100°C
30-160°C
Есте сақтаңыз
•
Күріш (
рис
), жарма (
крупы
) және палау (
плов
) үшін пісіру
уақытын ішкі ыдысқа салынған құрамдастарға қарай көп
функциялы тағам пісіргіш өзі анықтайды.
•
Сіз пеш ішінде пісіру (
печь
), қолмен пісіру (
мультипова
р)
және мультипісіргіш Pro (
Мультиповар Pro
) үшін пісіру
температурасын реттей аласыз. Пісіру үшін 40°C-160°C
аралығындағы температура пайдаланылады; қолмен пісіру және
мультипісіргіш Pro функциясы үшін 30°C - 160°C аралығындағы
температура пайдаланылады.
•
Пісіру басталғаннан кейін тамақ пісіруді тоқтату үшін Бастау/
Өшіру түймесін (
СТАРТ/ВЫКЛ
) басуыңызға болады, сонда көп
функциялы тағам пісіргіш күту режиміне өтеді.
4 Көп функциялы тағам
пісіргішті пайдалану
(4-сурет )
Есте сақтаңыз
•
Барлық мәзірлер үшін ішкі кәстрөлдің ішкі жағындағы
MAX
көрсеткішінен асырмаңыз, әйтпесе пісіру кезінде тағам тасып
кетуі мүмкін (
a
-сур.).
•
Күріш (
рис
), жарма (
крупы
) және палау (
плов
) пісірген кезде
пісіру уақыты ең басынан бастап көрсетілмейді.
Пісіру
уақытының көбісінде экранда көрсетіледі, себебі көп функциялы
тағам пісіргіш бастапқы дайындау кезеңінде суды/сұйықтық
пен құрамдастар көлемін анықтауға тиіс. Көп функциялы тағам
пісіргіш қажетті пісіру уақытын анықтаған кезде, қалған пісіру
уақыты экранда көрсетіледі. Ботқа (
каша
), буға пісіру (
готовить
на пару
), қайнату (
варить
), іркілдек (
холодец
), және сусындар
(
напитки
) үшін,су/сұйықтық қайнардан бұрын экранда
көрсетіледі. Су/сұйықтық қайнай бастағанда пісіру уақыты
экранда көрсетіледі.
•
Әр мәзірмен пісіру бойынша толық ақпаратты рецепттер
кітапшасынан қараңыз.
Кеңес
•
Белгілі бір мәзірді таңдау үшін «мәзір» (
МЕНЮ
) түймесін қайта-
қайта басыңыз. Сондай-ақ «мәзір» (
МЕНЮ
) түймесін бір рет
басып, қосу (
+
) немесе азайту (
-
) түймесін басуға да болады.
Алғашқы рет қолданар алдында
1
Ішкі ыдыстан барлық қосалқы құралдарды алыңыз, одан
кейін ішкі ыдыстың орам материалын алыңыз.
2
Көп функциялы тағам пісіргішті бірінші рет пайдаланбастан
бұрын оның бөліктерін мұқият тазалаңыз («Тазалау және
техникалық қызмет көрсету» тарауын қараңыз).
Есте сақтаңыз
•
Көп функциялы тағам пісіргішті пайдаланбастан бұрын барлық
бөліктерінің толық кепкенін тексеріңіз.
Күріш (рис) пен жарманы (крупы)
пісіру
Есте сақтаңыз
•
Тұратын аймағыңыздағы тоқ кернеуі тұрақты болмаса, көп
функциялы тағам пісіргіштегі тағам тасып кетуі мүмкін.
•
Пісіру аяқталғаннан кейін күрішті/жарманы араластырыңыз
және жұмсақ болуы үшін артық ылғалды кетіру үшін оны бірден
қопсытыңыз.
•
Пісіру жағдайларына байланысты күріштің/жарманың төменгі
бөлігі аздап қоңырлануы мүмкін.
1
Күрішті жуыңыз да, жуылған күрішті ішкі кәстрөлге салып, су
құйыңыз (
b
-сур.).
Есте сақтаңыз
•
Күріш/жарма мен судың арақатынасын рецепттер кітапшасынан
қараңыз.
2
Қақпақты ашу үшін қақпақты босату түймесін басыңыз
(
c
-сур.).
3
Ішкі ыдыстың сыртын кептіріп сүртіңіз (
d
-сур.), содан
кейін көп функциялы тағам пісіргішке салыңыз (
e
-сур.).
Есте сақтаңыз
•
Ішкі ыдыстың қыздыру элементіне дұрыс тиіп тұрғанын
тексеріңіз.
•
Ішкі кәстрөлдің сырты таза әрі құрғақ екенін және қыздырғыш
элементте бөгде қалдықтың жоқ екенін тексеріңіз.
4
Көп функциялы тағам пісіргіштің қақпағын жауып (
f
-сур.),
ашаны қуат розеткасына қосыңыз ( g-сур.).
5
«Мәзір» (
МЕНЮ
) түймесін түртіп, «күріш» (
рис
) (
h
-сур.)
немесе «жарма» (
крупы
) (
i
-сур.) тармағын таңдаңыз.
6
Растап, пісіруді бастау үшін «бастау» (
СТАРТ/ВЫКЛ
)
түймесін 3 секунд басып тұрыңыз (
j
-сур.).
7
Пісіру аяқталғанда, құрылғы дыбыстық сигнал шығарып,
жылы сақтау режимі автоматты түрде іске қосылады.
Палау (плов) пісіру
1
Палаудың құрамдас бөліктерін ішкі кәстрөлге салыңыз.
2
Ішкі ыдыстың сыртын кептіріп сүртіңіз (
d
-сур.), содан
кейін көп функциялы тағам пісіргішке салыңыз (
e
-сур.).
3
Көп функциялы тағам пісіргіштің қақпағын жауып (
f
-сур.),
ашаны қуат розеткасына қосыңыз (
g
-сур.).
4
«Мәзір» (
МЕНЮ
) түймесін басып, «палау» (
плов
) (
k
-сур.)
тармағын таңдаңыз.
5
Растап, пісіруді бастау үшін «бастау» (
СТАРТ/ВЫКЛ
)
түймесін 3 секунд басып тұрыңыз (
j
-сур.) тармағын
таңдаңыз.
6
Пісіру аяқталғанда, құрылғы дыбыстық сигнал шығарып,
жылы сақтау режимі автоматты түрде іске қосылады.
Ботқа (каша) пісіру
1
Ботқаның құрамдас бөліктерін ішкі кәстрөлге салып, шамалы
араластырыңыз.
2
Ішкі ыдыстың сыртын кептіріп сүртіңіз (
d
-сур.), содан
кейін көп функциялы тағам пісіргішке салыңыз ( e-сур.).
3
Көп функциялы тағам пісіргіштің қақпағын жауып (
f
-сур.),
ашаны қуат розеткасына қосыңыз (
g
-сур.).
4
«Мәзір» (
МЕНЮ
) түймесін басып, «ботқа» (
каша
) (
l
-сур.)
тармағын таңдаңыз.
»
Басқа пісіру уақытын орнату үшін «Пісіру уақытын
реттеу» тарауын қараңыз.
5
Растап, пісіруді бастау үшін «бастау» (
СТАРТ/ВЫКЛ
)
түймесін 3 секунд басып тұрыңыз (
j
-сур.) тармағын
таңдаңыз.
6
Пісіру аяқталғанда, құрылғы дыбыстық сигнал шығарып,
жылы сақтау режимі автоматты түрде іске қосылады.
Есте сақтаңыз
•
су/сұйықтық қайнардың алдында экранда көрсетіледі. Су/
сұйықтық қайнай бастағанда пісіру уақыты экранда көрсетіледі.
•
Құрамдас бөліктер мен сұйықтықтың арақатынасын рецепттер
кітапшасынан қараңыз.
Буға пісіру (готовить на пару)
1
Ішкі ыдысқа біраз су құйыңыз.
Есте сақтаңыз
•
Көкөністі буға пісіру үшін көкөніс түрі мен көлеміне қарай 0,2 л
- 1 л су құйыңыз; етті буға пісіру үшін еттің өлшемі мен көлеміне
қарай 2 л - 0,5 л су құйыңыз.
2
Себетті ішкі кәстрөлге салып, тағамды шараға салыңыз да,
шараны бу себетінің үстіне қойыңыз.
»
Құрамдас бөліктер бу себетінің барлық тесіктерін
жауып тастамасын, сонда бу себетінен ыстық бу
жоғары қарай көтеріледі.
3
Ішкі ыдыстың сыртын кептіріп сүртіңіз (
d
-сур.), содан
кейін көп функциялы тағам пісіргішке салыңыз (
e
-сур.).
4
Көп функциялы тағам пісіргіштің қақпағын жауып (
f
-сур.),
ашаны қуат розеткасына қосыңыз (
g
-сур.).
5
«Мәзір» (
МЕНЮ
) түймесін басып, «буға пісіру» (
готовить
на пару
) (
m
-сур.) тармағын таңдаңыз.
»
Басқа пісіру уақытын орнату үшін «Пісіру уақытын
реттеу» тарауын қараңыз.
6
Растап, пісіруді бастау үшін «бастау» (
СТАРТ/ВЫКЛ
)
түймесін 3 секунд басып тұрыңыз (
j
-сур.) тармағын
таңдаңыз.
7
Пісіру аяқталғанда, құрылғы дыбыстық сигнал шығарып,
жылы сақтау режимі автоматты түрде іске қосылады.
Есте сақтаңыз
•
Тағамды буға пісіріп жатқанда, бу себетін суға батырмаңыз.
•
су/сұйықтық қайнардың алдында экранда көрсетіледі. Су/
сұйықтық қайнай бастағанда пісіру уақыты экранда көрсетіледі.
•
Буға пісіру аяқталғанда, шара мен бу себетін шығарып алу үшін
аспаз қолғабын немесе шүберекті пайдаланыңыз, себебі олар өте
ыстық болуы мүмкін.
Қайнату (варить)
1
Ішкі кәстрөлге шамалы су құйыңыз.
2
Ішкі ыдыстың сыртын кептіріп сүртіңіз (
d
-сур.), содан
кейін көп функциялы тағам пісіргішке салыңыз (
e
-сур.).
3
Көп функциялы тағам пісіргіштің қақпағын жауып (
f
-сур.),
ашаны қуат розеткасына қосыңыз (
g
-сур.).
4
«Мәзір» (
МЕНЮ
) түймесін басып, «қайнату» (
варить
)
(
n
-сур.) тармағын таңдаңыз.
»
Басқа пісіру уақытын орнату үшін «Пісіру уақытын
реттеу» тарауын қараңыз.
5
Растап, пісіруді бастау үшін «бастау» (
СТАРТ/ВЫКЛ
)
түймесін 3 секунд басып тұрыңыз (
j
-сур.) тармағын
таңдаңыз.
6
Су қайнаған кезде, қақпақты ашып, тағамды ішкі кәстрөлге
салу керегін ескерту үшін көп функциялы тағам пісіргіш
дыбыстық сигнал береді.
Есте сақтаңыз
•
су/сұйықтық қайнардың алдында экранда көрсетіледі. Су/
сұйықтық қайнай бастағанда пісіру уақыты экранда көрсетіледі.
7
Пісіру аяқталғанда, құрылғы дыбыстық сигнал шығарып, күту
режиміне автоматты түрде ауысады.
Көже пісіру (Суп)
1
Көженің құрамдас бөліктері мен суды/сұйықтықты ішкі
кәстрөлге салыңыз.
2
Ішкі ыдыстың сыртын кептіріп сүртіңіз (
d
-сур.), содан
кейін көп функциялы тағам пісіргішке салыңыз (
e
-сур.).
3
Көп функциялы тағам пісіргіштің қақпағын жауып (
f
-сур.),
ашаны қуат розеткасына қосыңыз (
g
-сур.).
4
«Мәзір» (
МЕНЮ
) түймесін басып, «көже» (
Суп
) (
o
-сур.)
тармағын таңдаңыз.
»
Басқа пісіру уақытын орнату үшін «Пісіру уақытын
реттеу» тарауын қараңыз.
5
Растап, пісіруді бастау үшін «бастау» (
СТАРТ/ВЫКЛ
)
түймесін 3 секунд басып тұрыңыз (
j
-сур.) тармағын
таңдаңыз.
6
Пісіру аяқталғанда, құрылғы дыбыстық сигнал шығарып,
жылы сақтау режимі автоматты түрде іске қосылады.
Сусын дайындау (Напитки)
1
Сусынның құрамдас бөліктерін ішкі кәстрөлге салыңыз.
2
Ішкі ыдыстың сыртын кептіріп сүртіңіз (
d
-сур.), содан
кейін көп функциялы тағам пісіргішке салыңыз (
e
-сур.).
3
Көп функциялы тағам пісіргіштің қақпағын жауып (
f
-сур.),
ашаны қуат розеткасына қосыңыз (
g
-сур.).
4
«Мәзір» (
МЕНЮ
) түймесін басып, «сусындар»(
напитки
)
(
p
-сур.). тармағын таңдаңыз.
»
Басқа пісіру уақытын орнату үшін «Пісіру уақытын
реттеу» тарауын қараңыз.
5
Растап, пісіруді бастау үшін «бастау» (
СТАРТ/ВЫКЛ
)
түймесін 3 секунд басып тұрыңыз (
j
-сур.) тармағын
таңдаңыз.
6
Пісіру аяқталғанда, құрылғы дыбыстық сигнал шығарып,
жылы сақтау режимі автоматты түрде іске қосылады.
Есте сақтаңыз
•
су/сұйықтық қайнардың алдында экранда көрсетіледі. Су/
сұйықтық қайнай бастағанда пісіру уақыты экранда көрсетіледі.
Бұқтыру (тушить) немесе рагу пісіру
(рагу)
1
Бұқтырылатын немесе рагуға арналған құрамдас бөліктерді
ішкі кәстрөлге салыңыз.
2
Ішкі ыдыстың сыртын кептіріп сүртіңіз (
d
-сур.), содан
кейін көп функциялы тағам пісіргішке салыңыз (
e
-сур.).
3
Көп функциялы тағам пісіргіштің қақпағын жауып (
f
-сур.),
ашаны қуат розеткасына қосыңыз (
g
-сур.).
4
«Мәзір» (
МЕНЮ
) түймесін басып, «бұқтыру» (
тушить
)
(
q
-сур.) немесе «рагу» (
рагу
) (
r
-сур.) тармағын
таңдаңыз.
»
Басқа пісіру уақытын орнату үшін «Пісіру уақытын
реттеу» тарауын қараңыз.
5
Растап, пісіруді бастау үшін «бастау» (
СТАРТ/ВЫКЛ
)
түймесін 3 секунд басып тұрыңыз (
j
-сур.) тармағын
таңдаңыз.
6
Пісіру аяқталғанда, құрылғы дыбыстық сигнал шығарып,
жылы сақтау режимі автоматты түрде іске қосылады.
Демдеп пісіру (Tомить)
1
Ішкі кәстрөлді жақсылап тазалап, ішін жұмсақ шүберекпен
ішін құрғатып сүртіңіз.
2
Ішкі ыдыстың сыртын кептіріп сүртіңіз (
d
-сур.), содан
кейін көп функциялы тағам пісіргішке салыңыз (
e
-сур.).
3
Ашаны қуат розеткасына қосыңыз (
g
-сур.).
4
«Мәзір» (
МЕНЮ
) түймесін басып, «демдеп пісіру» (
Tомить
)
(
s
-сур.) тармағын таңдаңыз.
5
Растап, пісіруді бастау үшін «бастау» (
СТАРТ/ВЫКЛ
)
түймесін 3 секунд басып тұрыңыз (
j
-сур.) тармағын
таңдаңыз.
6
Пісіру аяқталғанда, құрылғы дыбыстық сигнал шығарып,
жылы сақтау режимі автоматты түрде іске қосылады.
Қуыру (жарить)
1
Ішкі ыдыстың сыртын кептіріп сүртіңіз (
d
-сур.), содан
кейін көп функциялы тағам пісіргішке салыңыз (
e
-сур.).
2
Ашаны қуат розеткасына қосыңыз g-сур.).
3
Ішкі кәстрөлге шамалы сұйық май құйыңыз.
4
«Мәзір» (
МЕНЮ
) түймесін басып, «қуыру» (
жарить
)
(
t
-сур.) тармағын таңдаңыз.
5
Растап, пісіруді бастау үшін «бастау» (
СТАРТ/ВЫКЛ
)
түймесін 3 секунд басып тұрыңыз (
j
-сур.).
6
Майды 5 минут қыздырыңыз да, құрамдас бөліктер мен
дәмдеуіштерді ішкі кәстрөлге салыңыз.
7
Қақпағын ашып қойып, құрамдас бөліктерін қалақшамен
үздіксіз араластырып тұрыңыз.
8
Пісіру аяқталғанда, құрылғы дыбыстық сигнал шығарып, күту
режиміне автоматты түрде ауысады.
Қақтап пісіру (запекать)
1
Құрамдас бөліктерін ішкі кәстрөлге салыңыз.
2
Ішкі ыдыстың сыртын кептіріп сүртіңіз (6-
d
-сур.), содан
кейін көп функциялы тағам пісіргішке салыңыз (
e
-сур.).
3
Көп функциялы тағам пісіргіштің қақпағын жауып (
f
-сур.),
ашаны қуат розеткасына қосыңыз (
g
-сур.).
4
“Мәзір” (
МЕНЮ
) түймесін басып, “қақтап пісіру” (
запекать
)
тармағын таңдаңыз (
u
-сур.).
5
Растап, пісіруді бастау үшін «бастау» (
СТАРТ/ВЫКЛ
)
түймесін 3 секунд басып тұрыңыз (
j
-сур.) тармағын
таңдаңыз.
6
Қыздырып пісірудің 2 кезеңі бар. Бірінші кезең (шамамен 35
минут) аяқталғаннан кейін қақпақты ашып, ішкі кәстрөлдегі
тағамды аударыстыру туралы ескерту үшін тағам пісіргіш әр
30 секунд сайын 5 рет қысқа дыбыс береді.
»
экранда жыпылықтайды.
7
Екінші кезеңді бастау үшін “мәзір” (
МЕНЮ
) түймесін
басыңыз.
»
Егер бірінші кезең аяқталғаннан кейін 5 минут ішінде
мәзір (
МЕНЮ
) түймесін баспасаңыз, тағам пісіргіш
жылы сақтау режіміне ауысады.
8
Пісіру аяқталғанда, құрылғы дыбыстық сигнал шығарып, күту
режиміне автоматты түрде ауысады.
Пеш ішінде пісіру (печь)
1
Пеште пісірілетін құрамдас бөліктерді ішкі кәстрөлге
салыңыз.
2
Ішкі ыдыстың сыртын кептіріп сүртіңіз (
d
-сур.), содан
кейін көп функциялы тағам пісіргішке салыңыз (
e
-сур.).
3
Көп функциялы тағам пісіргіштің қақпағын жауып (
f
-сур.),
ашаны қуат розеткасына қосыңыз (
g
-сур.).
Есте сақтаңыз
•
Торт немесе нан пісірген кезде, қақпақты жауып қойыңыз.
Тортты 130°C-та және 45 минут пісіру әдетте жақсы пісіру
нәтижесін береді.
•
Егер басқа тағамды 140°C-тан артық температурада пісіретін
болсаңыз, қақпағын ашып қойыңыз.
4
“Мәзір” (
МЕНЮ
) түймесін басып, “пеш ішінде пісіру” (
печь
)
тармағын таңдаңыз (
v
-сур.).
3
Put the plug in the power socket (fig.
g
).
4
Touch “menu” (
МЕНЮ
) to select “simmer” (
Tомить
)
(fig.
s
).
»
To choose a different cooking time, refer to chapter
“Setting up the cooking time”.
5
Touch and hold “start”
(СТАРТ/ВЫКЛ
) for 3 seconds to
confirm and start cooking (fig.
j
).
6
When the cooking is finished, the appliance beeps and turns
into warm keeping automatically.
Frying (жарить)
1
Wipe the outside of the inner pot dry (fig.
d
), and then put it
in the multicooker (fig.
e
).
2
Put the plug in the power socket (fig.
g
).
3
Pour some cooking oil into the inner pot.
4
Touch “menu” (
МЕНЮ
) to select “fry” (
жарить
) (fig.
t
).
5
Touch and hold “start”
(СТАРТ/ВЫКЛ
) for 3 seconds to
confirm and start cooking (fig.
j
).
6
Let the cooking oil heat up for 5 minutes, and then put the
ingredients and seasonings into the inner pot.
7
Keep the lid open and stir the ingredients constantly with a
spatula.
8
When the cooking is finished, the appliance beeps and turns
into standby automatically.
Roasting (запекать)
1
Put ingredients into the inner pot.
2
Wipe the outside of the inner pot dry (fig.
d
), and then put it
in the multicooker (fig.
e
).
3
Close the lid of the multicooker (fig.
f
), and put the plug in
the power socket (fig.
g
).
4
Touch “menu” (
МЕНЮ
) to select “roast” (
запекать
) (fig.
u
).
5
Touch and hold “start”
(СТАРТ/ВЫКЛ
) for 3 seconds to
confirm and start cooking (fig.
j
).
6
There are 2 stages of roasting. When the first stage (about
35 minutes) is over, the multicooker beeps 5 times every 30
seconds as a reminder for you to open the lid, and turn the
food over in the inner pot.
»
flashes on the screen.
7
Touch “menu” (
МЕНЮ
) to start the second stage.
»
If menu (
МЕНЮ
) is not touched within 5 minutes after
the first stage is over, the multicooker will turn into warm
keeping.
8
When the cooking is finished, the appliance beeps and turns
into standby automatically.
Baking (печь)
1
Put the ingredients to bake in the inner pot.
2
Wipe the outside of the inner pot dry (fig.
d
), and then put it
in the multicooker (fig.
e
).
3
Close the lid of the multicooker (fig.
f
), and put the plug in
the power socket (fig.
g
).
Note
•
When baking cake or bread, keep the lid closed during cooking.
Baking cake at 130°C and by 45 minutes usually delivers best
cooking result.
•
If you bake other food with a temperature above 140°C, keep the
lid open.
4
Touch “menu” (
МЕНЮ
) to select “bake” (
печь
) (fig.
v
).
»
To choose a different baking temperature, refer to chapter
“Setting up the cooking temperature”.
»
To choose a different cooking time, refer to chapter
“Setting up the cooking time”.
5
Touch and hold “start” (
СТАРТ/ВЫКЛ
) for 3 seconds to
confirm and start cooking (fig.
j
).
6
When the cooking is finished, the appliance beeps and turns
into warm keeping automatically.
Note
•
If the baking temperature is set below 80°C, when the cooking is
finished, the appliance turns into standby automatically.
•
When removing the inner pot from the multicooker after cooking,
use a kitchen glove or a cloth, as the inner pot could be very hot.
Making jelly meat (холодец)
1
Put the ingredients for the jelly meat in the inner pot.
2
Wipe the outside of the inner pot dry (fig.
d
), and then put it
in the multicooker (fig.
e
).
3
Close the lid of the multicooker (fig.
f
), and put the plug in
the power socket (fig.
g
).
4
Touch “menu” (
МЕНЮ
) to select “jelly meat” (
холодец
)
(fig.
w
).
»
To choose a different cooking time, refer to chapter
“Setting up the cooking time”.
5
Touch and hold “start” (
СТАРТ/ВЫКЛ
) for 3 seconds to
confirm and start cooking (fig.
j
).
6
When the cooking is finished, the appliance beeps and turns
into warm keeping automatically.
Note
•
displays on the screen before the water/liquid is brought
to boil. When the water/liquid starts boiling, the set cooking time
displays on the screen.
Making yogurt (йогурт) or sour milk
(кефир)
1
Mix the ingredients for the yogurt or sour milk well and put
them in the inner pot.
2
Wipe the outside of the inner pot dry (fig.
d
), and then put it
in the multicooker (fig.
e
).
3
Close the lid of the multicooker (fig.
f
), and put the plug in
the power socket (fig.
g
).
4
Touch “menu” (
МЕНЮ
) to select “yogurt” (
йогурт
) (fig.
x
)
or “sour milk” (
кефир
) (fig.
y
).
»
To choose a different cooking time, refer to chapter
“Setting up the cooking time”.
5
Touch and hold “start” (
СТАРТ/ВЫКЛ
) for 3 seconds to
confirm and start cooking (fig.
j
).
6
When the cooking is finished, the appliance beeps and turns
into standby automatically.
Reheating (разогреть)
1
Loosen the food and evenly distribute it in the inner pot.
2
Pour some water onto the food to prevent it from becoming
too dry. The quantity of the water depends on the amount of
food.
3
Wipe the outside of the inner pot dry (fig.
d
), and then put it
in the multicooker (fig.
e
).
4
Close the lid of the multicooker (fig.
f
), and put the plug in
the power socket (fig.
g
).
5
Touch “menu” (
МЕНЮ
) to select “reheat” (
разогреть
)
(fig.
z
).
»
To choose a different cooking time, refer to chapter
“Setting up the cooking time”.
6
Touch and hold “start” (
СТАРТ/ВЫКЛ
) for 3 seconds to
confirm and start cooking (fig.
j
).
7
When the cooking is finished, the appliance beeps and turns
into warm keeping automatically.
Manual (мультиповар)
You may use the manual mode to cook food with more control over
the cooking time and temperature.
1
Put ingredients into the inner pot.
2
Wipe the outside of the inner pot dry (fig.
d
), and then put it
in the multicooker (fig.
e
).
3
Close the lid of the multicooker (fig.
f
), and put the plug in
the power socket (fig.
g
).
4
Touch “menu” (
МЕНЮ
) to select “manual” (
мультиповар
)
(fig.
{
).
»
To choose a different baking temperature, refer to chapter
“Setting up the cooking temperature”.
»
To choose a different cooking time, refer to chapter
“Setting up the cooking time”.
5
Touch and hold “start” (
СТАРТ/ВЫКЛ
) for 3 seconds to
confirm and start cooking (fig.
j
).
6
When the cooking is finished, the appliance beeps and turns
into warm keeping automatically.
Note
•
If you select a temperature below 80°C, the multicooker
automatically turns into standby after the cooking process is finished.
•
If you select a temperature above 140°C, the top lid must be open
during cooking.
Multicook Pro (Мультиповар Pro)
With the multicook Pro function, you can set up to 9 stages of
cooking with different time and temperature.
For example, you can set the first stage for 5 minutes at 160°C,
the second stage for 10 minutes at 100°C and the last stage for 20
minutes at 80°C.
1
When the multicooker is at standby mode, touch “multicook
Pro” (
Мультиповар Pro
). (fig.
|
)
»
“
1
” lights up on the screen.
2
Refer to chapter “Setting up the cooking time” and select the
cooking time for stage 1.
3
Refer to chapter “Setting up the cooking temperature” and
select the cooking temperature for stage 1.
4
Touch “multicook Pro” (
мультиповар Pro
) again and move to
stage 2. (fig.
}
)
»
“
2
” lights up on the screen.
5
Set the cooking time and temperature for stage 2.
6
Repeat the above steps until you have set all the stages
you need, and touch and hold “start” (
СТАРТ/ВЫКЛ
) for
3 seconds to confirm and start cooking (fig.
j
).
Note
•
The total cooking time for all the cooking stages you have set has a
maximum limitation of 24 hours.
»
Пешке пісірудің басқа уақытын орнату үшін «Пісіру
уақытын реттеу» тарауын қараңыз.
»
Басқа пісіру уақытын орнату үшін «Пісіру уақытын
реттеу» тарауын қараңыз.
5
Растап, пісіруді бастау үшін «бастау» (
СТАРТ/ВЫКЛ
)
түймесін 3 секунд басып тұрыңыз (
j
-сур.) тармағын
таңдаңыз.
6
Пісіру аяқталғанда, құрылғы дыбыстық сигнал шығарып,
жылы сақтау режимі автоматты түрде іске қосылады.
Есте сақтаңыз
•
Егер пісіру температурасы 80°C-тан төмен орнатылса, тағам
піскен кезде құрылғы күту режіміне автоматты түрде ауысады.
•
Тағамды пісіргеннен кейін тағам пісіргіштен ішкі кәстрөлді алған
кезде аспаз қолғабын немесе шүберекті пайдаланыңыз, себебі
ішкі кәстрөл өте ыстық болуы мүмкін.
Іркілдек дайындау (холодец)
1
Іркілдектің құрамдас бөліктерін ішкі кәстрөлге салыңыз.
2
Ішкі ыдыстың сыртын кептіріп сүртіңіз (
d
-сур.), содан кейін
көп функциялы тағам пісіргішке салыңыз (
e
-сур.).
3
Көп функциялы тағам пісіргіштің қақпағын жауып (
f
-сур.),
ашаны қуат розеткасына қосыңыз (
g
-сур.).
4
“Мәзір” (
МЕНЮ
) түймесін басып, “іркілдек” (
холодец
)
тармағын таңдаңыз (
w
-сур.).
»
Басқа пісіру уақытын орнату үшін «Пісіру уақытын
реттеу» тарауын қараңыз.
5
Растап, пісіруді бастау үшін «бастау» (
СТАРТ/ВЫКЛ
)
түймесін 3 секунд басып тұрыңыз (
j
-сур.) тармағын
таңдаңыз.
6
Пісіру аяқталғанда, құрылғы дыбыстық сигнал шығарып,
жылы сақтау режимі автоматты түрде іске қосылады.
Есте сақтаңыз
•
су/сұйықтық қайнардың алдында экранда көрсетіледі. Су/
сұйықтық қайнай бастағанда пісіру уақыты экранда көрсетіледі.
Йогурт (йогурт) немесе айран
(кефир) дайындау
1
Йогурттың немесе айранның құрамдас бөліктерін жақсылап
араластырып, ішкі кәстрөлге салыңыз.
2
Ішкі ыдыстың сыртын кептіріп сүртіңіз (
d
-сур.), содан кейін
көп функциялы тағам пісіргішке салыңыз ( e-сур.).
3
Көп функциялы тағам пісіргіштің қақпағын жауып (
f
-сур.),
ашаны қуат розеткасына қосыңыз (
g
-сур.).
4
“Мәзір” (
МЕНЮ
) түймесін басып, “йогурт” (
йогурт
)
(
x
-сур.) немесе “айран” (
кефир
) (
y
-сур.) тармағын
таңдаңыз.
»
Басқа пісіру уақытын орнату үшін «Пісіру уақытын
реттеу» тарауын қараңыз.
5
Растап, пісіруді бастау үшін «бастау» (
СТАРТ/ВЫКЛ
)
түймесін 3 секунд басып тұрыңыз (
j
-сур.) тармағын
таңдаңыз.
6
Пісіру аяқталғанда, құрылғы дыбыстық сигнал шығарып, күту
режиміне автоматты түрде ауысады.
Жылыту (разогреть)
1
Суыған тағамды қопсытып, ішкі кәстрөлге біркелкі етіп
салыңыз.
2
Қатты құрғақ болмауы үшін тағамға біраз су құйыңыз. Судың
мөлшері тағамның көлеміне байланысты болады.
3
Ішкі ыдыстың сыртын кептіріп сүртіңіз (
d
-сур.), содан кейін
көп функциялы тағам пісіргішке салыңыз (
e
-сур.).
4
Көп функциялы тағам пісіргіштің қақпағын жауып (
f
-сур.),
ашаны қуат розеткасына қосыңыз (
g
-сур.).
5
“Мәзір” (
МЕНЮ
) түймесін басып, “жылыту” (
разогреть
)
тармағын таңдаңыз (
z
-сур.).
»
Басқа пісіру уақытын орнату үшін «Пісіру уақытын
реттеу» тарауын қараңыз.
6
Растап, пісіруді бастау үшін «бастау» (
СТАРТ/ВЫКЛ
)
түймесін 3 секунд басып тұрыңыз (
j
-сур.) тармағын
таңдаңыз.
7
Пісіру аяқталғанда, құрылғы дыбыстық сигнал шығарып,
жылы сақтау режимі автоматты түрде іске қосылады.
Көп функциялы аспаз (мультиповар)
Пісіру уақыты мен температурасын көбірек бақылап тағам пісіру
үшін қолмен орындау режимін пайдалана аласыз.
1
Құрамдас бөліктерін ішкі кәстрөлге салыңыз.
2
Ішкі ыдыстың сыртын кептіріп сүртіңіз (
d
-сур.), содан кейін
көп функциялы тағам пісіргішке салыңыз (
e
-сур.).
3
Көп функциялы тағам пісіргіштің қақпағын жауып (
f
-сур.),
ашаны қуат розеткасына қосыңыз (
g
-сур.).
4
“Мәзір” (
МЕНЮ
) түймесін басып, “көп функциялы аспаз”
(
мультиповар
) тармағын таңдаңыз (
{
-сур.).
»
Пешке пісірудің басқа уақытын орнату үшін «Пісіру
уақытын реттеу» тарауын қараңыз.
»
Басқа пісіру уақытын орнату үшін «Пісіру уақытын
реттеу» тарауын қараңыз.
5
Растап, пісіруді бастау үшін «бастау» (
СТАРТ/ВЫКЛ
)
түймесін 3 секунд басып тұрыңыз (
j
-сур.) тармағын
таңдаңыз.
6
Пісіру аяқталғанда, құрылғы дыбыстық сигнал шығарып,
жылы сақтау режимі автоматты түрде іске қосылады.
Есте сақтаңыз
•
Егер 80°C-тан төмен температураны таңдасаңыз, пісіру
аяқталғаннан кейін тағам пісіргіш күту режіміне автоматты түрде
ауысады.
•
Егер 140°C-тан жоғары температураны таңдасаңыз, онда пісіру
кезінде үстіңгі қақпақ ашық болуы тиіс.
Көп функциялы азпаз Pro
(Мультиповар Pro)
Көп функциялы аспаз Pro функциясы арқылы сіз әр түрлі уақыт
пен температураны таңдай отырып, 9 пісіру кезеңіне дейін орната
аласыз.
Мысалы, бірінші кезеңді 160°C-та 5 минутқа, екінші кезеңді 100°C-
та 10 минутқа және соңғы кезеңді 80°C-та 20 минутқа орната
аласыз.
1
Тағам пісіргіш күту режімінде болғанда, "көп функциялы
аспаз Pro" (
Мультиповар Pro
) түймесін басыңыз.
(
|
-сур.)
»
Экранда “
1
” жанады.
2
"Пісіру уақытын орнату" тарауын қарап, 1-кезең үшін пісіру
уақытын таңдаңыз.
3
"Пісіру температурасын орнату" тарауын қарап, 1-кезең үшін
пісіру температурасын таңдаңыз.
4
"Көп функциялы аспаз Pro" (
мультиповар Pro
) түймесін
қайта басып, 2-кезеңге өтіңіз. (
}
-сур.)
»
Экранда “
2
” жанады.
5
2-кезең үшін пісіру уақыты мен температурасын орнатыңыз.
6
Барлық қажетті кезеңдерді орнату үшін жоғарыда
көрсетілген қадамдарды қайталаңыз, содан кейін пісіруді
растап, бастау үшін "қосу" (
СТАРТ/ВЫКЛ
) түймесін 3 секунд
бойы басып тұрыңыз (
j
-сур.) тармағын таңдаңыз.
Есте сақтаңыз
•
Барлық орнатылған пісіру кезеңдерінің жалпы пісіру уақыты ең
көбі 24 сағат болады.
Жылы күйінде ұстау
Көп функциялы тағам пісіргіш жылы сақтау режимін оңай
басқаруға мүмкіндік береді.
•
Пісіру функциясын таңдау үшін “мәзір” (
МЕНЮ
) түймесін
басқаннан кейін "қосу" (
СТАРТ/ВЫКЛ
) түймесін 3 секунд бойы
ұстап тұрсаңыз, жылы күйінде ұстау индикаторы жанады. Пісіру
уақыты аяқталғаннан кейін, көп функциялы тағам пісіргіш жылы
сақтау режиміне тікелей ауысады.
•
Пісіру функциясын таңдау үшін "Мәзір" (
МЕНЮ
) түймесін
басқаннан кейін, егер алдымен "жылы күйінде ұстау"
(
ПОДОГРЕВ
) түймесін басып, содан кейін "қосу" (
СТАРТ/
ВЫКЛ
) түймесін 3 секунд бойы ұстап тұрсаңыз, жылы күйінде
ұстау индикаторы сөнеді. Пісіру уақыты аяқталғаннан кейін, көп
функциялы тағам пісіргіш күту режимінде болады.
Есте сақтаңыз
•
Құрылғы жылы күйінде ұстап тұру режіміне ауысқаннан кейін осы
режимде 12 сағат болады, содан кейін қысқа дыбыс беріп, жылы
күйінде ұстауды тоқтатады.
•
Күту режімінде болғанда, жылы күйінде ұстау режімін іске
қосу үшін
"
жылы күйінде ұстау
"
(
ПОДОГРЕВ
) түймесін басуға
болады. Жылы күйінде ұстаудың барлық уақыты экранда
көрінеді. Құрылғы 24 сағат бойы жылы күйінде ұстау режимінде
болады да, содан кейін қысқа дыбыс беріп, жылы күйінде ұстауды
тоқтатады.
•
Жылы күйінде ұстау режимінде
"
жылы күйінде ұстау
"
(
ПОДОГРЕВ
) түймесін басып, күту режиміне ауыстыруға
болады.
Пісіру уақытын орнату
Кейбір мәзірлер үшін пісіру уақытын бейімдеуге болады. "Мәзірге
шолу" тарауын қарап, қандай мәзірлердің уақытын реттеуге
болатынын және реттеу ауқымын қараңыз.
1
Қажетті пісіру мәзірін таңдаңыз.
2
"Пісіру уақыты” (
ВРЕМЯ ПРИГОТОВЛЕНИЯ
) түймесін
басыңыз (
~
-сур.).
»
Сағат көрсеткіші дисплейде жыпылықтайды.
3
Сағат көрсеткішін орнату үшін "көбейту" немесе "азайту" (
-
)
түймелерін басыңыз (
-сур.).
4
Сағат көрсеткіші орнатылғаннан кейін "пісіру уақыты"
(
ВРЕМЯ ПРИГОТОВЛЕНИЯ
) түймесін қайтадан басыңыз
(
€
-сур.).
»
Минут көрсеткіші дисплейде жыпылықтайды.
5
Минут көрсеткішін орнату үшін "көбейту" немесе "азайту" (
-
)
түймелерін басыңыз (
-сур.).
6
Растап, пісіруді бастау үшін «бастау» (
СТАРТ/ВЫКЛ
)
түймесін 3 секунд басып тұрыңыз (
j
-сур.) тармағын
таңдаңыз.
Есте сақтаңыз
•
Егер тағам пісіргіш "пісіру уақыты" (
ВРЕМЯ ПРИГОТОВЛЕНИЯ
)
басылғаннан кейін 15 секунд бойы ешбір әрекет жасалмаса, ол
күту режіміне ауысады.
•
Ең ұзақ пісіру уақыты 1 сағаттан аспайтын мәзірлер үшін "пісіру
уақыты" (
ВРЕМЯ ПРИГОТОВЛЕНИЯ
) түймесін бірінші рет
басқан кезде минут көрсеткіші дисплейде жыпылықтай бастайды.
Кідіртілген пісіру үшін уақытты алдын
ала орнату
Кейбір пісіру мәзірлері үшін кідіртілген пісіру уақытын алдын ала
орната аласыз. "Мәзірге шолу" тарауын қарап, қандай мәзірлерді
алдын ала орнатуға болатынын қараңыз.
1
Қажетті пісіру мәзірін таңдаңыз.
2
"Уақытты алдын ала орнату" (
ОТСРОЧКА
) түймесін
басыңыз. (
‚
-сур.)
»
Сағат көрсеткіші дисплейде жыпылықтайды.
3
Сағат көрсеткішін орнату үшін "көбейту" немесе "азайту" (
-
)
түймелерін басыңыз (
ƒ
-сур.).
4
Сағат көрсеткіші орнатылғаннан кейін “уақытты алдын
ала орнату” (
ОТСРОЧКА
) түймесін қайтадан басыңыз
(
„
-сур.).
»
Минут көрсеткіші дисплейде жыпылықтайды.
5
Минут көрсеткішін орнату үшін "көбейту" немесе "азайту" (
-
)
түймелерін басыңыз (
…
-сур.).
6
Растап, пісіруді бастау үшін «бастау» (
СТАРТ/ВЫКЛ
)
түймесін 3 секунд басып тұрыңыз (
j
-сур.) тармағын
таңдаңыз.
Есте сақтаңыз
•
Егер тағам пісіргіш "уақытты алдын ала орнату" (
ОТСРОЧКА
)
басылғаннан кейін 15 секунд бойы ешбір әрекет жасалмаса, ол
күту режіміне ауысады.
•
Алдын ала орнатылған уақыт өткен кезде, пісіру аяқталады.
Мысалы, сіз таңертең сағат 10:00-де алдын ала орнатылған
уақытты 8 сағат деп көрсетсеңіз, пісіру 8 сағаттан кейін, кешкі
сағат 18:00-де аяқталады.
Пісіру температурасын орнату
Кейбір мәзірлер үшін пісіру температурасын бейімдеуге
болады. "Мәзірге шолу" тарауын қарап, қандай мәзірлердің
температурасын реттеуге болатынын және реттеу ауқымын
қараңыз.
1
Қажетті пісіру мәзірін таңдаңыз.
2
“Температура” (
ТЕМП.
) түймесін басыңыз (
†
-сур.).
»
Әдепкі пісіру температурасы экранда көрінеді.
3
Пісіру температурасын орнату үшін "көбейту" немесе
"азайту" (
-
) түймелерін басыңыз (
‡
-сур.).
4
Растап, пісіруді бастау үшін «бастау» (
СТАРТ/ВЫКЛ
)
түймесін 3 секунд басып тұрыңыз (
j
-сур.) тармағын
таңдаңыз.
Есте сақтаңыз
•
Пісіру температурасын орнату үшін "көбейту" немесе "азайту"
түймелерін басудың орнына "температура" (ТЕМП.) түймесін
қайта басып, пісіру температурасын орнатуға болады.
Балалардан қорғау құлпын орнату
Балаларды тағам пісіргішті пайдаланудан қорғау немесе кез келген
қате әрекетті болдырмау үшін пісіру кезінде балалардан қорғау
құлпын қоса аласыз.
Cooking rice (рис) and grain (крупы)
Note
•
If the voltage is unstable at the area you live, it is possible that food
in the multicooker overflows.
•
After the cooking is finished, stir the rice/grain and loosen it
immediately to release excessive moisture for fluffy rice/grain.
•
Depending on the cooking conditions, the bottom portion of the
rice/grain may become slightly browned.
1
Rinse rice, put the washed rice in the inner pot, and fill in water
(fig.
b
).
Note
•
For details about the ratio of rice/grain and water, refer to the recipe
booklet.
2
Press the lid release button to open the lid (fig.
c
).
3
Wipe the outside of the inner pot dry (fig.
d
), and then put it
in the multicooker (fig.
e
).
Note
•
Make sure that the inner pot is in proper contact with the heating
element.
•
Make sure that the outside of the inner pot is clean and dry, and
that there is no foreign residue on the heating element.
4
Close the lid of the multicooker (fig.
f
), and put the plug in
the power socket (fig.
g
).
5
Touch “menu” (
МЕНЮ
) to select “rice” (
рис
) (fig.
h
) or
“grain” (
крупы
) (fig.
i
).
6
Touch and hold “start” (
СТАРТ/ВЫКЛ
) for 3 seconds to
confirm and start cooking (fig.
j
).
7
When the cooking is finished, the appliance beeps and turns
into warm keeping automatically.
Making pilaf (плов)
1
Put the ingredients for the pilaf into the inner pot.
2
Wipe the outside of the inner pot dry (fig.
d
), and then put it
in the multicooker (fig.
e
).
3
Close the lid of the multicooker (fig.
f
), and put the plug in
the power socket (fig.
g
).
4
Touch “menu” (
МЕНЮ
) to select “pilaf” (
плов
) (fig.
k
).
5
Touch and hold “start” (
СТАРТ/ВЫКЛ
) for 3 seconds to
confirm and start cooking (fig.
j
).
6
When the cooking is finished, the appliance beeps and turns
into warm keeping automatically.
Cooking porridge (каша)
1
Put ingredients for the porridge into the inner pot and stir a
little bit.
2
Wipe the outside of the inner pot dry (fig.
d
), and then put it
in the multicooker (fig.
e
).
3
Close the lid of the multicooker (fig.
f
), and put the plug in
the power socket (fig.
g
).
4
Touch “menu” (
МЕНЮ
) to select “porridge” (
каша
) (fig.
l
).
»
To choose a different cooking time, refer to chapter
“Setting up the cooking time”.
5
Touch and hold “start” (
СТАРТ/ВЫКЛ
) for 3 seconds to
confirm and start cooking (fig.
j
).
6
When the cooking is finished, the appliance beeps and turns
into warm keeping automatically.
Note
•
displays on the screen before the water/liquid is brought
to boil. When the water/liquid starts boiling, the set cooking time
displays on the screen.
•
For details about the ratio of ingredients and liquid, refer to the
recipe booklet.
Steaming (готовить на пару)
1
Pour some water into the inner pot.
Note
•
To steam vegetable, use 0.2L to 1L water depending on the types
and amount of vegetable; to steam meat, use 0.5L to 2L water
depending on the size and amount of meat.
2
Put the basket in the inner pot, put the food in a bowl, and
then put the bowl on the steam basket.
»
Make sure that not all the steaming holes on the steam
basket are covered by the ingredients, so that hot steam
could flow up from under the steam basket.
3
Wipe the outside of the inner pot dry (fig.
d
), and then put it
in the multicooker (fig.
e
).
4
Close the lid of the multicooker (fig.
f
), and put the plug in
the power socket (fig.
g
).
5
Touch “menu” (
МЕНЮ
) to select “steaming” (
готовить на
пару
) (fig.
m
).
»
To choose a different cooking time, refer to chapter
“Setting up the cooking time”.
6
Touch and hold “start” (
СТАРТ/ВЫКЛ
) for 3 seconds to
confirm and start cooking (fig.
j
).
7
When the cooking is finished, the appliance beeps and turns
into warm keeping automatically.
Note
•
When steaming food, do not immerse the steam basket in water.
•
displays on the screen before the water/liquid is brought
to boil. When the water/liquid starts boiling, the set cooking time
displays on the screen.
•
After the steaming is finished, use a kitchen glove or a cloth to
remove the bowl and steam basket, as they could be very hot.
Boiling (варить)
1
Fill the inner pot with some water.
2
Wipe the outside of the inner pot dry (fig.
d
), and then put it
in the multicooker (fig.
e
).
3
Close the lid of the multicooker (fig.
f
), and put the plug in
the power socket (fig.
g
).
4
Touch “menu” (
МЕНЮ
) to select “boil” (
варить
) (fig.
n
).
»
To choose a different cooking time, refer to chapter
“Setting up the cooking time”.
5
Touch and hold “start” (
СТАРТ/ВЫКЛ
) for 3 seconds to
confirm and start cooking (fig.
j
).
6
When the water is brought to boil, the multicooker beeps as a
reminder for you to open the lid and put the food in the inner
pot.
Note
•
displays on the screen before the water/liquid is brought
to boil. When the water/liquid starts boiling, the set cooking time
displays on the screen.
7
When the cooking is finished, the appliance beeps and turns
into standby automatically.
Making soup (Суп)
1
Put ingredients and water/liquid for the soup into the inner pot.
2
Wipe the outside of the inner pot dry (fig.
d
), and then put it
in the multicooker (fig.
e
).
3
Close the lid of the multicooker (fig.
f
), and put the plug in
the power socket (fig.
g
).
4
Touch “menu” (
МЕНЮ
) to select “soup” (
Суп
) (fig.
o
).
»
To choose a different cooking time, refer to chapter
“Setting up the cooking time”.
5
Touch and hold “start” (
СТАРТ/ВЫКЛ
) for 3 seconds to
confirm and start cooking (fig.
j
).
6
When the cooking is finished, the appliance beeps and turns
into warm keeping automatically.
Making beverage (напитки)
1
Put the ingredients for the beverage in the inner pot.
2
Wipe the outside of the inner pot dry (fig.
d
), and then put it
in the multicooker (fig.
e
).
3
Close the lid of the multicooker (fig.
f
), and put the plug in
the power socket (fig.
g
).
4
Touch “menu” (
МЕНЮ
) to select “beverage” (
напитки
)
(fig.
p
).
»
To choose a different cooking time, refer to chapter
“Setting up the cooking time”.
5
Touch and hold “start” (
СТАРТ/ВЫКЛ
) for 3 seconds to
confirm and start cooking (fig.
j
).
6
When the cooking is finished, the appliance beeps and turns
into warm keeping automatically.
Note
•
displays on the screen before the water/liquid is brought
to boil. When the water/liquid starts boiling, the set cooking time
displays on the screen.
Making stew (тушить) or ragout (рагу)
1
Put the ingredients for the stew or ragout in the inner pot.
2
Wipe the outside of the inner pot dry (fig.
d
), and then put it
in the multicooker (fig.
e
).
3
Close the lid of the multicooker (fig.
f
), and put the plug in
the power socket (fig.
g
).
4
Touch “menu” (
МЕНЮ
) to select “stew” (
тушить
) (fig.
q
) or
“ragout” (
рагу
) (fig.
r
).
»
To choose a different cooking time, refer to chapter
“Setting up the cooking time”.
5
Touch and hold “start” (
СТАРТ/ВЫКЛ
) for 3 seconds to
confirm and start cooking (fig.
j
).
6
When the cooking is finished, the appliance beeps and turns
into warm keeping automatically.
Simmering (Tомить)
1
Clean the inner pot thoroughly and wipe the inside of the pot
dry with a soft cloth.
2
Wipe the outside of the inner pot dry (fig.
d
), and then put it
in the multicooker (fig.
e
).
EN
User manual
KK
Пайдаланушы нұсқаулығы
RU
Руководство пользователя
UK
Посібник користувача


