Микроволновые печи Hansa AMM 20 BIH - инструкция пользователя по применению, эксплуатации и установке на русском языке. Мы надеемся, она поможет вам решить возникшие у вас вопросы при эксплуатации техники.
Если остались вопросы, задайте их в комментариях после инструкции.
"Загружаем инструкцию", означает, что нужно подождать пока файл загрузится и можно будет его читать онлайн. Некоторые инструкции очень большие и время их появления зависит от вашей скорости интернета.


13
EN
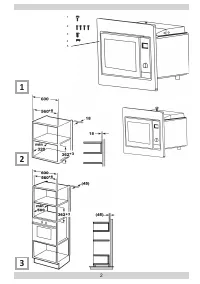
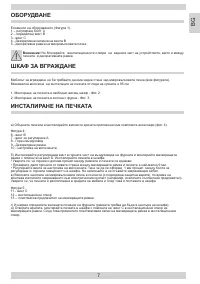
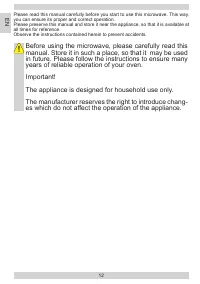
ACCESSORIES
BUILT-IN FURNITURE
The built-in cabinet shall not have a rear wall behind the appliance. Minimum installation height is 85cm. Do not cover
ventilation slots and air intake points.
Electrical connection
The oven is fitted with a plug and must be only connected to a properly installed ear
-
thed socket. In accordance with the appropriate regulations, the socket must only be
installed and the connecting cable must only be replaced by a qualified electrician. If
the plug is no longer accessible following installation and all-pole isolating switch must
be present on the installation side with a contact gap of at least 3mm.
Elements (Fig. 1).
1- ADJUST SCREW A
2- SCREW B
3- SCREW C
4- TRIM-KIT PLASTIC COVER
5- Frame
1. Installation in single furniture niche - Fig. 2.
2. Installation in furniture niche above the oven - Fig. 3.
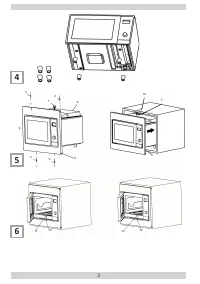
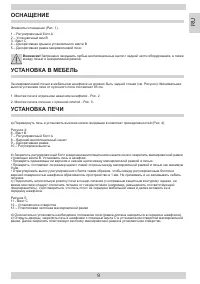
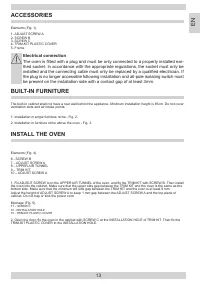
INSTALL THE OVEN
Elements (Fig. 4).
6 - SCREW B
7 – ADJUST SCREW A
8 – UPPER AIR TUNNEL
9 – TRIM KIT
10 – ADJUST SCREW A
1. Fix ADJSUT SCREW A on the UPPER AIR TUNNEL of the oven, and fix the TRIM KIT with SCREW B. Then install
the oven into the cabinet. Make sure that the upper side gap between the TRIM KIT and the oven is the same as the
bottom side. Make sure that the minimum left side gap between the TRIM KIT and the oven is at least 9 mm.
Adjust the height of ADJUST SCREW A to keep 1 mm gap between the ADJUST SCREW A and the top plane of
cabinet. Do not trap or kink the power cord.
Montage (Fig. 5).
11 -
SCREW C
12 - INSTALLATION HOLE
13 - TRIM-KIT PLASTIC COVER
2. Open the door; fix the oven in the cabinet with SCREW C at the INSTALLATION HOLE of TRIM KIT. Then fix the
TRIM-KIT PLASTIC COVER to the INSTALLATION HOLE.


