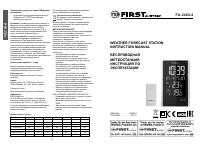
Метеостанции FIRST AUSTRIA FA-2460-2 - инструкция пользователя по применению, эксплуатации и установке на русском языке. Мы надеемся, она поможет вам решить возникшие у вас вопросы при эксплуатации техники.
Если остались вопросы, задайте их в комментариях после инструкции.
"Загружаем инструкцию", означает, что нужно подождать пока файл загрузится и можно будет его читать онлайн. Некоторые инструкции очень большие и время их появления зависит от вашей скорости интернета.
2
3
ENGLISH
FEATURES:
• Perpetual Calendar Up to Year 2099
• Time in 12/24 hour format.
• Daily Alarm Function
• Automatic snooze function
• Temperature alternatively in °C or °F
• Indoor temperature measurement ranges:
-9.9°C (14.1°F) ~ 50°C (122°F)
• Outdoor temperature measurement ranges:
-20°C (-4°F) ~ 60°C (140°F)
• Wireless Outdoor Sensor:
— Wall Mount or Table Stand
— One Wireless Thermo Sensor Included
— 433.92MHz RF transmitting frequency
— 60 meter transmission range in an open
area
• Colorful gradient backlight function (when the
DC power is plugged in, it is effective)
• USB charger function
• Power Supply:
Battery: 2 x LR6 AA
DC-POWER: DC 5.0V 1.2A
APPEARANCE:
MAIN:
EM3536B Manual
Features
:
Perpetual Calendar Up to Year 2099
Time in 12/24 hour format.
Daily Alarm Function
Automatic snooze function
Temperature alternatively in
℃
or
℉
Indoor temperature measurement ranges: -9.9°C (14.1°F) ~ 50°C (122°F)
Outdoor temperature measurement ranges: -20°C (-4°F) ~ 60°C (140°F)
Wireless Outdoor Sensor:
— Wall Mount or Table Stand
— One Wireless Thermo Sensor Included
— 433.92MHz RF transmitting frequency
— 60 meter transmission range in an open area
Colorful gradient backlight function (when the DC power is plugged in, it is effective)
USB charger function
Power Supply:
Battery: 2 x LR6 AA
DC-POWER: DC5.0V 1.2A
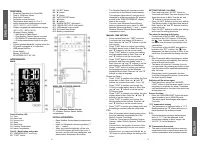
Appearance
:
MAIN
:
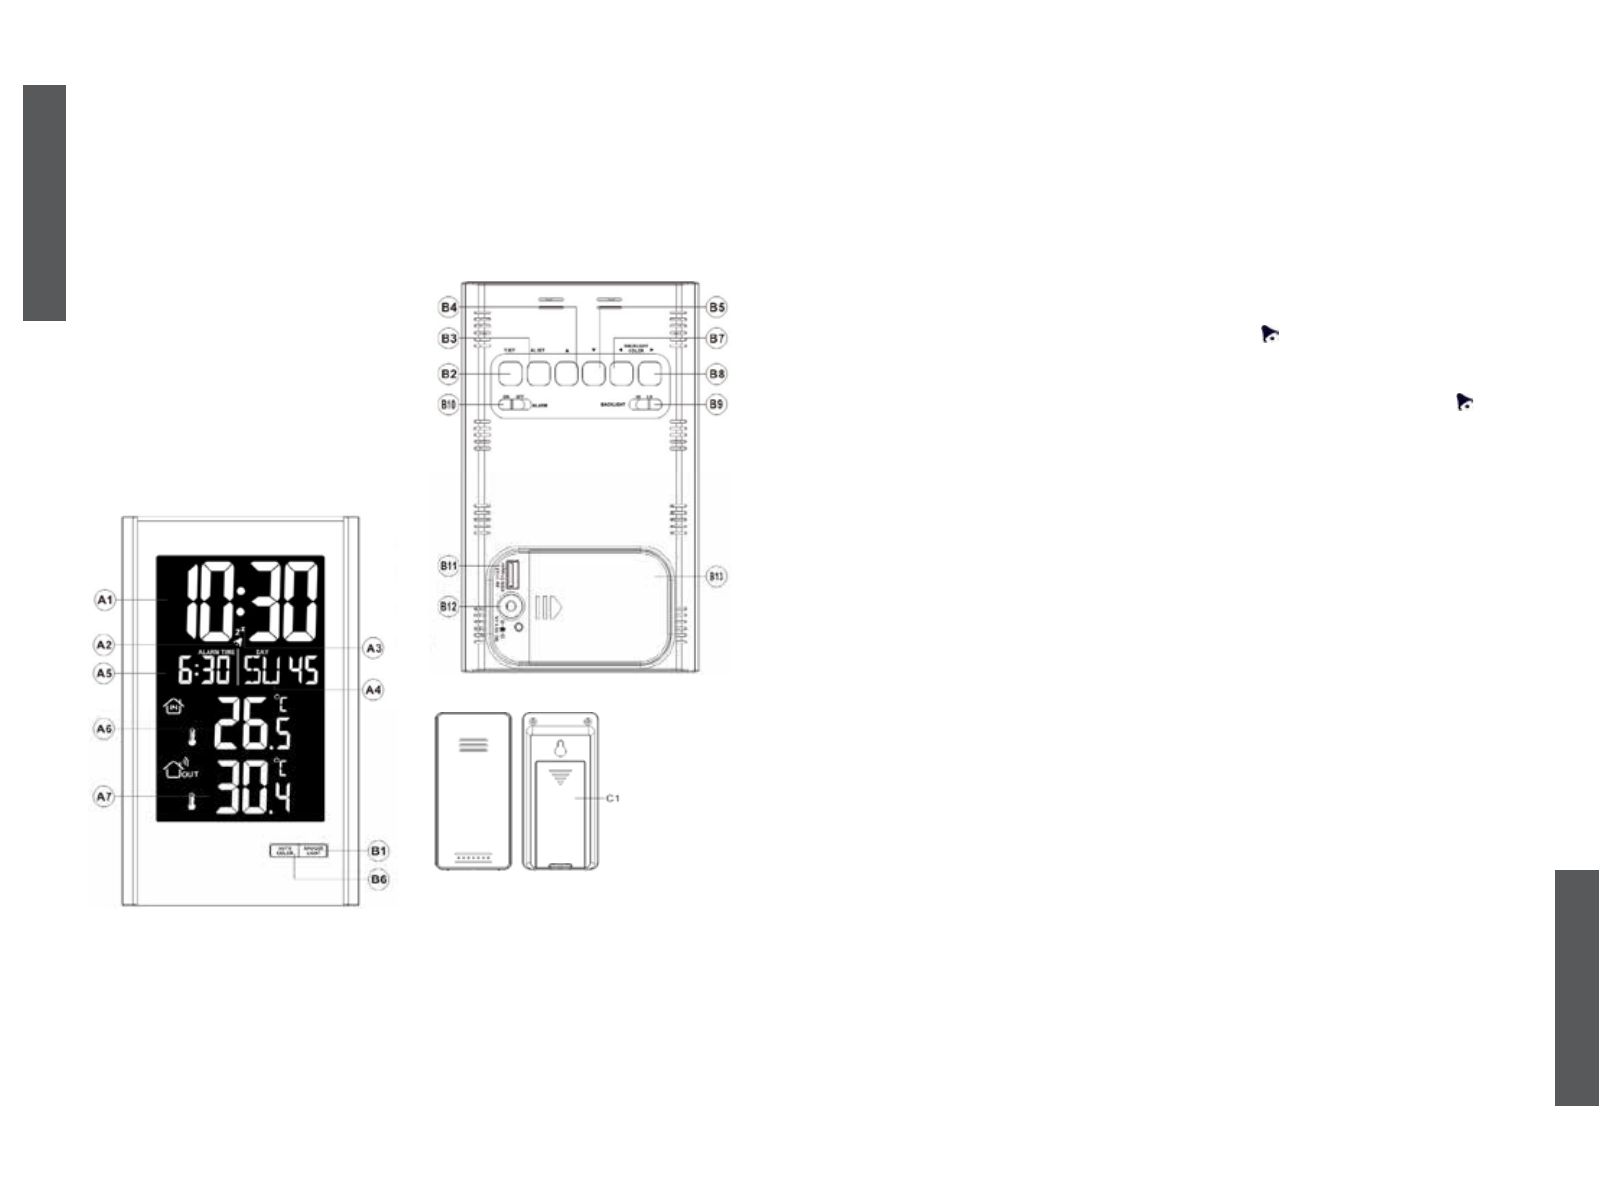
Part A-Positive LCD
A1: Time
A2: Alarm icon
A3: Snooze icon
A4: Week
A5: Alarm time
A7: Outdoor Temperature
A8: Indoor Temperature
Part B – Back button and power
B1: “SNOOZE/LIGHT” touch key
B2: “T.SET” button
B3: “AL.SET” button
B4: “▲” button
B5: “▼” button
B6: “AUTO COLOR” button
B7: “◄” button
B8: “►” button
B9: “ALARM ON/OFF” shift switch
B10: “BACKLIGHT HI/LO” shift switch
B11: USB charger output socket
B12: DC power input socket
B13: Battery compartment
EM3536B Manual
Features
:
Perpetual Calendar Up to Year 2099
Time in 12/24 hour format.
Daily Alarm Function
Automatic snooze function
Temperature alternatively in
℃
or
℉
Indoor temperature measurement ranges: -9.9°C (14.1°F) ~ 50°C (122°F)
Outdoor temperature measurement ranges: -20°C (-4°F) ~ 60°C (140°F)
Wireless Outdoor Sensor:
— Wall Mount or Table Stand
— One Wireless Thermo Sensor Included
— 433.92MHz RF transmitting frequency
— 60 meter transmission range in an open area
Colorful gradient backlight function (when the DC power is plugged in, it is effective)
USB charger function
Power Supply:
Battery: 2 x LR6 AA
DC-POWER: DC5.0V 1.2A
Appearance
:
MAIN
:
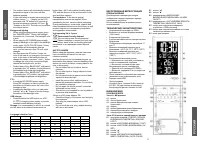
WIRELESS OUTDOOR SENSOR
Part C –Wireless Outdoor Sensor
C1: Wireless Outdoor Sensor battery
compartment
INITIAL OPERATION:
• Open Weather Station battery compartment
cover
• Insert 2 x AA batteries observing polarity [“+”
and “ –“ marks]
• When you insert the batteries, all the icon
on the LCD display will briefly light up for 3
seconds, and you will hear a beep tone, and
detect indoor temperature & humidity.
ENGLISH
• The Weather Station will now start to make
a connection to the Remote remote sensor.
This operation takes about 3 minutes and is
displayed by a flashing reception RF antenna
symbol in the “REMOTE SENSOR” display
area on the receiver.
• This now, open Wireless Remote Sensor
battery compartment cover. Insert 2 x AAA
batteries observing polarity [“+” and “–“ marks].
Replace Wireless Remote Sensor battery
compartment cover.
MANUAL TIME SETTING:
• Press and hold down the “T.SET” button for
2 seconds, the Year display 2014 starts to
flash. Now use “▲” and “▼” buttons to set the
correct year.
• Press “T.SET” button to confirm your setting,
the Month display starts to flash. Now use “▲”
and “▼” buttons to set the correct month.
• Press “T.SET” button to confirm your setting,
the Date display starts to flash. Now use “▲”
and “▼” buttons to set the correct date.
• Press “T.SET” button to confirm your setting,
the Month and Date icon display starts to
flash. Now use “▲” and “▼” buttons to set the
date display on Month/Date or Date/Month.
• Press “T.SET” button to confirm your setting,
the language selection for the Weekday
displays starts to flash. Now use “▲” and “▼”
buttons to select a language.
Please see Table 1
• Press “T.SET” to confirm your setting, the Time
zones start to flash. Now use “▲” and “▼”
buttons set a correct time zone (-12 to +12).
• Press “T.SET” to confirm your setting, the
12/24 hour mode display starts to flash. Now
use “▲” and “▼” buttons to set the correct
12/24 hour mode.
• Press “T.SET” to confirm your setting, the Hour
display starts to flash. Now use “▲” and “▼”
buttons to set the correct hour.
• Press “T.SET” to confirm your setting, the
Minute displays starts to flash. Now use “▲”
and “▼” buttons to set the correct minute.
• Press “T.SET” to confirm your setting and to end
the setting procedures, enter the clock mode.
F.Y.I.:
• After 20 seconds without pressing any button,
the clock switches automatically from Set
Mode to Normal Time Mode.
• There are 7 languages of Weekday: English,
German, Italian, French, Spanish, Dutch and
Danish.
• In the set time, the number of minutes of the
change, automatically from the zero second
forward
• In the set time, you can press hold the “▲” or
“▼” button to quickly change the setting of the
value
SETTING THE DAILY ALARMS:
• Press and hold down “AL.SET” button for
2 seconds until Alarm Time hour display of the
Alarm time starts to flash. Use the “▲” and
“▼” buttons to set the required hour.
• Press “AL.SET” button to confirm your setting.
The Minute display of the Alarm time starts to
flash. Use the “▲” and “▼” buttons to set the
required minute.
• Press “AL.SET” button to confirm your setting
and to end the setting procedure.
The alarm for opening and closing
• Product back of the „ALARM“ shift switch
is pushed in the “ON” position, LCD display
the “ ” icon, the alarm function is open , at
the same time, the alarm time display in the
calendar bar
• Product back of the „ALARM“ shift switch is
pushed in the “OFF” position, the “ ” icon
disappears, the alarm function is close, at the
same time, the calendar bar display calendar
F.Y.I.:
• After 20 seconds without pressing any button
the clock switches automatically from setting
mode to Normal clock mode.
• The alarm will sound for 2 minutes if you do
not deactivate it by pressing any button. In this
case the alarm will be repeated automatically
after 24 hours.
• Rising alarm sound (crescendo, duration:
2 minutes) changes the volume 4 times whilst
the alarm signal is heard.
Switching off the alarm signal
• Press any button except the “SNOOZE/
LIGHT” button to stop the alarm signal. It is not
necessary to reactivate the alarm. It switches
itself automatically to the alarm time which has
already been set.
Snooze function:
• Press the “SNOOZE/LIGHT” button the alarm
signal sounds to get to SNOOZE mode.
The alarm signal sounds again after approx.
5 minutes.
°C/°F temperature display
• The temperature is displayed either in °C/°F.
Briefly pressing the “▼” button allows you to
switch between the individual modes.
F.Y.I.:
• If the temperature reading is below ranges,
the LL.L °C (°F) will be displayed. If the
temperature reading is above ranges, the
HH.H°C (°F) will be displayed.
RF Transmission Procedure:
• The main unit automatically starts receiving
transmission from outdoor thermo sensor for
outdoor temperature after batteries inserted.

