
Машинки для стрижки Vitek VT-2576 - инструкция пользователя по применению, эксплуатации и установке на русском языке. Мы надеемся, она поможет вам решить возникшие у вас вопросы при эксплуатации техники.
Если остались вопросы, задайте их в комментариях после инструкции.
"Загружаем инструкцию", означает, что нужно подождать пока файл загрузится и можно будет его читать онлайн. Некоторые инструкции очень большие и время их появления зависит от вашей скорости интернета.


6
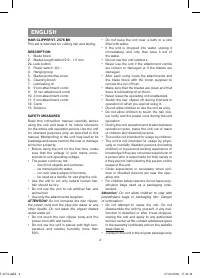
ENGLISH
– The best haircutting results are reached on
dry hair, not wet.
– Comb the hair with a comb (12) to reveal
uneven locks.
– It is better to leave longer hair after cutting
for the first time.
– After learning your clipper better, you will
be able to arrange your hair in any style
you need.
Step 1
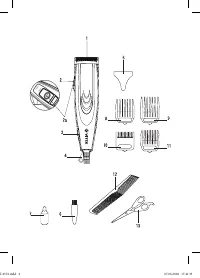
Set the 3 mm attachment comb (10) or 6 mm
attachment comb (11). Switch the unit on using
the power switch (3), setting it to position «I».
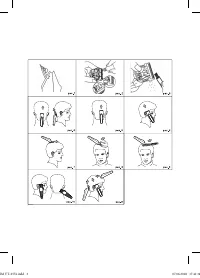
Hold the hair clipper with the blades pointed
upwards. Start cutting from the beginning of the
hair growth. Slowly move the trimmer upwards.
This way cut the head back area at neck bottom
and near the ears (pic. 4, 5, 6).
Step 2
Switch the hair clipper off using the power switch
(3) by setting it to the position «0», unplug the
unit, then set the 9 mm attachment comb (8) for
longer hair or 12 mm attachment comb (9) and
continue cutting hair near top of the head (pic. 7)
Step 3 – cutting in the temples area
Switch the hair clipper off and unplug it, then
set the 3 mm attachment comb (10) or 6 mm
attachment comb (11) and cut hair in the area of
temples. Then set the 9 mm attachment comb
(8) or 12 mm attachment comb (9) and continue
cutting towards the top of the head (pic. 6).
Step 4 – cutting the crown of the head
Using the 9 mm attachment comb (8) or 12 mm
attachment comb (9), cut the hair on the top
of the head towards the crown against the hair
growth direction (pic. 7).
•
You can cut hair against and along the direc-
tion of hair growth, but keep in mind that the
hair cut against the growth will be shorter than
the hair cut along the growth.
•
Use the 3 mm attachment comb (10) and
6 mm attachment comb (11) for very short
haircut. To leave a little longer hair, use the 9
mm attachment comb (8) or 12 mm attach-
ment comb (9).
•
To leave longer hair, grip hair locks between
your fingers and cut the hair off using the
clipper (pic. 8).
•
You can use the comb: lift the hair locks and
cut them with the hair clipper above the comb
(pic. 9).
•
Always start cutting from the head back.
•
Comb the hair to reveal uneven locks.
•
Use the scissors (13) to make haircut even.
Step 5 – the final part
In the final stage of hair cutting remove the
attachment comb from the unit, set the switch (2)
to the position 0.9 mm, turn the blades of the
clipper towards the hair and trim hair on the tem-
ples and neck carefully. Do not press the clipper
strongly, there is danger of injuries or cuts when
open blades come in contact with skin (pic. 10).
Cone-shaped haircut
Set the necessary attachment comb and start
cutting from the head back towards the crown.
Cut the hair against the direction of the growth,
from the front side towards the crown, and from
the sides (pic. 11). To get a flat top haircut, use
the comb: lift the locks and cut them along the
comb. Comb the hair to reveal uneven locks.
Note:
During the breaks between operations,
you can hang the clipper on the hanging loop (4)
having preliminarily switched the unit off with the
power switch (3).
After you finish cutting hair, switch the hair
clipper off setting the power switch (3) to the
position «0» and take the power plug out of
the socket, put the protective cover (5) on the
blades (1).
CLEANING AND CARE
– Switch the unit off using the power switch (3)
and unplug it.
– Remove the blades block (1) (see the chapter
«Lubricating the blade block») and clean the
blades and inside the hair clipper body from
hair, using the brush (6) (pic. 3).
– Clean the hair clipper body and the attach-
ment combs (8-11) with a slightly damp cloth
and then wipe it dry.
– Put the protective cover (5) on the blades
block (1).
IM VT-2576.indd 6
07.06.2018 17:41:34
Содержание
- 9 Не разрешайте детям играть с; Смазка блока лезвий; – Рекомендуется очищать и смазывать
- 10 Напоминание; Шаг первый
- 11 Шаг пятый — заключительная часть; : В перерывах в работе можно; ЧИСТКА И УХОД
- 12 КОМПЛЕКТ ПОСТАВКИ; Машинка для стрижки; ТЕХНИЧЕСКИЕ ХАРАКТЕРИСТИКИ; Не использовать прибор вбли-; УТИЛИЗАЦИЯ; Срок службы устройства – 3 года
- 28 RUS
Характеристики

Остались вопросы?Не нашли свой ответ в руководстве или возникли другие проблемы? Задайте свой вопрос в форме ниже с подробным описанием вашей ситуации, чтобы другие люди и специалисты смогли дать на него ответ. Если вы знаете как решить проблему другого человека, пожалуйста, подскажите ему :)


