
Машинки для стрижки Vitek VT-2511 - инструкция пользователя по применению, эксплуатации и установке на русском языке. Мы надеемся, она поможет вам решить возникшие у вас вопросы при эксплуатации техники.
Если остались вопросы, задайте их в комментариях после инструкции.
"Загружаем инструкцию", означает, что нужно подождать пока файл загрузится и можно будет его читать онлайн. Некоторые инструкции очень большие и время их появления зависит от вашей скорости интернета.


6
ENGLISH
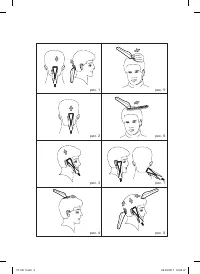
growth. Slowly move the clipper upwards. This
way cut the head back area at neck bottom and
near the ears (pic. 1, 2, 3)
Step two
Switch the unit off using the power switch (1) by
setting it to the “O” position, unplug the unit, then
set the 9 mm attachment comb (8) for longer hair
or 12 mm attachment comb (9) and continue cut-
ting hair near top of the head (pic. 4).
Step three – cutting temples
Switch the hair clipper off and unplug it, then
set the 3 mm attachment comb (6) or 6 mm
attachment comb (7) and cut hair in the area
of the temples. Then set the 9 mm attach-
ment comb (8) or 12 mm attachment comb (9)
and continue cutting towards the top of the head.
Step four – cutting the top of the head
Using the 9 mm attachment comb (8) or 12 mm
attachment comb (9), cut the hair on the top
of the head towards the crown against the hair
growth direction.
•
You can cut hair against and along the direc-
tion of hair growth, but keep in mind that the
hair cut against the growth will be shorter than
the hair cut along the growth.
•
Use the 3 mm attachment comb (6) and
6 mm attachment comb (7) for very short hair-
cut. To leave longer hair, use the necessary
9 mm comb (8) or 12 mm attachment comb (9).
•
To leave longer hair, take hair locks between
your fingers and cut hair using the clipper
(pic. 5).
•
You can use the comb (11): lift the hair locks
and cut them above the comb (pic. 6).
•
Always start cutting from the back of the head.
•
Set the hair with the comb (11) to reveal
uneven locks.
•
Use the scissors (12) to make haircut even
Step 5 – the final part
–
In the final stage of hair cutting, remove the
attachment comb from the hair clipper, turn
the blades of the clipper towards the hair and
trim hair on the temples and neck carefully. Do
not press the clipper strongly, there is danger
of injuries or cuts when open blades come in
contact with the skin (pic. 7)
–
After finishing hair cutting, put the protective
cover (10) on the blades (3, 4).
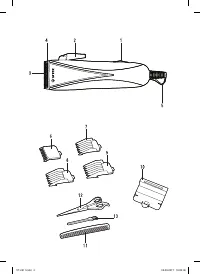
Cone-shaped haircut
Set the necessary attachment comb and start
cutting from the head back towards the crown.
Cut hair against hair growth from the head front
to the crown and on the head sides (pic. 8).
To get a flat top haircut, use the comb (11):
lift the locks and cut them along the comb. Set
the hair with the comb (11) to reveal uneven
locks.
Note:
Between operations, you can hang the
clipper on the hanging loop (5) having prelim-
inarily switched the unit off using the power
switch (1).
CLEANING AND CARE
Lubricating the blades
Regularly lubricate the blades using oil for hair
clipper blades.
–
Switch the unit off using the power switch (1)
and unplug it.
–
Apply one–two drops of oil on the teeth
of the blades (3, 4) and the back side of
the upper blade (4), switch the unit on
and make sure that the blades are moving
smoothly.
–
Switch the unit off; clean the excess oil with
a dry cloth.
Attention!
To lubricate the blades, use only spe-
cial oil for hair clipper blades.
DO NOT USE vegetable oil, fat, oil mixed with any
solvents for lubricating.
Solvents will evaporate, leaving thick grease that
may slow down the blades motion.
Cleaning the hair clipper
–
Switch off and unplug the unit.
–
Clean the blades from hair, using the clean-
ing brush (13).
–
Wipe the accessories and the unit body with
a slightly wet cloth, and then dry them with a
soft cloth.
–
Put the protective cover (10) on the blades
(3, 4).
–
Do not immerse the unit into water or any
other liquid.
–
Do not use solvents or abrasives for clean-
ing the unit.
VT-2511.indd 6
05.09.2017 18:05:37
Характеристики

Остались вопросы?Не нашли свой ответ в руководстве или возникли другие проблемы? Задайте свой вопрос в форме ниже с подробным описанием вашей ситуации, чтобы другие люди и специалисты смогли дать на него ответ. Если вы знаете как решить проблему другого человека, пожалуйста, подскажите ему :)


