Машинки для стрижки Remington PG2000 - инструкция пользователя по применению, эксплуатации и установке на русском языке. Мы надеемся, она поможет вам решить возникшие у вас вопросы при эксплуатации техники.
Если остались вопросы, задайте их в комментариях после инструкции.
"Загружаем инструкцию", означает, что нужно подождать пока файл загрузится и можно будет его читать онлайн. Некоторые инструкции очень большие и время их появления зависит от вашей скорости интернета.


7
ENGLISH
3. Hold the trimmer to the base of your neck with the blade facing up. Move the trimmer
up the neck until it touches your index finger which is protecting the hair roots.
4. Move your trimmer slowly and keep the hair roots at the base of your head out of the
way of the trimmer.
DETAILED NOSE, EYEBROW AND EAR HAIR TRIMMING
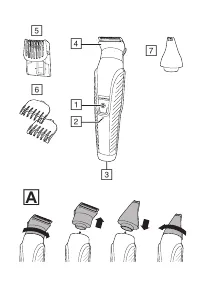
Attachments
Nose, ear and eyebrow trimmer
Nose and ear:
1. Fit the nose, ear and eyebrow trimmer.
2. Insert the attachment gently into the nostril or ear.
3. Gently move the attachment in and out while rotating the groomer at the same time.
•
Don’t insert the attachment more than 6 mm into the nostril or ear.
•
Wash the attachment after each use.
Eyebrow:
1. Carefully guide the attachment to remove any stray or longer hairs from the eybrow.
2. To completely remove hairs, let the attachment touch the skin then move over the
desired area.
CARE FOR YOUR GROOMER
Care for your product to ensure a long lasting performance. We recommend that you clean
your groomer after each use.
AFTER EACH USE
•
Brush any accumulated hairs from the groomer and attachment heads.
•
The easiest and most hygienic way to clean the groomer is by detaching the head from
the groomer body and rinsing the head with warm water.
•
The groomer body should not be rinsed.
•
Place one or two drops of cutter oil or sewing machine oil on the blades.
•
Turn the clipper on to distribute the oil evenly, wipe off any excess oil.
BATTERY REMOVAL
We strongly recommend that a professional removes the rechargeable battery. Parts of
the shaver case, and tools have sharp edges and may cause injury if not handled correctly.
•
The rechargeable battery must be removed from the appliance before it is scrapped.
•
Disconnect the charging adapter before removing the battery.
1. Ensure that the battery is fully discharged. To do this, operate the shaver until it stops.
2. Unplug the trimmer.
3. Using a suitable tool, carefully pry apart the front and rear halves of the case at the
joint line.
GB
DE
NL
FR
ES
IT
DK
SE
FI
NO
PT
SK
CZ
PL
HU
RU
TR
RO
GR
SI
HR
UA
BG
AE
Содержание
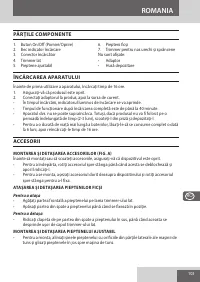
- 90 УСТАНОВКА И СНЯТИЕ ФИКСИРОВАННЫХ НАПРАВЛЯЮЩИХ НАСАДОК; Чтобы надеть насадку
- 91 Чтобы снять насадку; УСТАНОВКА И СНЯТИЕ РЕГУЛИРУЕМОЙ НАСАДКИ-ГРЕБНЯ; ИНСТРУКЦИИ ПО ЭКСПЛУАТАЦИИ; СТРИЖКА «ТРЕХДНЕВНАЯ ЩЕТИНА» И ПОДСТРИГАНИЕ ВОЛОС НА ТЕЛЕ; Насадки
- 92 ПОДРЕЗАНИЕ ВОЛОС
- 93 ОФОРМЛЕНИЕ КОНТУРА И КОРОТКАЯ СТРИЖКА; ТЩАТЕЛЬНОЕ ПОДРАВНИВАНИЕ БРОВЕЙ, ВОЛОС В НОСУ И УШАХ
- 94 ЕДВА ЗАМЕТНАЯ ЩЕТИНА И ВЫСОКОТОЧНОЕ ПОДРАВНИВАНИЕ; УХОД ЗА ТРИММЕРОМ; ПОСЛЕ КАЖДОГО ИСПОЛЬЗОВАНИЯ; ИЗВЛЕЧЕНИЕ БАТАРЕИ
- 95 ПОВТОРНАЯ ПЕРЕРАБОТКА
Характеристики

Остались вопросы?Не нашли свой ответ в руководстве или возникли другие проблемы? Задайте свой вопрос в форме ниже с подробным описанием вашей ситуации, чтобы другие люди и специалисты смогли дать на него ответ. Если вы знаете как решить проблему другого человека, пожалуйста, подскажите ему :)


