
Машинки для стрижки Remington HC9700 - инструкция пользователя по применению, эксплуатации и установке на русском языке. Мы надеемся, она поможет вам решить возникшие у вас вопросы при эксплуатации техники.
Если остались вопросы, задайте их в комментариях после инструкции.
"Загружаем инструкцию", означает, что нужно подождать пока файл загрузится и можно будет его читать онлайн. Некоторые инструкции очень большие и время их появления зависит от вашей скорости интернета.

Clipper does not work when turned on:
• Clipper must be charged for a full 4 hours.
Clipper cutters do not move:
• The cutting unit may be dirty and clogged. Clean the unit as directed
in Cleaning and Maintaining section.
• Always clean the blade and clipper before storing.
• Always place the blade protection guard back on the clipper blades
before storing.
Clipper does not hold charge:
• Fully discharge battery by running clipper until it stops, then follow recharging
instructions (see section on charging your hair clipper).
U.S. and Canada residents:
To order accessories call 800-392-6544, visit your
local retailer, or visit RemingtonProducts.com.
Spectrum Brands, Inc. Money-back Offer
If within 30 days after you have purchased your Remington
®
branded product,
you are not satisfied and would like a refund, return it with the sales slip indicat-
ing purchase price and date of purchase to the retailer from whom it was pur-
chased. Spectrum Brands, Inc. will reimburse all retailers who accept the product
within 30 days from the date of purchase. If you have any questions concerning
the money-back guarantee, please call 800-736-4648 in the U.S. or Canada.
Remington Guarantees Satisfaction After 60 Days!
Remington 60-Day Money Back Guarantee*
If within 60 days after purchasing any Remington
®
branded product, you are not
completely satisfied and would like a refund, return it with the original dated sales
receipt directly to Remington and receive a full refund.** For questions concerning
the money-back guarantee, please call 800-736-4648 in the U.S. or Canada.
*Applies to U.S. and Canadian customers’ returns only.
**Terms and conditions apply.
Terms and Conditions
1.
Refund will be in the form of a check issued in U.S. Dollars and will be provided
only if all Terms and Conditions are met.
2.
The following items must be returned to Remington and postmarked no later
than 60 days after purchase of the Remington
®
branded product:
a. The Remington
®
product;
b. The original sales receipt indicating price and date purchased; and
c. The completed 60-day money back guarantee form located at
RemingtonProducts.com/60day.
3.
In addition, Remington, in its discretion, must determine that the returned product
was used in accordance with the instruction booklet (included with the product
at the time of purchase).
4.
Returns should be mailed prepaid (no collect returns accepted) to:
Remington 60-Day MBG
507 Stokely Drive, Box 1
DeForest, WI 53532
5.
Refund does not include postage costs for the return of the product, but will
include applicable taxes paid by customer, if any.
6.
No responsibility will be accepted for late, lost, stolen, misdirected or
damaged product.
7.
Please allow 4–6 weeks to receive your refund by check.
Questions or comments:
Call 800-736-4648 in the U.S.
or Canada or visit
RemingtonProducts.com.
Limited Five Year Warranty
Spectrum Brands, Inc. warrants this product against any defects that are due to
faulty material or workmanship for the life of the product. This warranty does not
include damage to the product resulting from accident or misuse.
If the product should become defective within the warranty period, we will replace it
free of charge. Return your product with your name, address and day time phone
number to: Remington Returns Center, 507 Stokely Dr., P.O. Box 1, Deforest, WI
53532. For more information call 800-736-4648 in the U.S. or Canada.
Warranty excludes:
•
The blades and storage case are not included in the limited five year warranty.
This warranty does not cover products damaged by the following:
• Accident, misuse, abuse or alteration of the product
• Servicing by unauthorized persons
• Use with unauthorized accessories
• Connecting it to incorrect current and voltage
• Wrapping cord around appliance causing premature wear & breakage
• Any other conditions beyond our control
No responsibility, obligation, or liability is assumed for the installation or maintenance
of this product.
SPECTRUM BRANDS, INC. SHALL NOT BE RESPONSIBLE FOR ANY
INCIDENTAL, SPECIAL OR CONSEQUENTIAL DAMAGES RESULTING FROM THE
USE OF THIS PRODUCT. ALL IMPLIED WARRANTIES, INCLUDING BUT NOT
LIMITED TO IM PLIED WARRANTIES OF FITNESS AND MERCHANTABILITY, ARE
LIMITED IN DURATION TO THE LIFE OF THE PRODUCT.
This warranty gives you specific legal rights and you may also have other rights
which vary from state to state or province to province. Some states do not allow
the exclusion or limitation of incidental, special or consequential damages.
Warranty
Dist. by: Spectrum Brands, Inc., Middleton, WI 53562
Dist. by: Spectrum Brands Canada Inc.
255 Longside Drive, Unit 101
Mississauga, ON L5W 1L8
® Registered Trademark of Spectrum Brands, Inc.
© 2017 Spectrum Brands, Inc. 5/17 17582-00
Made in China.
T22-0005042-A
Contains a listed adaptor.
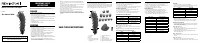
How to Use
Product Disposal
When your rechargeable clipper reaches the end of its useful life, the batteries
must be removed and recycled or disposed of properly in accordance with your
local and state requirements.
The following should be followed for battery removal:
•
Ensure device is unplugged from any electrical outlet and discharged
of all power.
• The battery is not serviceable.
• The battery must be removed from the appliance before it is scrapped.
• Push out the blade assembly from the unit.
• Using the hex wrench remove 4 screws from the unit.
• Using a small screwdriver, pry off the top housing.
• Remove the switch assembly.
• Using a small screwdriver remove 6 screws from the top inner housing.
• Open the top inner housing to expose the printed circuit board.
• Cut the wires which connect the motor to the circuit board and expose the battery.
• Cut the wire tabs which connect the battery to the circuit board and remove
the battery.
Note:
This clipper is not intended for professional use.
Cleaning and Maintenance
Troubleshooting
STEP 4 – Top of the head
• Use the longer length guide comb 22mm or 25mm on the clipper to cut hair on
top of the head against the direction in which the hair normally grows.
• Always work from the back of the head.
STEP 5 – The finishing touches
• Use the clipper without a guide comb for close trimming around the base and
sides of the neck.
• To produce a clean straight line at the sideburns, reverse the hair clipper. Place
the reversed clipper at right angles to the head, tips of the blades lightly
touching the skin and then work downwards.
SHORT TAPERED STYLES – “Flat Tops” and Short Cuts
• Starting with the longest guide comb attached (25mm), cut from the back of
the neck to the crown. Hold the guide comb flat against the head and slowly
move the clipper through the hair.
• Use the same procedure from the lower side to the upper side of the head. Then
cut the hair against the direction in which it grows and level with the sides.
• To give a “flat top” look, the hair on top of the head must be cut over the top
of a flat comb.
• Use a closer guide comb to taper the hair down to the neckline as desired.
• To ensure long lasting performance of the clipper, clean the blades and
unit regularly.
• Ensure the appliance is switched off and unplugged from the power outlet.
• Do not use harsh or corrosive cleaners on the unit or blades.
• Cleaning should be done with a soft brush.
• After each use - Brush the accumulated hair from the blades.
• Ensure the appliance is switched off and unplugged from the power outlet.
• To clean the unit, wipe with a damp cloth and dry immediately.
Note:
Suitable for cleaning under water.
WASHABLE CLEANING
• The clipper is fully washable and can be easily cleaned under a running tap.
• Press the blade release point to slide out the blade. Then the blade set can
easily be cleaned under the tap.
• Once the blades are cleaned and dry, place the blade set on top of the clipper
and push it towards the hair clipper until it snaps into place.
• We recommend that you oil the blades regularly. Add a few drops on all gliding
surfaces, the cutting area and back pads of the blades.
Note:
A hex wrench is provided to enable you to take the blade apart for
deep cleansing.
EVERY SIX MONTHS
• The blade assembly can be taken apart for deep cleansing.
• Use the provided hex wrench to remove the two blade fasteners.
• The blade will come apart in 3 pieces, that can be wiped and cleaned.
Spare blade replacement model: Blade SP-HC9700
BLADES
• It is recommended to oil the blades after every use.
• Place 2 to 3 drops of lubricating oil on the moving blade and turn on the
clipper. The oil should distribute on its own. Wipe off any excess oil.
Характеристики

Остались вопросы?Не нашли свой ответ в руководстве или возникли другие проблемы? Задайте свой вопрос в форме ниже с подробным описанием вашей ситуации, чтобы другие люди и специалисты смогли дать на него ответ. Если вы знаете как решить проблему другого человека, пожалуйста, подскажите ему :)


