
Лобзики Makita DJV180Z - инструкция пользователя по применению, эксплуатации и установке на русском языке. Мы надеемся, она поможет вам решить возникшие у вас вопросы при эксплуатации техники.
Если остались вопросы, задайте их в комментариях после инструкции.
"Загружаем инструкцию", означает, что нужно подождать пока файл загрузится и можно будет его читать онлайн. Некоторые инструкции очень большие и время их появления зависит от вашей скорости интернета.


9
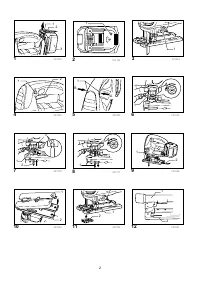
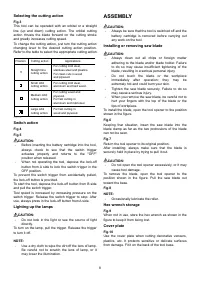
Anti-splintering device
Fig.11
For splinter-free cuts, the anti-splintering device can be
used. To install the anti-splintering device, move the tool
base all the way forward and fit it from the back of tool
base. When you use the cover plate, install the anti-
splintering device onto the cover plate.
CAUTION:
•
The anti-splintering device cannot be used when
making bevel cuts.
Dust extraction
The dust nozzle (optional accessory) is recommended
to perform clean cutting operations.
Fig.12
To attach the dust nozzle on the tool, insert the hook of
dust nozzle into the hole in the base.
The dust nozzle can be installed on either left or right
side of the base.
Fig.13
Then connect a Makita vacuum cleaner to the dust
nozzle.
Fig.14
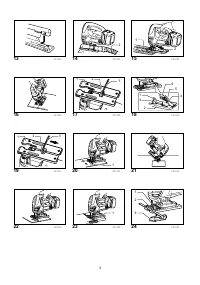
OPERATION
CAUTION:
•
Always hold the base flush with the workpiece.
Failure to do so may cause blade breakage,
resulting in a serious injury.
Fig.15
Turn the tool on without the blade making any contact
and wait until the blade attains full speed. Then rest the
base flat on the workpiece and gently move the tool
forward along the previously marked cutting line.
NOTE:
•
If the tool is operated continuously until the battery
cartridge has discharged, allow the tool to rest for
15 minutes before proceeding with a fresh battery.
When cutting curves, advance the tool very slowly.
Bevel cutting
Fig.16
CAUTION:
•
Always be sure that the tool is switched off and the
battery cartridge is removed before tilting the base.
With the base tilted, you can make bevel cuts at any
angle between 0° and 45° (left or right).
Loosen the bolt on the back of the base with the hex
wrench. Move the base so that the bolt is positioned in
the center of the bevel slot in the base.
Fig.17
Tilt the base until the desired bevel angle is obtained.
The V-notch of the gear housing indicates the bevel
angle by graduations. Then tighten the bolt firmly to
secure the base.
Fig.18
Front flush cuts
Fig.19
Loosen the bolt on the back of the base with the hex
wrench and slide the base all the way back. Then
tighten the bolt to secure the base.
Cutouts
Cutouts can be made with either of two methods A or B.
A) Boring a starting hole:
Fig.20
•
For internal cutouts without a lead-in cut from an
edge, pre-drill a starting hole 12 mm or more in
diameter. Insert the blade into this hole to start
your cut.
B) Plunge cutting:
Fig.21
•
You need not bore a starting hole or make a lead-
in cut if you carefully do as follows.
1.
Tilt the tool up on the front edge of the base with
the blade point positioned just above the
workpiece surface.
2.
Apply pressure to the tool so that the front edge
of the base will not move when you switch on the
tool and gently lower the back end of the tool
slowly.
3.
As the blade pierces the workpiece, slowly lower
the base of the tool down onto the workpiece
surface.
4.
Complete the cut in the normal manner.
Finishing edges
Fig.22
To trim edges or make dimensional adjustments, run the
blade lightly along the cut edges.
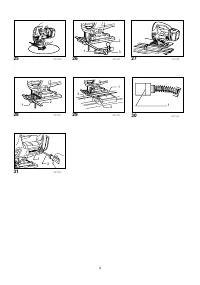
Metal cutting
Always use a suitable coolant (cutting oil) when cutting
metal. Failure to do so will cause significant blade wear.
The underside of the workpiece can be greased instead
of using a coolant.
Rip fence set (optional accessory)
CAUTION:
•
Always be sure that the tool is switched off and the
battery cartridge is removed before installing or
removing accessories.
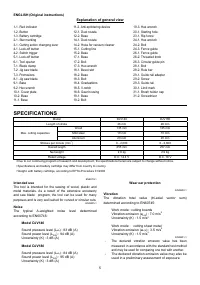
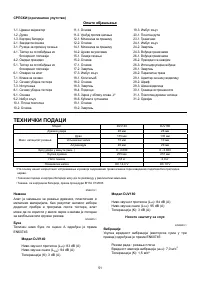
Характеристики

Остались вопросы?Не нашли свой ответ в руководстве или возникли другие проблемы? Задайте свой вопрос в форме ниже с подробным описанием вашей ситуации, чтобы другие люди и специалисты смогли дать на него ответ. Если вы знаете как решить проблему другого человека, пожалуйста, подскажите ему :)


