Культиваторы Einhell GC-SR 12 - инструкция пользователя по применению, эксплуатации и установке на русском языке. Мы надеемся, она поможет вам решить возникшие у вас вопросы при эксплуатации техники.
Если остались вопросы, задайте их в комментариях после инструкции.
"Загружаем инструкцию", означает, что нужно подождать пока файл загрузится и можно будет его читать онлайн. Некоторые инструкции очень большие и время их появления зависит от вашей скорости интернета.


GB
- 11 -
5. Before starting the equipment
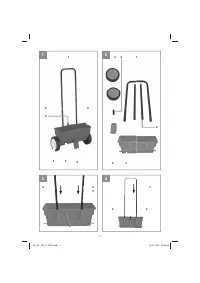
5.1 Installing the controller
Push bar
•
Fit the push rods into the spreader tank
(Fig. 3).
•
Fit the push bar on to the push rods (Fig. 4).
Adjustment lever
Fit the adjustment lever grip (Fig.2/ Item 2) to the
adjustment lever (Fig. 5/ Item A).
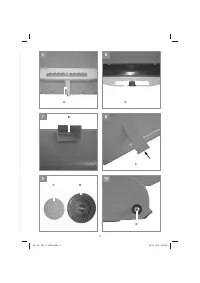
Foot
•
Remove the screw (Fig. 7/ Item B).
•
Insert the foot (Fig. 8/ Item 5) and secure it.
Wheels
•
Take the wheel caps off the wheels (Fig. 9).
•
Remove the screws (Fig. 10/ Item E) (on both
sides).
•
Attach the wheels (Fig. 11/ Item D) and
secure them.
•
Fit the wheel caps.
5.2 Filling
•
Measure the area over which you intend to
spread the spreader material and determine
the size of the area in square meters. Work
out the amount of spreader material required
by referring to the amounts given on the
fertilizer/seed packaging.
•
Ensure that the spreader material
compartment is dry and clean.
•
Move the adjustment lever (Fig. 6 / Item 2) to
the “0” position.
•
Spread some sheets of newspaper out on
a firm, dry surface. Place the spreader on
the newspaper and carefully fill the spreader
material compartment. Do not allow the
spreader material compartment to overflow
and do not spill the spreader material. Never
fill the spreader material compartment
directly on the lawn, because spilled spreader
material will burn the grass as a result of over-
fertilization.
•
Make sure that the black spreading roller
cover is completely covered by spreader
material. The fertilizer will only be spread
evenly across the full spreading width if the
cover is completely covered.
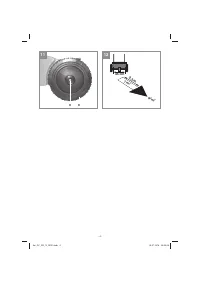
5.3 Determining the right spreader setting
(Fig. 12)
Spreading material products such as lawn
seed, fertilizer and other care products vary
considerably in terms of distribution quantity,
granule size and weight, which means that it
is not possible to use a single universal setting
for all. The required spreader setting is easy to
determine.
•
Fill the compartment half full with the sprea-
der material (see 5.2).
•
Spread out a clean and dry plastic sheet on a
smooth and level surface (e.g. in the garage).
•
We recommend that you set the adjustment
lever to “4” to start with. Push the spreader
along over a length of 2.3 m. With a spreading
width of 45 cm this equates to an area of
approx. 1 m².
•
Sweep up the spreader material, weigh it
using household scales (distribution rate
per m²) and compare the weight to the
information provided by the manufacturer on
the spreader material packaging (e.g. 30 g/
m²). Set the adjustment lever to a higher level
if insufficient material is distributed, or to a
lower level if too much is distributed.
•
Make a note of the determined values so that
you can use them again if needed.
6. Operation
Important! If you use the spreader on wet, damp
or very tall grass (grass over 60 mm in height), the
spreader material may become moist and block
the spreading action. This may result in too much
or insu
ffi
cient spreader material being spread.
6.1 Spreader settings
Select the spreader settings determined in
advance (see 5.3). You must observe the
instructions on the fertilizer/seed packaging.
6.2 Spreading
•
After filling with spreader material (see
section 5.2), set the adjustment lever to the
determined position (see 5.3) and start sprea-
ding the material over the lawn surface.
•
Over the outermost 2-3 lanes we recommend
that you spread the material in both a
crosswise and a lengthwise direction. You can
spread the material over the rest of the lanes
in a lengthwise direction only. Spread the
material on an overlapping basis and make
Anl_GC_SR_12_SPK9.indb 11
Anl_GC_SR_12_SPK9.indb 11
05.07.2018 09:58:50
05.07.2018 09:58:50
Характеристики

Остались вопросы?Не нашли свой ответ в руководстве или возникли другие проблемы? Задайте свой вопрос в форме ниже с подробным описанием вашей ситуации, чтобы другие люди и специалисты смогли дать на него ответ. Если вы знаете как решить проблему другого человека, пожалуйста, подскажите ему :)


