
Кофеварка Princess 249408 - инструкция пользователя по применению, эксплуатации и установке на русском языке. Мы надеемся, она поможет вам решить возникшие у вас вопросы при эксплуатации техники.
Если остались вопросы, задайте их в комментариях после инструкции.
"Загружаем инструкцию", означает, что нужно подождать пока файл загрузится и можно будет его читать онлайн. Некоторые инструкции очень большие и время их появления зависит от вашей скорости интернета.
EN
Instruction manual
NL
Gebruiksaanwijzing
FR
Mode d’emploi
DE
Bedienungsanleitung
ES
Manual de usuario
PT
Manual de utilizador
IT
Manuale utente
SV
Bruksanvisning
CS
Návod na použití
PL
Instrukcja obsługi
SK
Návod na použitie
Grind & Brew Coffee Maker Compact Deluxe
01.249408.01.001
RU
Руководство по эксплуатации
2
3
6
7
5
4
1
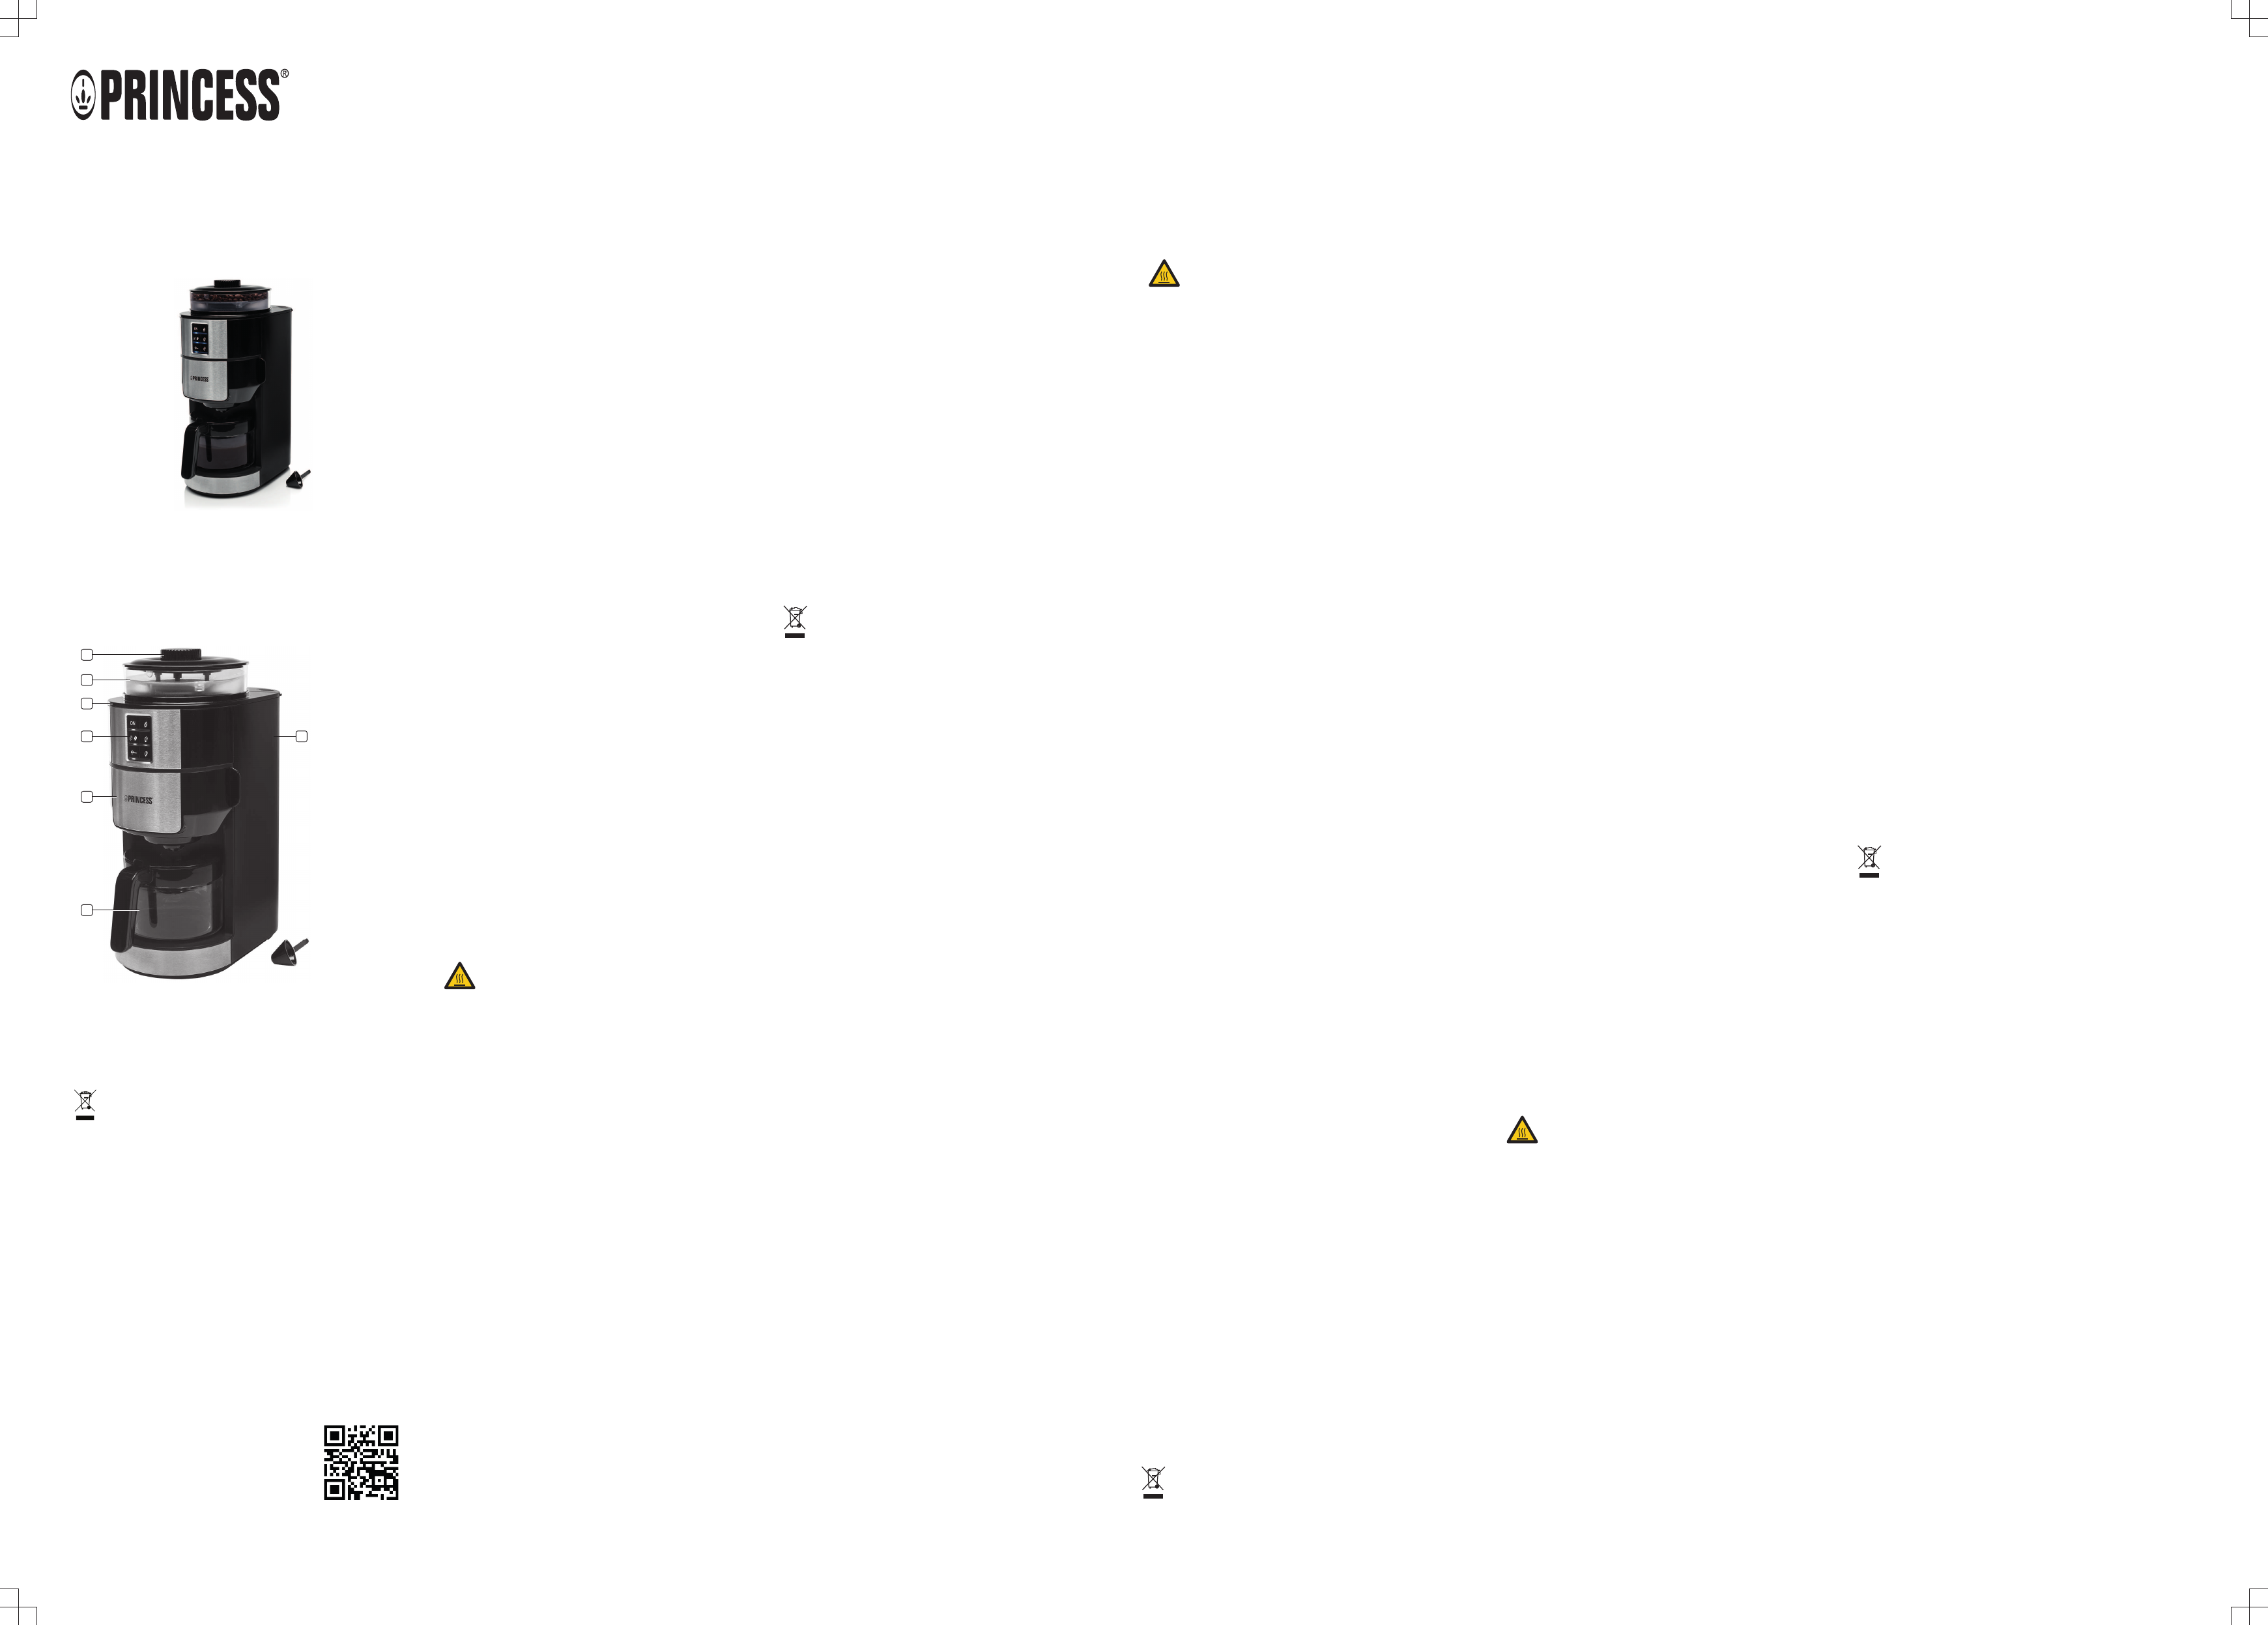
PARTS DESCRIPTION / ONDERDELENBESCHRIJVING / DESCRIPTION DES PIÈCES /
TEILEBESCHREIBUNG / DESCRIPCIÓN DE LAS PIEZAS / DESCRIÇÃO DOS
COMPONENTES / DESCRIZIONE DELLE PARTI / BESKRIVNING AV DELAR /
OPIS CZĘŚCI / POPIS SOUČÁSTÍ / POPIS SÚČASTÍ /
ОПИСАНИЕ ЗАПЧАСТИ
service.princess.info
© Princess 2017
[WEEE Logo]
EN
Instruction manual
SAFETY
• By ignoring the safety instructions the
manufacturer can not be hold responsible for
the damage.
• If the supply cord is damaged, it must be
replaced by the manufacturer, its service
agent or similarly qualified persons in order to
avoid a hazard.
• Never move the appliance by pulling the cord
and make sure the cord can not become
entangled.
• The appliance must be placed on a stable,
level surface.
• The user must not leave the device
unattended while it is connected to the supply.
• This appliance is only to be used for
household purposes and only for the purpose
it is made for.
• This appliance shall not be used by children
aged less than 8 years. This appliance can be
used by children aged from 8 years and above
and persons with reduced physical, sensory or
mental capabilities or lack of experience and
knowledge if they have been given
supervision or instruction concerning use of
the appliance in a safe way and understand
the hazards involved. Children shall not play
with the appliance. Keep the appliance and its
cord out of reach of children aged less than 8
years. Cleaning and user maintenance shall
not be made by children unless older than 8
and supervised.
• To protect yourself against an electric shock,
do not immerse the cord, plug or appliance in
the water or any other liquid.
• This appliance is intended to be used in
household and similar applications such as:
– Staff kitchen areas in shops, offices and other working environments.
– By clients in hotels, motels and other residential type environments.
– Bed and breakfast type environments.
– Farm houses.
• Children shall not play with the appliance.
• This appliance shall not be used by children.
Keep the appliance and its cord out of reach
of children.
• To protect yourself against an electric shock,
do not immerse the cord, plug or appliance in
the water or any other liquid.
• The connector must be removed before the
appliance will be cleaned, please make sure
the inlet is completely dry before the unit will
be used again.
• Only use the appliance with the appropriate
connector.
•
Surface are liable to get hot during use.
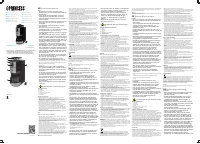
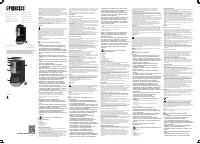
PARTS DESCRIPTION
1. Cover
2. Funnel
3. Coffee pot
4. Knob
5. Coffee bean compartment
6. Control panel
7. Water tank
BEFORE THE FIRST USE
• Take the appliance and accessories out the box. Remove the
stickers, protective foil or plastic from the device.
• Place the device on a flat stable surface and ensure a minimum of 10
cm. free space around the device. This device is not suitable for
installation in a cabinet or for outside use.
• Before using your appliance for the first time, wipe off all removable
parts with a damp cloth. Never use abrasive products.
• Put the power cable into the socket. (Note: Make sure the
voltage which is indicated on the device matches the local voltage
before connecting the device. Voltage 220V-240V 50/60Hz)
• For a perfect taste, carry out 2 or 3 boil processes with fresh water
(without coffee). Once all the water has passed through, switch the
appliance off and let it cool down during 5 minutes. Then repeat the
process with fresh water.
• Never pour hot water, milk, coffee powder or tea into the water tank.
• Do not fill the water tank beyond the 6 cup indication.
USE
Make coffee with freshly ground beans
• Pour the desired volume of water into water reservoir, make sure the
water level will not exceed te max. sign.
• Turn the funnel support to the left. Make sure that the filter, filter cover
and funnel are placed correctly in the funnel support. After that turn
the funnel support to the right until it is locked.
• Fill the coffee bean compartment with coffee beans. Make sure not to
use more than 100 gram.
• Plug the power plug into the wall socket.
• Select 2, 4 or 6 cups button to set the desired amount of cups, if
nothing is selected the default is 6 cups. Ensure to always fill the water
tank with the same cups of water as selected.
• Turn the coarseness knob to set the desired type of grind settings.
• Press the coffee strength button to choose between the 2 settings.
• Press the on/off button, the grinder will start, after some seconds
grinding the brewing process will start.
• When the brewing process is finished a buzzer will sound 3 times.
• The can can remain on the hotplate, which begins to heat up as soon
as the coffee maker is switched on. The hotplate will keep the coffee
hot until the coffee maker is switched off (NOTE: due to safety
reasons the hot plate will turn off automatically after a while).
Make coffee with ground coffee
• Pour the desired volume of water into water reservoir, make sure the
water level will not exceed te max. sign.
• Turn the funnel support to the left. Make sure that the funnel and the filter
are correctly placed in the funnel support. Add the desired amount of
pre-ground coffee into the filter. Place the filter cover and turn the funnel
support to the right until it is locked.
• Press the ground coffee button, after that press the on/off button.
• The device starts brewing immediately.
• When the brewing process is finished a buzzer will sound 3 times.
• The can can remain on the hotplate, which begins to heat up as soon as
the coffee maker is switched on. The hotplate will keep the coffee hot
until the coffee maker is switched off (NOTE: due to safety reasons the
hot plate will turn off automatically after a while).
CLEANING AND MANTENANCE
• Always unplug the device and let it cool down completely before cleaning
• Clean the outside and the base of the device with a damped cloth.
• Never immerse the appliance in water or other liquid.
• All the non-electrical parts can be washed in warm soapy water. Dry
thoroughly before reusing. These parts are not dishwasher safe. Never
use abrasive detergents.
• Dry all the parts after cleaning thoroughly.
• Make sure always remove the remaining beans and keep clean the
grinder and the grinder compartment when the appliance is not used
regularly. To prevent clogging of the grinder compartment.
Cleaning mineral deposits
• The appliance has to be descaled every month, otherwise the coffee
taste will become bad and the scale deposited inside in the machine may
cause permanent and irreparable damage to the machine.
• Use detergent, which can be obtained from specialist shops, and follow
the instructions given.
• Mix adequate descaler with cold water in a measuring jug as per its
instructions. Fill the water tank up to the Max level with the prepared
descaling solution. Then put the water tank back into the machine.
• Press the ground coffee button, the indicator light will turn on, press the
On/Off button, the appliance will start the cleaning procedure.
• Make sure you always rinse the device with clear water after rinse it with
the water/descaler mixture.
GUARANTEE
• This product is guaranteed for 24 months granted. Your warranty is valid
if the product is used in accordance to the instructions and for the
purpose for which it was created. In addition, the original purchase
(invoice, sales slip or receipt) is to be submitted with the date of
purchase, the name of the retailer and the item number of the product.
• For the detailed warranty conditions, please refer to our service website:
service.princess.info
ENVIRONMENT
This appliance should not be put into the domestic garbage at the
end of its durability, but must be offered at a central point for the recycling
of electric and electronic domestic appliances. This symbol on the
appliance, instruction manual and packaging puts your attention to this
important issue. The materials used in this appliance can be recycled. By
recycling of used domestic appliances you contribute an important push to
the protection of our environment. Ask your local authorities for information
regarding the point of recollection.
Support
You can find all available information and spare parts at http://
www.service.princess.info/!
NL
Gebruiksaanwijzing
VEILIGHEID
• De fabrikant is niet aansprakelijk voor schade
voortvloeiend uit het niet opvolgen van de
veiligheidsinstructies.
• Als het netsnoer beschadigd is, moet het
worden vervangen door de fabrikant, de
onderhoudsmonteur van de fabrikant of door
personen met een soortgelijke kwalificatie om
gevaar te voorkomen.
• Verplaats het apparaat nooit door aan het snoer
te trekken. Zorg ervoor dat het snoer nergens in
verstrikt kan raken.
• Het apparaat moet op een stabiele, vlakke
ondergrond worden geplaatst.
• De gebruiker mag het apparaat niet onbeheerd
achterlaten wanneer de stekker zich in het
stopcontact bevindt.
• Dit apparaat is uitsluitend voor huishoudelijk
gebruik en voor het doel waar het voor bestemd
is.
• Dit apparaat mag niet worden gebruikt door
kinderen jonger dan 8 jaar. Dit apparaat kan
worden gebruikt door kinderen vanaf 8 jaar en
door personen met verminderde lichamelijke,
zintuiglijke of geestelijke vermogens of gebrek
aan de benodigde ervaring en kennis indien ze
onder toezicht staan of instructies krijgen over
hoe het apparaat op een veilige manier kan
worden gebruikt alsook de gevaren begrijpen
die met het gebruik samenhangen. Kinderen
mogen niet met het apparaat spelen. Houd het
apparaat en het netsnoer buiten bereik van
kinderen jonger dan 8 jaar. Laat reiniging en
onderhoud niet door kinderen uitvoeren, tenzij
ze ouder zijn dan 8 jaar en onder toezicht staan.
• Dompel het snoer, de stekker of het apparaat
niet onder in water of andere vloeistoffen om
elektrische schokken te voorkomen.
• Dit apparaat is bedoeld voor huishoudelijk en
soortgelijk gebruik, zoals:
– Personeelskeukens in winkels, kantoren en andere werkomgevingen.
– Door gasten in hotels, motels en andere residentiële omgevingen.
– Bed&Breakfast-type omgevingen.
– Boerderijen.
• Kinderen mogen niet met het apparaat spelen.
• Dit apparaat mag niet worden gebruikt door
kinderen. Houd het apparaat en het netsnoer
buiten bereik van kinderen.
• Dompel het snoer, de stekker of het apparaat
niet onder in water of andere vloeistoffen om
elektrische schokken te voorkomen.
• De connector dient te worden verwijderd
alvorens het apparaat te reinigen. Wees er
zeker van dat de inlaat volledig droog is
alvorens het apparaat weer in gebruik te
nemen.
• Gebruik het apparaat uitsluitend met een
geschikte connector.
•
Het oppervlak kan heet worden tijdens
gebruik.
BESCHRIJVING VAN DE ONDERDELEN
1. Deksel
2. Trechter
3. Koffiekan
4. Knop
5. Koffiebonencompartiment
6. Bedieningspaneel
7. Waterreservoir
VOORAFGAAND AAN HET EERSTE GEBRUIK
• Haal het apparaat en de accessoires uit de doos. Verwijder de stickers,
de beschermfolie of het plastic van het apparaat.
• Plaats het apparaat op een vlakke, stabiele ondergrond. Zorg voor
minimaal 10 cm vrije ruimte rondom het apparaat. Dit apparaat is niet
geschikt voor inbouw of gebruik buitenshuis.
• Veeg voor het eerste gebruik van het apparaat alle afneembare
onderdelen af met een vochtige doek. Gebruik nooit schurende
producten.
• Sluit het netsnoer aan op het stopcontact. (Let op: Zorg er voor het
aansluiten van het apparaat voor dat het op het apparaat aangegeven
voltage overeenkomt met de plaatselijke
netspanning. Voltage: 220V-240V 50/60Hz)
• Laat het apparaat eerst 2 of 3 maal met zuiver water doorlopen (zonder
koffie). Is het water doorgelopen, schakel dan het apparaat uit en laat het
5 minuten afkoelen. Herhaal vervolgens de procedure met zuiver water.
• Giet nooit heet water, melk, koffiepoeder of thee in het waterreservoir.
• Vul het waterreservoir niet verder dan de markering voor 6 koppen.
GEBRUIK
Koffie zetten met vers gemalen bonen
• Giet de gewenste hoeveelheid water in het waterreservoir en zorg dat
het waterniveau niet hoger dan de maximummarkering komt.
• Draai de trechterhouder naar links. Plaats de filter, de filterdeksel en de
trechter correct in de trechterhouder. Draai hierna de trechterhouder
naar rechts tot hij op zijn plaats vergrendelt.
• Vul het koffiebonencompartiment met koffiebonen. Gebruik niet meer
dan 100 gram.
• Steek de stekker in het stopcontact.
• Kies de knop voor 2, 4 of 6 koppen om het gewenste aantal koppen te
zetten. Als u niets kiest, worden standaard 6 koppen gezet. Vul het
waterreservoir altijd met hetzelfde aantal koppen water als het door u
gekozen aantal koppen koffie.
• Draai de grofheidsknop naar de gewenste maalinstelling.
• Druk op de koffiesterkteknop om te kiezen tussen de 2 instellingen.
• Druk op de aan/uit-knop, de molen start en na een paar seconden malen
begint het koffiezetten.
• Na voltooiing van het koffiezetten klinkt 3 keer een zoemer.
• De kan kan op de warmhoudplaat blijven staan. Deze plaat begint warm
te worden zodra het koffiezetapparaat wordt ingeschakeld. De
warmhoudplaat houdt de koffie warm totdat het koffiezetapparaat wordt
uitgeschakeld. (LET OP: om veiligheidsredenen zal de warmhoudplaat
na een tijdje automatisch uitschakelen.)
Koffie zetten met gemalen koffie
• Giet de gewenste hoeveelheid water in het waterreservoir en zorg dat
het waterniveau niet hoger dan de maximummarkering komt.
• Draai de trechterhouder naar links. Plaats de trechter en de filter correct
in de trechterhouder. Doe de gewenste hoeveelheid voorgemalen koffie
in de filter. Plaats de filterdeksel en draai de trechterhouder naar rechts
tot hij op zijn plaats vergrendelt.
• Druk op de knop voor gemalen koffie en daarna op de aan/uit-knop.
• Het apparaat begint direct met koffie zetten.
• Na voltooiing van het proces klinkt 3 keer een zoemer.
• De kan kan op de warmhoudplaat blijven staan. Deze plaat begint warm
te worden zodra het koffiezetapparaat wordt ingeschakeld. De
warmhoudplaat houdt de koffie warm totdat het koffiezetapparaat wordt
uitgeschakeld. (LET OP: om veiligheidsredenen zal de warmhoudplaat
na een tijdje automatisch uitschakelen.)
REINIGING EN ONDERHOUD
• Verwijder voor reiniging altijd de stekker uit het stopcontact en laat het
apparaat volledig afkoelen.
• Reinig de buitenzijde en de voet van het apparaat met een vochtige
doek.
• Dompel het apparaat nooit onder in water of een andere vloeistof.
• U kunt alle niet-elektrische onderdelen in een warm sopje afwassen.
Droog ze zorgvuldig voordat u de machine weer gaat gebruiken. Deze
onderdelen zijn niet geschikt voor de vaatwasser. Gebruik nooit
schurende reinigingsmiddelen.
• Droog na het reinigen alle onderdelen zorgvuldig.
• Verwijder als het apparaat niet regelmatig wordt gebruikt altijd de
overgebleven bonen en houd de molen en het maalcompartiment
schoon. Dit is om te voorkomen dat het maalcompartiment verstopt
raakt.
Verwijderen van kalkafzetting
• Ontkalk het apparaat maandelijks, anders krijgt de koffie een nare smaak
en kan kalkaanslag de machine blijvend en onherstelbaar beschadigen.
• Gebruik een bij een gespecialiseerde winkel verkrijgbaar
reinigingsmiddel en volg de gegeven instructies op.
• Meng voldoende ontkalkingsmiddel volgens de instructies met koud
water in een maatbeker. Vul het waterreservoir tot het maximumniveau
met de bereide ontkalkingsoplossing. Plaats vervolgens het
waterreservoir terug in de machine.
• Druk op de knop voor gemalen koffie, het indicatielampje gaat branden,
druk op de aan/uit-knop en het apparaat start de reinigingsprocedure.
• Spoel het apparaat na het ontkalken altijd na met schoon water.
GARANTIE
• Op dit product wordt een garantie van 24 maanden verleend. Uw
garantie is geldig indien het product is gebruikt in overeenstemming met
de gebruiksaanwijzing en voor het doel waarvoor het gemaakt is. Tevens
dient de originele aankoopbon (factuur, kassabon of kwitantie) te worden
overlegd met daarop de aankoopdatum, de naam van de retailer en het
artikelnummer van het product.
• Voor uitgebreide garantievoorwaarden verwijzen wij u naar onze
servicewebsite: service.princess.info
MILIEU
Dit apparaat mag aan het einde van de levensduur niet bij het
normale huisafval worden gedeponeerd, maar moet bij een speciaal
inzamelpunt voor hergebruik van elektrische en elektronische apparaten
worden aangeboden. Het symbool op het apparaat, in de
gebruiksaanwijzing en op de verpakking attendeert u hierop. De in het
apparaat gebruikte materialen kunnen worden gerecycled. Met het
recyclen van gebruikte huishoudelijke apparaten levert u een belangrijke
bijdrage aan de bescherming van ons milieu. Informeer bij uw lokale
overheid naar het inzamelpunt.
Support
U kunt alle beschikbare informatie en reserveonderdelen vinden op http://
www.service.princess.info/!
FR
Manuel d'instructions
SÉCURITÉ
• Si vous ignorez les instructions de sécurité, le
fabricant ne saurait être tenu responsable des
dommages.
• Si le cordon d'alimentation est endommagé, il
doit être remplacé par le fabricant, son
réparateur ou des personnes qualifiées afin
d'éviter tout risque.
• Ne déplacez jamais l'appareil en tirant sur le
cordon et veillez à ce que ce dernier ne soit pas
entortillé.
• L'appareil doit être posé sur une surface stable
et nivelée.
• Ne laissez jamais le dispositif sans surveillance
s'il est connecté à l'alimentation.
• Cet appareil est uniquement destiné à des
utilisations domestiques et seulement dans le
but pour lequel il est fabriqué.
• Cet appareil ne doit pas être utilisé par des
enfants de moins de 8 ans. Cet appareil peut
être utilisé par des enfants de 8 ans ou plus et
des personnes présentant un handicap
physique, sensoriel ou mental voire ne
disposant pas des connaissances et de
l'expérience nécessaires en cas de surveillance
ou d'instructions sur l'usage de cet appareil en
toute sécurité et de compréhension des risques
impliqués. Les enfants ne doivent pas jouer
avec l'appareil. Maintenez l'appareil et son
cordon d'alimentation hors de portée des
enfants de moins de 8 ans. Le nettoyage et la
maintenance utilisateur ne doivent pas être
confiés à des enfants sauf s'ils ont 8 ans ou
plus et sont sous surveillance.
• Afin de vous éviter un choc électrique,
n'immergez pas le cordon, la prise ou l'appareil
dans de l'eau ou autre liquide.
• Cet appareil est destiné à une utilisation
domestique et aux applications similaires,
notamment :
– coin cuisine des commerces, bureaux et autres environnements de
travail
– hôtels, motels et autres environnements de type résidentiel
– environnements de type chambre d’hôtes
– fermes.
• Les enfants ne doivent pas jouer avec
l'appareil.
• Cet appareil ne doit pas être utilisé par les
enfants. Maintenez l'appareil et son cordon
d'alimentation hors de portée des enfants.
• Afin de vous éviter un choc électrique,
n'immergez pas le cordon, la prise ou l'appareil
dans de l'eau ou autre liquide .
• L’adaptateur doit être retiré avant de nettoyer
l’appareil, veillez à ce que l'orifice d'entrée soit
totalement sec avant de réutiliser l'appareil.
• Utilisez l’appareil uniquement avec le
connecteur approprié.
•
La surface peut devenir chaude à l'usage.
DESCRIPTION DES PIÈCES
1. Couvercle
2. Entonnoir
3. Pot de café
4. Bouton
5. Compartiment de grains de café
6. Panneau de commande
7. Réservoir d'eau
AVANT LA PREMIÈRE UTILISATION
• Sortez l'appareil et les accessoires hors de la boîte. Retirez les
autocollants, le film protecteur ou le plastique de l'appareil.
• Mettez l'appareil sur une surface stable plate et assurez un dégagement
tout autour de l'appareil d'au moins 10 cm. Cet appareil ne convient pas
à une installation dans une armoire ou à un usage à l'extérieur.
• Avant la première utilisation de votre appareil, essuyez toutes les pièces
amovibles avec un chiffon humide. N’utilisez jamais de produits abrasifs.
• Branchez le cordon d’alimentation à la prise. (Remarque : Veillez à ce
que la tension indiquée sur l’appareil corresponde à celle du secteur
local avant de connecter l'appareil. Tension 220V-240V 50/60Hz)
• Pour éliminer tout mauvais goût, effectuer 2 ou 3 cycles de chauffe
complets avec de l’eau fraîche (sans café). Une fois que toute l’eau est
passée, éteindre l’appareil et le laisser refroidir pendant 5 minutes. Puis
réitérer le processus avec de l’eau fraîche.
• Ne versez jamais d'eau chaude, lait, poudre de café ou thé dans le
réservoir d'eau.
• Ne remplissez pas le réservoir d'eau au-delà de l'indication 6 tasses.
UTILISATION
Préparation de café avec des grains fraîchement moulus
• Versez le volume souhaité d'eau dans le réservoir d'eau et assurez-vous
que le niveau d'eau ne dépasse pas le repère max.
• Tournez le support d'entonnoir à gauche. Assurez-vous que le filtre, le
cache de filtre et l'entonnoir sont bien placés dans le support d'entonnoir.
Ensuite, tournez le support d'entonnoir à droite pour le verrouiller.
• Remplissez le compartiment de grains de café avec des grains de café.
Assurez-vous de ne pas dépasser 100 grammes.
• Branchez la fiche secteur dans la prise murale.
• Sélectionnez le bouton 2, 4 ou 6 tasses pour régler le nombre de tasses
voulues. En l'absence de choix, 6 tasses sont sélectionnées par défaut.
Assurez-vous de toujours remplir le réservoir d'eau avec la même
quantité de tasses d'eau que la sélection.
• Tournez la molette de mouture sur le réglage de mouture voulu.
• Appuyez sur le bouton de puissance du café pour choisir entre 2
réglages.
• Appuyez sur le bouton marche/arrêt et le moulin démarre puis, après
quelques secondes, le processus de brassage démarre à son tour.
• Une fois le processus de brassage terminé, un avertisseur retentit 3 fois.
• La verseuse peut rester sur la plaque chauffante. Celle-ci chauffe dès
que la cafetière est allumée. La plaque chauffante permet de maintenir le
café chaud tant que la cafetière n'est pas éteinte (NOTE : par sécurité, la
plaque chauffante se coupe automatiquement après un moment).
Préparation du café avec du café moulu
• Versez le volume souhaité d'eau dans le réservoir d'eau et assurez-vous
que le niveau d'eau ne dépasse pas le repère max.
• Tournez le support d'entonnoir à gauche. Assurez-vous que l'entonnoir
et le filtre sont correctement placés dans le support d'entonnoir. Ajoutez
la quantité voulue de café moulu dans le filtre. Placez le cache de filtre et
tournez le support d'entonnoir à droite pour le verrouiller.
• Appuyez sur le bouton de café moulu puis sur le bouton marche/arrêt.
• L'appareil commence immédiatement le brassage.
• Une fois le processus de brassage terminé, un avertisseur retentit 3 fois.
• La verseuse peut rester sur la plaque chauffante. Celle-ci chauffe dès
que la cafetière est allumée. La plaque chauffante permet de maintenir le
café chaud tant que la cafetière n'est pas éteinte (NOTE : par sécurité, la
plaque chauffante se coupe automatiquement après un moment).
NETTOYAGE ET ENTRETIEN
• Débranchez toujours l’appareil et laissez-le refroidir complètement avant
de le nettoyer.
• Nettoyez l'extérieur et la base de l'appareil avec un chiffon humide.
• N’immergez pas l'appareil dans de l'eau ou dans d'autres liquides.
• Toutes les pièces non électriques sont lavables à l’eau chaude
savonneuse. Séchez-les complètement avant de les réutiliser. Ces
pièces ne se lavent pas au lave-vaisselle. N’utilisez jamais de détergent
abrasif.
• Essuyez à fond tous les éléments après leur nettoyage.
• Assurez-vous toujours de retirer le reliquat de grains et de préserver la
propreté du moulin et du compartiment de moulin si l'appareil n'est pas
utilisé régulièrement. Pour éviter toute obstruction du compartiment de
moulin.
Nettoyage des dépôts minéraux
• L'appareil doit être détartré chaque mois sinon l'arôme du café
s'appauvrit et le dépôt de tartre dans la machine peut l'endommager de
manière permanente et irréparable.
• Utilisez un détergent, disponible dans les commerces spécialisés, et
suivez les instructions données.
• Mélangez le détartrant adapté avec de l'eau froide dans un verre doseur,
selon ses instructions. Remplissez le réservoir d'eau jusqu'au niveau
Max avec la solution de détartrage préparée. Replacez ensuite le
réservoir d'eau dans la machine.
• Appuyez sur le bouton de café moulu et le témoin indicateur s'allume.
Appuyez sur le bouton marche/arrêt et l'appareil lance la procédure de
nettoyage.
• Veillez à toujours rincer l'appareil à l'eau claire après le rinçage avec le
mélange eau/détartrant.
GARANTIE
• Ce produit est garanti pour une période de 24 mois. Votre garantie est
valable si le produit est utilisé selon les instructions et pour l'usage
auquel il est destiné. De plus, la preuve d'achat d'origine (facture, reçu
ou ticket de caisse) doit être présentée, montrant la date d'achat, le nom
du détaillant et le numéro d'article du produit.
• Pour connaître les conditions de garantie détaillées, veuillez consulter
notre site Internet de service : service.princess.info
ENVIRONNEMENT
Cet appareil ne doit pas être jeté avec les déchets ménagers à la
fin de sa durée de vie, il doit être remis à un centre de recyclage pour les
appareils électriques et électroniques. Ce symbole sur l'appareil, le
manuel d'utilisation et l'emballage attire votre attention sur un point
important. Les matériaux utilisés dans cet appareil sont recyclables. En
recyclant vos appareils, vous contribuez de manière significative à la
protection de notre environnement. Renseignez-vous auprès des autorités
locales pour connaître les centres de collecte des déchets.
Support
Vous pouvez trouver toutes les informations et pièces de rechange sur
http://www.service.princess.info/ !
DE
Bedienungsanleitung
SICHERHEIT
• Beim Ignorieren der Sicherheitshinweise kann
der Hersteller nicht für Schäden haftbar
gemacht werden.
• Ist das Netzkabel beschädigt, muss es vom
Hersteller, dem Kundendienst oder ähnlich
qualifizierten Personen ersetzt werden, um
Gefahren zu vermeiden.
• Bewegen Sie das Gerät niemals durch Ziehen
am Kabel, und stellen Sie sicher, dass sich das
Kabel nicht verwickelt.
• Das Gerät muss auf einer ebenen, stabilen
Fläche platziert werden.
• Das Gerät darf nicht unbeaufsichtigt bleiben,
während es am Netz angeschlossen ist.
• Dieses Gerät darf nur für den
Haushaltsgebrauch und nur für den Zweck
benutzt werden, für den es hergestellt wurde.
• Dieses Gerät darf nicht von Kindern unter 8
Jahren verwendet werden. Dieses Gerät darf
von Kindern ab 8 Jahren und von Personen mit
eingeschränkten körperlichen, sensorischen
oder geistigen Fähigkeiten oder einem Mangel
an Erfahrung und Kenntnissen verwendet
werden, sofern diese Personen beaufsichtigt
oder über den sicheren Gebrauch des Geräts
unterrichtet wurden und die damit verbundenen
Gefahren verstanden haben. Kinder dürfen mit
dem Gerät nicht spielen. Halten Sie das Gerät
und sein Anschlusskabel außerhalb der
Reichweite von Kindern unter 8 Jahren.
Reinigungs- und Wartungsarbeiten dürfen nicht


