
Кофемолки BRAYER BR1181 - инструкция пользователя по применению, эксплуатации и установке на русском языке. Мы надеемся, она поможет вам решить возникшие у вас вопросы при эксплуатации техники.
Если остались вопросы, задайте их в комментариях после инструкции.
"Загружаем инструкцию", означает, что нужно подождать пока файл загрузится и можно будет его читать онлайн. Некоторые инструкции очень большие и время их появления зависит от вашей скорости интернета.


6
7
en
en
•
keep the original package.
•
Check the delivery set.
•
Read the safety measures and operating
recommendations.
•
examine the unit for damages; if the unit is damaged,
do not plug it into the mains.
• Make sure that the indicated specifications of the
power supply voltage of the unit correspond to the
specifications of your mains. When the unit is used in
the mains with 60 Hz frequency, it does not need any
additional settings.
•
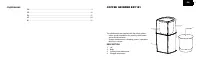
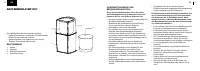
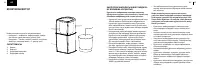
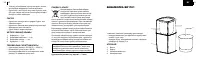
Remove the lid (1).
•
Turn the coffee grinder attachment (3)
counterclockwise and remove it from the unit body
(2).
•
Wash the lid (1) with warm water and neutral
detergent, rinse and wipe it dry.
•
Wipe the coffee grinder attachment (3) and the
chopper attachment (4) with a soft, slightly damp
cloth and then wipe them dry.
•
The cutting edges of the chopping knives are very
sharp and dangerous. Handle the chopping knives
very carefully during cleaning.
•
Clean the unit body (2) with a soft, slightly damp
cloth, and then wipe it dry.
•
do not immerse the coffee grinder, the power cord
and the power plug into water or any other liquids.
USAGe
he operation cycle of grinding coffee beans should
not exceed 30 seconds. After that make a 1-2
minutes break. After three operation cycles let the
unit cool down for 30 minutes.
•
note:
— when using the unit for the first time, a
foreign smell from the electric motor can appear —
this is normal and it is not covered by warranty.
COFFee GRInDeR ATTACHMenT (3)
•
Grind only the necessary amount of coffee beans
right before the coffee making.
•
Install the coffee grinder attachment (3) on the unit
body (2) and turn it clockwise as far as it will go.
Make sure that the coffee grinder attachment (3) is
fixed properly.
•
Add the coffee beans into the coffee grinder
attachment (3). The coffee grinder capacity does not
exceed 70 g of coffee beans.
•
Install the lid (1).
•
Insert the power plug into the mains socket.
•
Press on the lid (1) and hold it.
•
After grinding the coffee beans release the lid (1),
wait for the knives to stop completely and pull the
power plug out of the socket.
•
Slightly tap on the lid (1) to crumble the ground
coffee stuck to it.
•
Remove the lid (1), put the ground coffee into a
suitable sealed container.
•
Remove the coffee grinder attachment (3), for this
turn it counterclockwise.
•
Clean the coffee grinder attachment (3).
CHOPPeR ATTACHMenT (4)
The operation cycle of chopping products in the
chopper attachment should not exceed 30 seconds.
After that make a 1-2 minutes break. After three
operation cycles let the unit cool down for 30
minutes.
•
The chopper attachment is used for chopping greens,
vegetables, dried fruit, nuts etc.
•
ATTenTIOn!
- the cutting edges of the chopping knives are very
sharp and dangerous. Handle the chopping knives
very carefully during cleaning.
- do not chop very hard products, such as nutmegs,
cereals, ice and frozen food.
- the maximal weight of hard products (nuts, dried
fruit etc.) should not exceed 45 g.
- the amount of products to process should not
exceed the «MAX» mark or be below the cutting
blades of the chopping knives.
BeFORe YOU START CHOPPInG THe PRODUCTS:
•
cut vegetables and fruit into pieces no more that
1.5x1.5 cm at size, remove stems of herbs, shell
nuts.
•
Install the chopper attachment (4) on the unit body
(2) and turn it clockwise as far as it will go. Make sure
that the chopper attachment (4) is fixed properly. Be
careful: the chopping knives are sharp.
•
Put the preliminary cut products into the chopper
attachment (4), do not exceed the maximal level
mark «MAX».
•
Install the lid (1).
•
Insert the power plug into the mains socket.
•
Press on the lid (1) and hold it.
•
If the chopping knives stop rotating during the unit
operation, stop using the unit, unplug it and open
the lid (1), remove the product which is hindering
the chopping knives rotation. If the chopping knives
rotation is hindered, it is recommended to add a
minimal amount of water, liquor, milk or oil into the
chopper attachment (4) bowl.
•
After chopping the products release the lid (1), wait
for the knives to stop completely and pull the power
plug out of the socket.
•
Remove the lid (1).
•
Take the chopped food out of the chopper attachment
(4).
Характеристики

Остались вопросы?Не нашли свой ответ в руководстве или возникли другие проблемы? Задайте свой вопрос в форме ниже с подробным описанием вашей ситуации, чтобы другие люди и специалисты смогли дать на него ответ. Если вы знаете как решить проблему другого человека, пожалуйста, подскажите ему :)


