Измерительные приборы Bosch GMS 100 - инструкция пользователя по применению, эксплуатации и установке на русском языке. Мы надеемся, она поможет вам решить возникшие у вас вопросы при эксплуатации техники.
Если остались вопросы, задайте их в комментариях после инструкции.
"Загружаем инструкцию", означает, что нужно подождать пока файл загрузится и можно будет его читать онлайн. Некоторые инструкции очень большие и время их появления зависит от вашей скорости интернета.


12
| English
1 609 929 Y44 | (10.5.11)
Bosch Power Tools
Working Advice
f
Measuring values can be impaired through certain am-
bient conditions. These include, e. g., the proximity of
other equipment that produce strong magnetic or elec-
tromagnetic fields, moisture, metallic building materi-
als, foil-laminated insulation materials or conductive
wallpaper or tiles.
Therefore, please also observe other
information sources (e. g. construction plans) before drill-
ing, sawing or routing into walls, ceilings or floors.
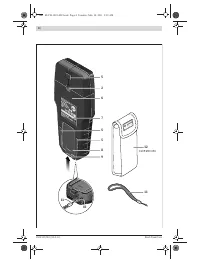
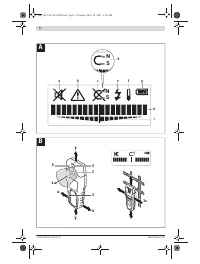
Marking Objects
If required, detected objects can be marked. Perform a meas-
urement as usual. Once you have found the boundaries or the
centre of an object, mark the sought location through the
marking hole
2
.
Temperature Control
The measuring tool is equipped with a temperature control in-
dicator, as accurate measurements are only possible as long
as the temperature within the measuring tool remains con-
stant.
When the temperature control indicator
f
lights up, the meas-
uring tool is not within the operating temperature range or
was subject to large variations in temperature.
Switch the
measuring tool off and allow it to adjust to the ambient
temperature before switching it on again.
Warning Function
When indicator
b
lights up on the display, the measurement
must be restarted. Remove the measuring tool from the wall
and place it on the base material at a different location.
When indicator
b
flashes on display
3
, send the measuring
tool to an authorised customer services agent.
Recalibration
When the main scale
h
indicates a continuously high ampli-
tude, even though there is no object near the measuring tool,
the measuring tool can be manually recalibrated.
– Switch the measuring tool off.
– Remove all objects near the measuring tool that could be
detected, including your wrist watch or rings made of
metal, and hold the measuring tool up.
Pay attention that battery indicator
g
indicates at least 1/3
capacity:
– Switch the measuring tool on again. When the measuring
tool starts, immediately press and hold the the On/Off but-
ton
4
. Hold the On/Off button until the illuminated ring
1
slowly flashes red, indicating the calibration of the measur-
ing tool.
– When the calibration was successful, ring
1
lights up green
and the measuring tool automatically ready for operation
again.
Note:
If the measuring tool does not automatically start, re-
peat the recalibration. If the measuring tool still does not
start, send it to an authorised customer services agent.
Maintenance and Service
Maintenance and Cleaning
f
Check the measuring tool each time before use.
In case
of visible damage or loose components inside the measur-
ing tool, safe function can no longer be ensured.
Keep the measuring tool clean and dry at all times to ensure
proper and safe working.
Do not immerse the measuring tool in water or other fluids.
Wipe away debris or contamination with a dry, soft cloth. Do
not use cleaning agents or solvents.
In order not to affect the measuring function, decals/stickers or
name plates, especially metal ones, may not be attached in the
sensor area
6
on the front or back side of the measuring tool.
Do not remove the contact pads
5
on the backside of the
measuring tool.
If the measuring tool should fail despite the care taken in man-
ufacturing and testing procedures, repair should be carried
out by an authorised after-sales service centre for Bosch pow-
er tools. Do not open the measuring tool yourself.
In all correspondence and spare parts orders, please always
include the 10-digit article number given on the type plate of
the measuring tool.
After-sales Service and Customer Assistance
Our after-sales service responds to your questions concern-
ing maintenance and repair of your product as well as spare
parts. Exploded views and information on spare parts can
also be found under:
www.bosch-pt.com
Our customer service representatives can answer your ques-
tions concerning possible applications and adjustment of
products and accessories.
Great Britain
Robert Bosch Ltd. (B.S.C.)
P.O. Box 98
Broadwater Park
North Orbital Road
Denham
Uxbridge
UB 9 5HJ
Tel. Service: +44 (0844) 736 0109
Fax: +44 (0844) 736 0146
E-Mail: boschservicecentre@bosch.com
Ireland
Origo Ltd.
Unit 23 Magna Drive
Magna Business Park
City West
Dublin 24
Tel. Service: +353 (01) 4 66 67 00
Fax: +353 (01) 4 66 68 88
OBJ_BUCH-1418-002.book Page 12 Tuesday, May 10, 2011 8:18 AM
Характеристики

Остались вопросы?Не нашли свой ответ в руководстве или возникли другие проблемы? Задайте свой вопрос в форме ниже с подробным описанием вашей ситуации, чтобы другие люди и специалисты смогли дать на него ответ. Если вы знаете как решить проблему другого человека, пожалуйста, подскажите ему :)


