Холодильник AEG S 75438 KG - инструкция пользователя по применению, эксплуатации и установке на русском языке. Мы надеемся, она поможет вам решить возникшие у вас вопросы при эксплуатации техники.
Если остались вопросы, задайте их в комментариях после инструкции.
"Загружаем инструкцию", означает, что нужно подождать пока файл загрузится и можно будет его читать онлайн. Некоторые инструкции очень большие и время их появления зависит от вашей скорости интернета.
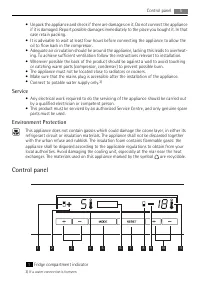

2
Fridge temperature indicator
3
Buttons for setting fridge temperature
4
Fridge thermometer indicator (with COOLMATIC)
5
MODE button
6
Display
7
RESET switch
8
Freezer compartment indicator
9
Freezer temperature indicator
10
Buttons for setting freezer temperature
11
Freezer thermometer indicator (with FROSTMATIC)
Switching on
Plug the plug into the power outlet.
The display is illuminated, the appliance is on.
As soon as the appliance is turned on, it is in alarm condition, the temperature flashes and
you will hear a buzzer.
Press the RESET switch and the buzzer will go off (refer to "High temperature alarm" ) and
on the temperature indicator will appear the warmest temperature reached.
For a correct storage of the food the following temperatures should be set:
+5°C in the fridge
-18°C in the freezer
To select a different temperature refer to "Temperature regulation".
Wait until the inside compartment temperature reach -18°C, before introducing the goods
in the freezer compartment.
Switching off
To switch the appliance off do these steps:
1. Remove the mains plug.
If the appliance is not going to be used for an extended period:
1. Remove the mains plug or turn out the circuit breaker or fuse.
2. Defrost and clean the appliance thoroughly.
3. Finally, leave the doors open so as to avoid a build up of odours.
Temperature setting buttons
The temperature is adjusted using the temperature setting buttons. These buttons are con
-
nected to the temperature indicator.
• The temperature indicator is switched over from the indicator of the ACTUAL tempera
-
ture (Temperature indicator is illuminated) to the indicator of the DESIRED temperature
(Temperature indicator flashes) by pressing one of the Temperature setting buttons.
• Each time one of the two buttons is pressed again the DESIRED temperature is adjusted
by 1°C. The DESIRED temperature must be reached within 24 hours.
If neither button is pressed, the temperature indicator automatically switches back after a
short period (approx. 5 sec.) to the indicator of the ACTUAL temperature.
DESIRED temperature means:
6
Control panel


