
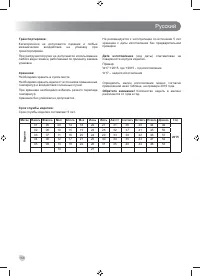
Газонокосилки Ryobi RLM46175SO 5133002554 - инструкция пользователя по применению, эксплуатации и установке на русском языке. Мы надеемся, она поможет вам решить возникшие у вас вопросы при эксплуатации техники.
Если остались вопросы, задайте их в комментариях после инструкции.
"Загружаем инструкцию", означает, что нужно подождать пока файл загрузится и можно будет его читать онлайн. Некоторые инструкции очень большие и время их появления зависит от вашей скорости интернета.


English
7
EN
FR
DE
ES
IT
NL
PT
DA
SV
FI
NO
RU
PL
CS
HU
RO
LV
LT
ET
HR
SL
SK
BG
UK
3. Open the oil cap/dipstick by turning it 90°
counterclockwise. Remove the oil cap/dipstick.
4. Slowly add oil. Fill to the “Full” line on the dipstick. Do
not over
fi
ll.
NOTE:
When checking the oil level, seat the dipstick in the
oil
fi
ll hole but do not screw in.
5. Reinstall and secure the oil cap/dipstick by turning it 90°
clockwise.
To check engine oil:
■
Be sure mower is level and area around oil cap/dipstick
is clean.
■
Remove the oil cap/dipstick. Wipe clean and reseat in
the oil
fi
ll hole but do not screw in.
■
Remove the oil cap/dipstick again and check the oil
level. Add oil as needed.
STARTING OR STOPPING THE MOWER
See figure 5.
WARNING
Never start or run the engine inside a closed or poorly
ventilated area; breathing exhaust fumes can kill.
Starting the engine
1. Open the fuel valve.
2. Press the primer bulb 3 times.
NOTE:
This step is not usually necessary when starting
an engine that has already run for a few minutes.
3. Hold the power lever down against the handle.
4. Pull the starter grip until the engine starts. Slowly
release the starter cord so that the rope does not snap
back.
NOTE:
It may be necessary to repeat the priming steps
in cooler weather. In warmer weather, overpriming may
cause flooding and the engine will not start. If you do
flood the engine, wait a few minutes before attempting
to start and do not repeat priming steps.
Starting the engine using the ONE+
TM
EasyStart
TM
1. Install the battery pack. See
fi
gure 5b.
a. Open the battery compartment cover.
b. Place the battery pack in the product, aligning the
rib on the battery pack with the groove in the battery
port. Make sure the latches on the battery pack
snap into place and the battery pack is secured to
the product before beginning operation.
c. Close the battery cover. Snap the cover in place.
NOTE:
Always remove the battery pack from product
when not in use.
2. Open the fuel valve.
3. Press the primer bulb 3 times.
4. Hold the power lever down against the handle.
5. Turn the ONE+
TM
EasyStart
TM
key to start the engine. If
the product fails to start, wait for 60 sec. Failure to follow
this instruction may damage the ONE+
TM
EasyStart
TM
.
NOTE:
Do not turn the ONE+
TM
EasyStart
TM
key while the
product is already running.
NOTE:
It may be necessary to repeat the priming steps in
cooler weather. In warmer weather, overpriming may cause
fl
ooding and the engine will not start. If you do
fl
ood the
engine, wait a few minutes before attempting to start and
do not repeat priming steps.
Stopping the engine
1. Release the power lever and allow the engine to come
to a complete stop.
2. Close the fuel valve.
PROPELLING THE PRODUCT
See figure 6.
■
To self-propel: Hold down the power lever while slowly
pulling the self-propel bail towards the handle. Release
the self-propel bail to stop the wheel drive.
■
To manually propel: Hold down the power lever. Do not
engage the self-propel bail.
NOTE:
The product will start to run when the self-propel
bail is engaged.
SETTING BLADE HEIGHT
See figure 7.
When shipped, the wheels on the mower are set to a low-
cutting position. Before using the mower for the
fi
rst time,
adjust the cutting position to the height best suited for your
lawn. The average lawn should be between 38 mm to 50
mm during cool months and between 50 mm and 76 mm
during hot months.
To set the blade height:
■
Stop the product and wait for the blade to come to a
complete stop.
■
To raise the blade height, grasp the height adjustment
lever and move it toward the back of the mower.
■
To lower the blade height, grasp the height adjustment
lever and move it toward the front of the mower.
SETTING HANDLE HEIGHT AND ANGLE
See figure 8.
The height of the handle can be easily adjusted for operator
preference.
To adjust the handle height:
■
Remove the quick-release knob.
■
Slide out the quick-release lever and adjust the height
to the other opening.
■
Reinstall the quick-release fastener. Tighten the quick-
release knob.
■
Repeat on the other side of the handle.
To adjust the handle angle:
■
Release the lower quick-release fasteners.


