
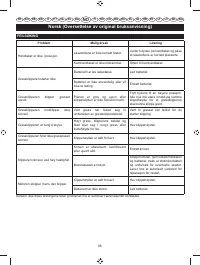
Газонокосилки Greenworks G40LM45 2500107UA - инструкция пользователя по применению, эксплуатации и установке на русском языке. Мы надеемся, она поможет вам решить возникшие у вас вопросы при эксплуатации техники.
Если остались вопросы, задайте их в комментариях после инструкции.
"Загружаем инструкцию", означает, что нужно подождать пока файл загрузится и можно будет его читать онлайн. Некоторые инструкции очень большие и время их появления зависит от вашей скорости интернета.


INSTALLING SIDE DISCHARGE DEFLECTOR
See figure 6.
NOTE
: When using the side discharge deflector, do not
install the grassbox. The mulching plug should remain
installed.
1. Lift the side discharge door.
2. Align the hooks on the defl ector with the hinge rod on
the underside of the door.
3. Lower the defl ector until the hooks are secured on the
mulch door hinge rod.
4. Release the defl ector and side discharge door.
16
Deutsch (Übersetzung der originalen Anleitungen)
DE
FR EN
ES
IT
PT NL SV DA NO FI HU CS RU RO PL SL HR ET LT LV SK BG
16
English (Original instructions)
EN
FR
DE ES
IT
PT NL SV DA NO FI HU CS RU RO PL SL HR ET LT LV SK BG
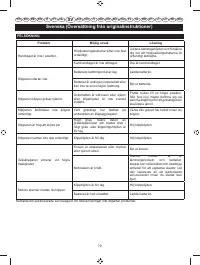
WARNING
Do not use any attachments or accessories not
recommended by the manufacturer of this product. The
use of attachments or accessories not recommended
can result in serious personal injury.
WARNING
Always inspect mower for missing or damaged parts
and blade for damage, uneven, or excessive wear prior
to use. Using a product with damaged or missing parts
could result in serious personal injury.
■
Do not tilt the lawn mower when starting the engine
or switching on the motor, unless the lawn mower has
to be tilted for starting. In this case, do not tilt it more
than absolutely necessary and lift only the part which
is away from the operator.
■
Do not start the engine when standing in front of the
discharge chute.
■
Do not put hands or feet near or under rotating parts.
Always keep clear of the discharge opening.
For complete charging instructions, refer to the operator’s
manual for the battery packs and chargers listed in the
specifi cations section.
TO INSTALL BATTERY PACK
See figure 8.
1. Lift and hold up the battery door.
2. Place the battery pack on the tool. Align raised ribs on
battery pack with grooves in the product's battery port.
3. Make sure the latch on bottom of the battery pack
snaps in place and that battery pack is fully seated
and secure in the product before beginning operation.
4. Insert the isolator key.
5. If the machine is not going to be used immediately, do
not insert the isolator key.
6. Close the door.
both sides.
3. Tighten the upper handle with the quick release
fasteners on both sides.
INSTALLING THE GRASSBOX
See figure 3.
1. Lift the rear discharge door.
2. Lift the grassbox by its handle and place under the
rear door, so that the hooks on the grassbox frame are
seated into the slots in the handle bracket.
3. Release the rear door. When installed correctly, the
hooks on the grassbox will rest securely in the slots on
the handle brackets.
INSTALLING THE MULCHING PLUG
See figure 5.
1. Lift and hold up the rear discharge door.
2. Grasp the mulching plug by its handle and insert it at a
slight angle, as shown.
3. Push the mulching plug securely into place.
4. Lower the rear discharge door.
SETTING BLADE HEIGHT
See figure 7.
When shipped, the wheels on the mower are set to a low-
cutting position. Before using the mower for the first time,
adjust the cutting position to the height best suited for your
lawn. The average lawn should be between 38 mm and 51
mm during cool months and between 51 mm and 70 mm
during hot months.
To adjust the blade height
■
To raise the blade height, grasp the height adjustment
lever and move it toward the back of the mower.
■
To lower the blade height, grasp the height adjustment
lever and move it toward the front of the mower.
OPERATION
WARNING
Do not allow familiarity with products to make you
careless. Remember that a careless fraction of a
second is suffi cient to infl ict serious injury.
WARNING
Always wear eye protection. Failure to do so could
result in objects being thrown into your eyes resulting
in possible serious injury.


