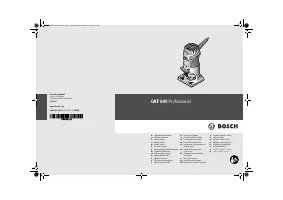
Фрезеры Bosch GKF 600 - инструкция пользователя по применению, эксплуатации и установке на русском языке. Мы надеемся, она поможет вам решить возникшие у вас вопросы при эксплуатации техники.
Если остались вопросы, задайте их в комментариях после инструкции.
"Загружаем инструкцию", означает, что нужно подождать пока файл загрузится и можно будет его читать онлайн. Некоторые инструкции очень большие и время их появления зависит от вашей скорости интернета.


English |
17
Bosch Power Tools
1 609 92A 11C | (12.11.14)
Working Advice
Protect router bits against shock and impact.
Before any work on the machine itself, pull the mains
plug.
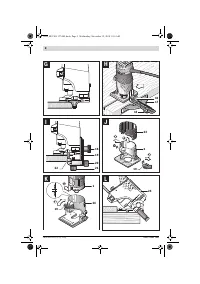
Shaping or Molding Applications (see figure G)
For shaping or molding applications without the use of a par-
allel guide, the router bit must be equipped with a pilot or a
ball bearing.
– Guide the switched on power tool from the side toward the
workpiece until the pilot or the ball bearing of the router bit
faces against the workpiece edge to be machined.
– Guide the machine alongside the workpiece edge. Ensure
that the tool rests on the workpiece at the correct angle.
Excessive pressure can damage the edge of the workpiece.
Routing with Parallel Guide (see figure H)
For edge-parallel cuts, mount the parallel guide
17
.
– Fasten the parallel guide
17
to the routing base
2
with the
knurled screw
16
.
– Adjust the desired depth setting with wing bolt
18
on the
parallel guide.
– Guide the switched on power tool with uniform feed and
lateral pressure on the parallel guide alongside the work-
piece edge.
Routing with Roller Guide (see figure I)
The roller guide
19
is used for routing edges with router bits
without pilot or ball bearing.
– Fasten the roller guide to the routing base
2
with knurled
screw
16
.
– Guide the machine with uniform feed alongside the work-
piece edge.
Lateral Clearance:
In order to change the amount of material
removal, the lateral clearance between workpiece and the
guide roller
22
of the roller guide
19
can be adjusted.
– Loosen wing bolt
20
, adjust the desired lateral clearance
by turning wing bolt
21
and tighten wing bolt
20
again.
Height:
Adjust the vertical alignment of the roller guide de-
pending on the router bit in use and the thickness of the mate-
rial to be worked.
– Loosen knurled screw
16
on the roller guide, move the roll-
er guide to the desired position and tighten the knurled
screw again.
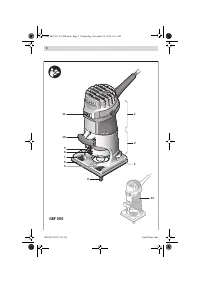
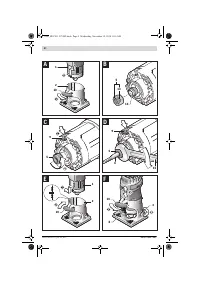
Mounting the Base Cover Sleeve (see figure J)
Intensive use of the power tool will cause the routing base to
become hot. In this case, a base cover sleeve (accessory) can
be mounted for protection of the hands.
– Remove the clamping lever
10
.
– Place the base cover sleeve
23
on the routing base
2
from
above.
– Reassemble the clamping lever again in such a manner that
the motor unit
1
is held securely in the routing base when
the clamping lever is locked.
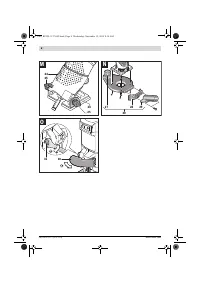
Routing with Tilt Base (see figures K – M)
The tilt base
24
is particularly suitable for flush routing of lam-
inated edges at hard to reach locations, for routing special an-
gles as well as for beveling edges.
When beveling edges using the tilt base, the router bit must be
equipped with a pilot or a ball bearing.
For mounting of the tilt base, follow the work steps in section
“Mounting the Routing Base” (page 16) accordingly.
To achieve precise angles, the tilt base
24
is equipped with
adjustment notches in steps of 7.5 °. The complete adjust-
ment range is 75 ° (45 ° toward the front and 30 ° toward the
rear).
– Loosen both wing bolts
25
.
– Adjust the requested value using the scale
26
and tighten
the wing bolts
25
again.
Changing the Guide Plate (see figure N)
The side-handle subbase
30
can be mounted in place of the
guide plate
6
. It offers an additional handle
12
as well as a
connection possibility for dust extraction.
– Unscrew the four pan head screws on the bottom side of
the guide plate
6
and remove the guide plate.
– Screw the side-handle subbase
30
to the base plate with
the fastening screws provided.
In order to connect dust extraction, an extraction adapter
29
must be mounted to the side-handle subbase
30
.
– Screw the extraction adapter to the guide plate with the
two screws provided.
– Connect an extraction hose (Ø 35 mm) to the mounted ex-
traction adapter.
– To ensure optimum dust extraction, the extraction adapter
should be cleaned regularly.
When working edges, additionally use the extraction hood
28
.
– Mount the extraction hood between the side-handle sub-
base
30
and the extraction adapter
29
.
– Remove the extraction hood again for working smooth face
surfaces.
The machine can be plugged directly into the receptacle of a
Bosch all-purpose vacuum cleaner with remote starting con-
trol. The vacuum cleaner starts automatically when the ma-
chine is switched on.
The vacuum cleaner must be suitable for the material being
worked.
When vacuuming dry dust that is especially detrimental to
health or carcinogenic, use a special vacuum cleaner.
Readjusting the Clamping Lever (see figure O)
When the motor unit
1
is no longer tightly seated in the routing
base, the tensioning force of the clamping lever
10
must be
readjusted.
– Open the clamping lever.
– Turn nut
31
approx. 45 ° in clockwise direction with an
open-end spanner (size 8 mm).
– Tighten the clamping lever again.
– Check if the motor unit is clamped securely. Do not over-
tighten the nut.
OBJ_BUCH-1137-002.book Page 17 Wednesday, November 12, 2014 8:16 AM
Содержание
- 109 Описание продукта и услуг; Применение по назначению
- 110 Технические данные; Заявление о соответствии; Сборка; Замена рабочего инструмента
- 111 Отсос пыли и стружки; Работа с инструментом
- 112 Включение электроинструмента; Указания по применению
- 113 Техобслуживание и сервис; Техобслуживание и очистка
- 114 Утилизация
Характеристики

Остались вопросы?Не нашли свой ответ в руководстве или возникли другие проблемы? Задайте свой вопрос в форме ниже с подробным описанием вашей ситуации, чтобы другие люди и специалисты смогли дать на него ответ. Если вы знаете как решить проблему другого человека, пожалуйста, подскажите ему :)


