Фильтры для воды Brita My P1 (1025434) - инструкция пользователя по применению, эксплуатации и установке на русском языке. Мы надеемся, она поможет вам решить возникшие у вас вопросы при эксплуатации техники.
Если остались вопросы, задайте их в комментариях после инструкции.
"Загружаем инструкцию", означает, что нужно подождать пока файл загрузится и можно будет его читать онлайн. Некоторые инструкции очень большие и время их появления зависит от вашей скорости интернета.


ENGLISH
7
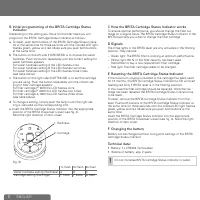
3.3
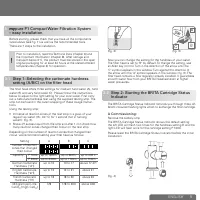
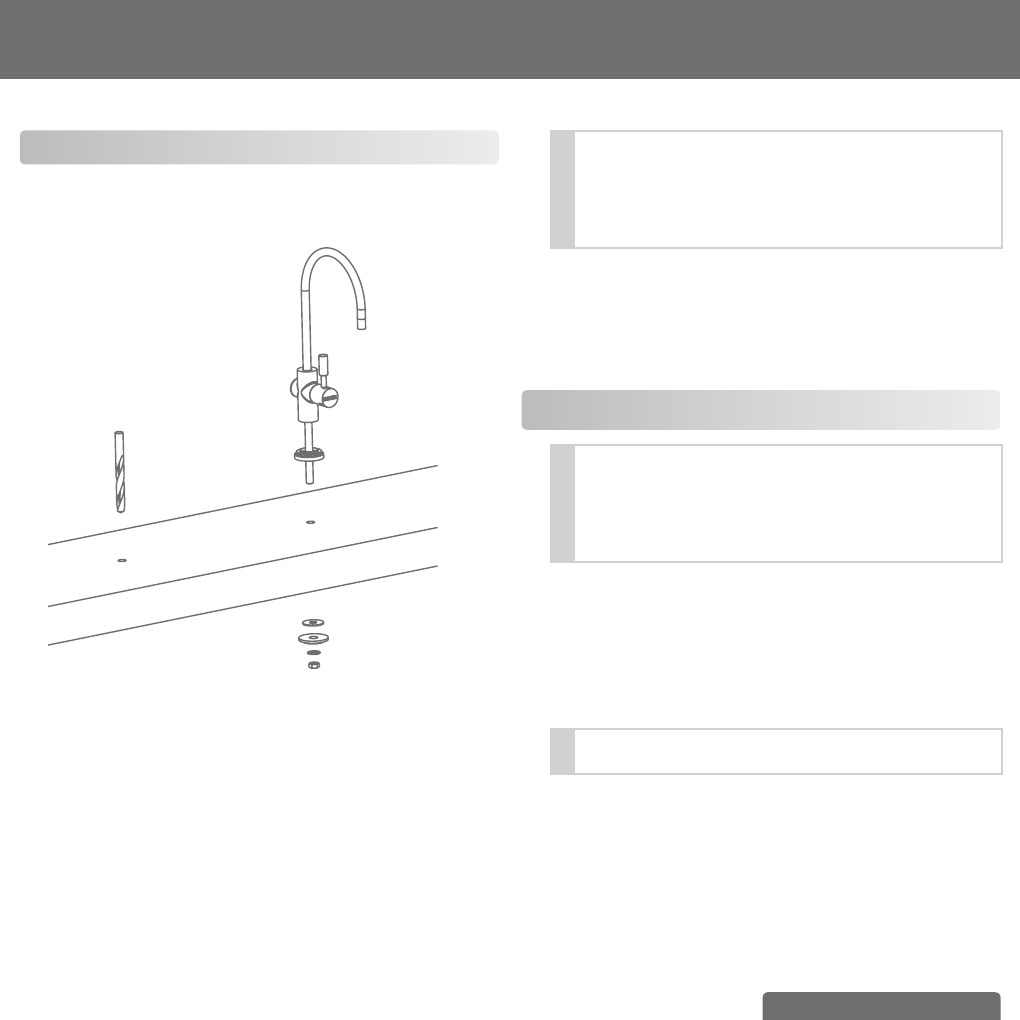
Step 3: Installing the BRITA Dispenser
To install the BRITA Dispenser, firstly ensure you have all the com-
ponents required (see fig. 6).
1.
2.
3.
4.
5.
6.
(fig. 6)
12 mm
Drill
1. BRITA Dispenser
2. Base
(Work surface)
3. Gasket
4. Counter plate
5. Locking ring
6. Hexagon nut (7/16")
To start, find a suitable place to set up your BRITA Dispenser near
your sink. We recommend installing it next to the sink on the work
surface (next to the main tap). Please make sure that there is
enough room for the P 1000 filter cartridge, the two hoses under
the sink or the drill hole.
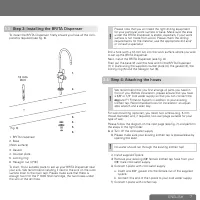
!
Please note that you will need the right drilling equipment
for your particular work surface or base. Make sure the area
under the BRITA Dispenser is stable, especially if your work
surface is not made from wood. Please check the drilling
requirements for the material, use the appropriate drill and/
or consult a specialist.
Drill a hole (with a 12-mm bit) into the work surface where you wish
to set up the BRITA Dispenser.
Next, install the BRITA Dispenser (see fig. 6).
Then put the base (2) over the hole and fix the BRITA Dispenser
(1) in place using the supplied counter plate (4), the gasket (3), the
locking ring (5) and the hexagon nut (6).
3.4
Step 4: Attaching the hoses
!
We recommend that you first arrange all parts you need in
front of you. Before installation, please ensure that you have
a 3/8" or 1/2" cold water supply so that you can connect the
my
pure P1 Filtration System in addition to your existing
kitchen tap. Recommended tools for installation: an adjust-
able wrench and a allen key.
For wall mounting (optional), you need: two screws (e.g. 5 mm
thread diameter) and, if required, two wall plugs suitable for your
type of wall.
Please follow the diagram on the next page (see fig. 7) and perform
the steps in the right order.
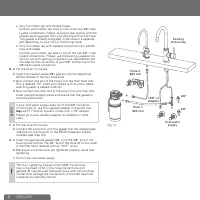
A
a) Turn off the cold water supply
b) Please make sure your existing kitchen tap is pressureless by
opening the lever
!
No water should run through the existing kitchen tap!
c) Install supplied T-piece
d) Remove your existing 3/8" female kitchen tap hose from your
3/8" male cold water supply.
e) Connect t-piece with cold water supply.
a. Insert one 3/8“ gasket into the female nut of the supplied
t-piece.
b. Connect this end of the t-piece to your cold water supply.
f) Connect t-piece with kitchen tap
Характеристики

Остались вопросы?Не нашли свой ответ в руководстве или возникли другие проблемы? Задайте свой вопрос в форме ниже с подробным описанием вашей ситуации, чтобы другие люди и специалисты смогли дать на него ответ. Если вы знаете как решить проблему другого человека, пожалуйста, подскажите ему :)


