
Электрорубанки Makita 1911B - инструкция пользователя по применению, эксплуатации и установке на русском языке. Мы надеемся, она поможет вам решить возникшие у вас вопросы при эксплуатации техники.
Если остались вопросы, задайте их в комментариях после инструкции.
"Загружаем инструкцию", означает, что нужно подождать пока файл загрузится и можно будет его читать онлайн. Некоторые инструкции очень большие и время их появления зависит от вашей скорости интернета.


7
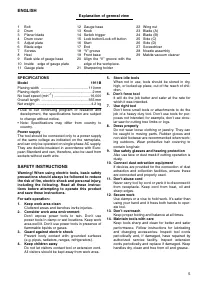
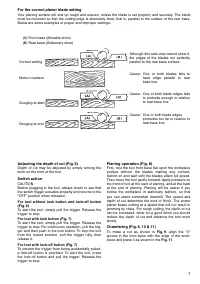
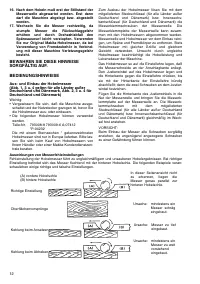
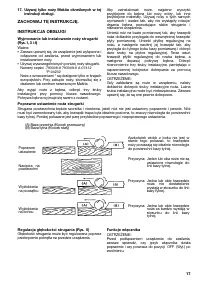
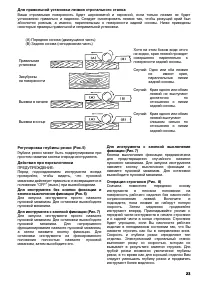
For the correct planer blade setting
Your planing surface will end up rough and uneven, unless the blade is set properly and securely. The blade
must be mounted so that the cutting edge is absolutely level, that is, parallel to the surface of the rear base.
Below are some examples of proper and improper settings.
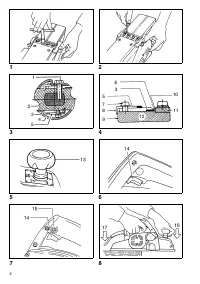
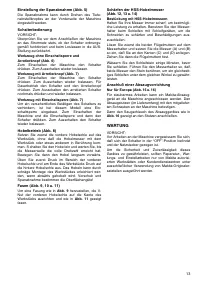
Adjusting the depth of cut (Fig. 5)
Depth of cut may be adjusted by simply turning the
knob on the front of the tool.
Switch action
CAUTION:
Before plugging in the tool, always check to see that
the switch trigger actuates properly and returns to the
“OFF” position when released.
For tool without lock button and lock-off button
(Fig. 6)
To start the tool, simply pull the trigger. Release the
trigger to stop.
For tool with lock button (Fig. 7)
To start the tool, simply pull the trigger. Release the
trigger to stop. For continuous operation, pull the trig-
ger and then push in the lock button. To stop the tool
from the locked position, pull the trigger fully, then
release it.
For tool with lock-off button (Fig. 7)
To prevent the trigger from being accidentally pulled,
a lock-off button is provided. To star t the tool, press
the lock-off button and pull the trigger. Release the
trigger to stop.
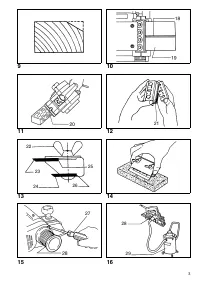
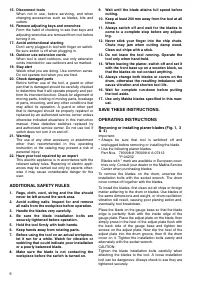
Planing operation (Fig. 8)
First, rest the tool front base flat upon the workpiece
surface without the blades making any contact.
Switch on and wait until the blades attain full speed.
Then move the tool gently forward. Apply pressure on
the front of tool at the start of planing, and at the back
at the end of planing. Planing will be easier if you
incline the workpiece in stationary fashion, so that
you can plane somewhat downhill. The speed and
depth of cut determine the kind of finish. The power
planer keeps cutting at a speed that will not result in
jamming by chips. For rough cutting, the depth of cut
can be increased, while for a good finish you should
reduce the depth of cut and advance the tool more
slowly.
Chamfering (Fig. 9, 10 & 11)
To make a cut as shown in
Fig. 9
, align the “V”
groove in the front base with the edge of the work-
piece and plane it as shown in the
Fig. 11
.
(A) Front base (Movable shoe)
(B) Rear base (Stationary shoe)
Correct setting
Nicks in surface
Gouging at start
Gouging at end
Although this side view cannot show it,
the edges of the blades run perfectly
parallel to the rear base surface.
Cause: One or both blades fails to
have edge parallel to rear
base line.
Cause: One or both blade edges fails
to protrude enough in relation
to rear base line.
Cause: One or both blade edges
protrudes too far in relation to
rear base line.
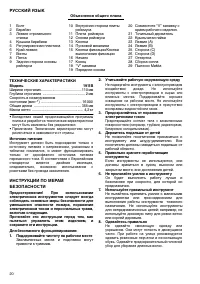
Характеристики

Остались вопросы?Не нашли свой ответ в руководстве или возникли другие проблемы? Задайте свой вопрос в форме ниже с подробным описанием вашей ситуации, чтобы другие люди и специалисты смогли дать на него ответ. Если вы знаете как решить проблему другого человека, пожалуйста, подскажите ему :)


