Электропилы Bosch GKT 55 GCE - инструкция пользователя по применению, эксплуатации и установке на русском языке. Мы надеемся, она поможет вам решить возникшие у вас вопросы при эксплуатации техники.
Если остались вопросы, задайте их в комментариях после инструкции.
"Загружаем инструкцию", означает, что нужно подождать пока файл загрузится и можно будет его читать онлайн. Некоторые инструкции очень большие и время их появления зависит от вашей скорости интернета.


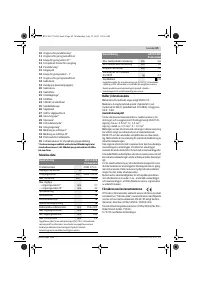


English |
17
Bosch Power Tools
1 609 929 Y20 | (13.7.11)
f
The spindle lock button 25 may be actuated only when
the saw spindle is at a standstill.
Otherwise, the power
tool can be damaged.
– With the Allen key
5
, unscrew the clamping bolt
20
turning
in rotation direction
n
.
– Remove the clamping flange
21
and the saw blade
22
from
the saw spindle
26
.
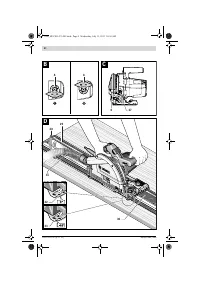
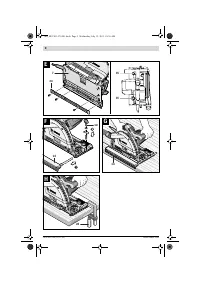
Mounting the Saw Blade (see figure A)
Adjust the maximal cutting depth, see section “Adjusting the
Cutting Depth”.
For changing the cutting tool, it is best to place the machine
on the face side of the motor housing.
– Pivot lever
3
toward the front.
– Push lock-off button
2
toward the front and press the saw
toward base plate
7
until it engages in the position for
changing the saw blade.
– Clean the saw blade
22
and all clamping parts to be assem-
bled.
– Place the saw blade
22
on to the mounting flange
23
. The
cutting direction of the teeth (direction or arrow on saw
blade) and the direction-of-rotation arrow on the blade
guard
15
must correspond.
– Mount the clamping flange
21
and screw in the clamping
bolt
20
turning in rotation direction
o
. Observe correct
mounting position of mounting flange
23
and clamping
flange
21
.
– Press the spindle lock button
25
and keep it pressed.
– With the Allen key
5
, tighten the clamping bolt
20
turning
in rotation direction
o
. The tightening torque is between
6 – 9 Nm, which corresponds to hand tight plus ¼ turn.
– Pivot lever
3
back. When doing this, the saw retracts back
to the starting position.
Dust/Chip Extraction
f
Before any work on the machine itself, pull the mains
plug.
f
Dusts from materials such as lead-containing coatings,
some wood types, minerals and metal can be harmful to
one’s health. Touching or breathing-in the dusts can cause
allergic reactions and/or lead to respiratory infections of
the user or bystanders.
Certain dusts, such as oak or beech dust, are considered
as carcinogenic, especially in connection with wood-treat-
ment additives (chromate, wood preservative). Materials
containing asbestos may only be worked by specialists.
– As far as possible, use a dust extraction system suita-
ble for the material.
– Provide for good ventilation of the working place.
– It is recommended to wear a P2 filter-class respirator.
Observe the relevant regulations in your country for the
materials to be worked.
f
Prevent dust accumulation at the workplace.
Dusts can
easily ignite.
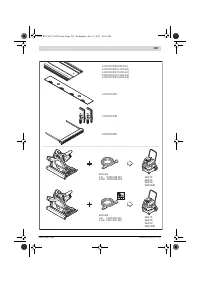
External Dust Extraction
Mount the vacuum hose
31
(accessory) on to the saw dust
ejector
18
.Connect the vacuum hose
31
to a vacuum cleaner
(accessory). An overview for connecting to various vacuum
cleaners can be found at the end of this manual.
The machine can be plugged directly into the receptacle of a
Bosch all-purpose vacuum cleaner with remote starting con-
trol. The vacuum cleaner starts automatically when the ma-
chine is switched on.
The vacuum cleaner must be suitable for the material being
worked.
When vacuuming dry dust that is especially detrimental to
health or carcinogenic, use a special vacuum cleaner.
Operation
Operating Modes
f
Before any work on the machine itself, pull the mains
plug.
Adjusting the Cutting Depth (see figure B – C)
f
Adjust the cutting depth to the thickness of the work-
piece.
Less than a full tooth of the blade teeth should be
visible below the workpiece.
Turn cutting-depth indicator
8
to the bottom position
n
for
sawing without guide rail, or to the upper position
o
for saw-
ing with guide rail.
Press slider
27
and adjust the desired cutting depth (material
thickness + tooth height of the saw blade) on cutting-depth
scale
6
.
Adjusting the Cutting Angle
Loosen the wing bolts
11
and
17
. Tilt the saw sidewards. Ad-
just the desired measure on the scale
9
. Tighten the wing
bolts
11
and
17
again.
The mitre angle of the saw can be adjusted to – 1 ° or + 47 ° .
For the – 1 ° mitre angle, additionally push button
16
while
tilting, or for the + 47 ° mitre angle, push button
12
while tilt-
ing.
Note:
For bevel cuts, the cutting depth is smaller than the set-
ting indicated on the cutting-depth scale
6
.
Cutting Marks (see figure D)
The 0 ° cutting mark (
32
) indicates the position of the saw
blade for straight cuts. The 45 ° cutting mark (
33
) indicates
the position of the saw blade for 45 ° cuts without using the
guide rail.
Starting Operation
f
Observe correct mains voltage! The voltage of the pow-
er source must agree with the voltage specified on the
nameplate of the machine. Power tools marked with
230 V can also be operated with 220 V.
Switching On and Off
To
start
the machine,
first
push the lock-off button for the
On/Off switch
2
and
then
press the On/Off switch
1
and keep
it pressed.
Actuating lock-off button
2
releases the plunging device at the
same time, and allows for the saw to be pushed down. This
makes the saw blade plunge into the workpiece. When pulling
OBJ_BUCH-1471-001.book Page 17 Wednesday, July 13, 2011 10:56 AM


