Электропилы AL-KO SOLO 621 - инструкция пользователя по применению, эксплуатации и установке на русском языке. Мы надеемся, она поможет вам решить возникшие у вас вопросы при эксплуатации техники.
Если остались вопросы, задайте их в комментариях после инструкции.
"Загружаем инструкцию", означает, что нужно подождать пока файл загрузится и можно будет его читать онлайн. Некоторые инструкции очень большие и время их появления зависит от вашей скорости интернета.


GB-6
• After use, lay the chainsaw horizontally on some absor-
bing surface. The oil spread on the blade, chain and
drive may lead to some further dripping of oil.
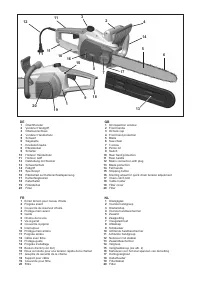
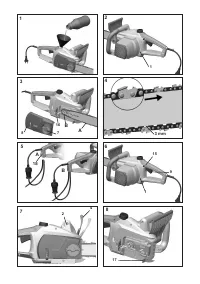
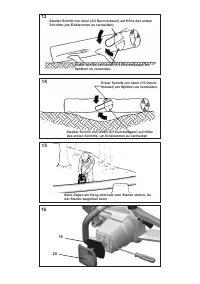
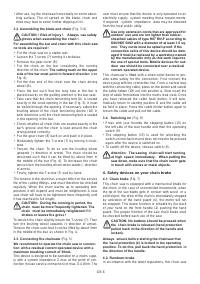
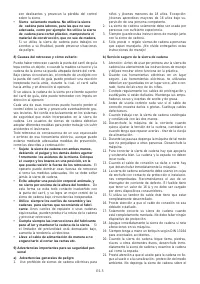
3.2. Assembling the blade and chain
(Fig. 3-4)
CAUTION ! Risk of injury ! Always use safety
gloves when assembling the chain !
For assembling the bar and chain with this chain saw
no tools are required !
• Put the chain saw on a stable rest.
• Loosen the T-screw (7) turning it clockwise.
• Remove the gear cover (8).
• Put the chain on the bar considering the running
direction of the chain.
The cutting teeth on the upper
side of the bar must point in forward direction
(see
Fig. 4).
• Put the free end of the chain over the chain driving
wheel (B).
• Place the bar such that the long hole in the bar is
placed exactly on the guiding element in the bar seat.
• Take care that the chain tensioning bolt (A) is seated
exactly in the small opening in the bar (Fig. 3). It must
be visible through the opening. If necessary, adjust the
knurling wheel of the chain tensioning device (16) in
both directions until the chain tensioning bolt is seated
in the opening in the bar.
• Check whether all chain links are seated exactly in the
bar’s groove and the chain is lead around the chain
driving wheel correctly.
• Put the gear cover (8) back on and push it in place.
• Moderately tighten the T-screw (7) by turning it clock-
wise.
• Tension the chain. To do so turn the knurling wheel
upwards (+ direction of arrow). The chain should be
tensioned such that it can be lifted by about 3mm in
the middle of the bar (Fig. 4). To decrease the chain
tension turn the knurling wheel down-wards (- direction
of arrow).
• Finally, tighten the T-screw (7) well by hand.
The tension in the chain has a major effect on the service
life of the cutting fi ttings, and must therefore be checked
regularly. When the chain warms up to operating tem-
perature it will expand and must be retightened. A new
saw chain will have to be tightened more frequently until
it has reached its full length.
CAUTION: During the running-in period, the
chain must be more frequently tightened. The
chain must be immediately retightened if it
shakes or leaves the grove !
To tension the chain slightly loosen the T-screw (7). Then
turn the knurling wheel upwards (+ direction of arrow).
Tension the chain such that it can be lifted by about 3mm
in the middle of the bar, as shown in Fig. 4.
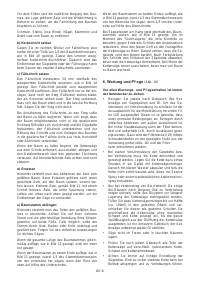
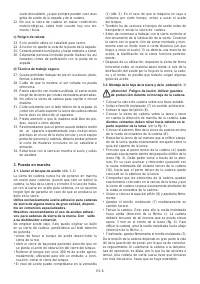
3.3. Connecting the chainsaw
(Fig. 5)
We recommend to operate the chain saw in connec-
tion with a residual current operated device with a
maximum breaking current of 30mA.
This device is designed to be operated on a mains supp-
ly with a system impedance Z max at the point of con-
nection (house service connection) of max. 0.4 Ohm. The
user must ensure that the device is only operated on an
electricity supply system meeting these require-ments.
If required, system impedance data may be obtained
from the local public utility.
Use only extension cords that are approved for
outdoor use and are not lighter than rubber-
sheathed cables of type H07 RN-F according to
DIN/VDE 0282 with a diameter of at least 1.5 sq.
mm. They cords must be splash-proof. If the
connection cable of this device should be dam-
aged it must be replaced by a workshop named
by the manufacturer only as this work requires
the use of special tools. Mobile devices for out-
door use should be connected over a residual
current operated device.
This chainsaw is fi tted with a strain-relief device to pro-
vide extra safety for the connection. First connect the
device plug with the connection line. Form a narrow loop
with the connecting cable, press on the button and swivel
the cable holder (18) out into position A. Now insert the
loop of cable from below into the mains lead cleat. Once
you have released the cable hook button, it will auto-
matically return to starting position B and the cable will
be held in place. Press the cable holder button again to
loosen the cable and pull out the cable.
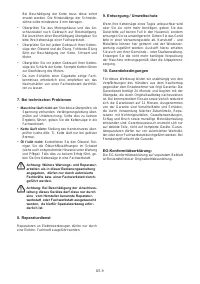
3.4. Switching on
(Fig. 6)
• Press with your thumbs the stopping button (15) on
the left side of the rear handle and then the operating
switch (9).
• The stopping button (15) is used for unlocking the
switch-on mechanism and does not need to be pressed
again after the device is switched on.
• To switch off the device, release switch (9).
Attention: The sawing chain will start running
at high speed immediately. When putting the
saw down, make sure that the chain never gets
in touch with stones or metal objects.
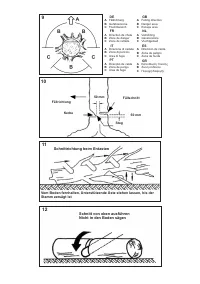
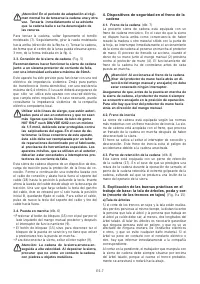
4. Safety devices on your chain brake
4.1. Chain brake
(Fig. 7)
This chain saw is equipped with a mechanical brake for
the chain. In the case of uncontrolled movements, when
the tip of the sax blade gets in contact with wood or a
solid object, the drive of the chain is immediately stopped
by activation of the hand guard (4), the motor will not
be stopped. This brake function is initiated by the back
of your hand on the front handle (2) pushing the hand
guard. The proper function of the saw chain brake shall
be checked before each use of the saw.
CAUTION: No buttons should be pressed when
the chain brake is released (hand protection
pulled back in the direction of the handle and
locked).
Always ensure before starting the chainsaw that
the hand protection (4) is locked in the operating
position. To do this, pull back the hand protection in
the direction of the handle.
4.2. Rundown brake
In accordance with the latest regulations, this chain saw


