Электробритвы Philips AT620 - инструкция пользователя по применению, эксплуатации и установке на русском языке. Мы надеемся, она поможет вам решить возникшие у вас вопросы при эксплуатации техники.
Если остались вопросы, задайте их в комментариях после инструкции.
"Загружаем инструкцию", означает, что нужно подождать пока файл загрузится и можно будет его читать онлайн. Некоторые инструкции очень большие и время их появления зависит от вашей скорости интернета.


- Do not use the supply unit in or near wall
sockets that contain an electric air freshener
to prevent irreparable damage to the supply
unit.
Electromagnetic fields (EMF)
This Philips appliance complies with all applicable standards and
regulations regarding exposure to electromagnetic fields.
General
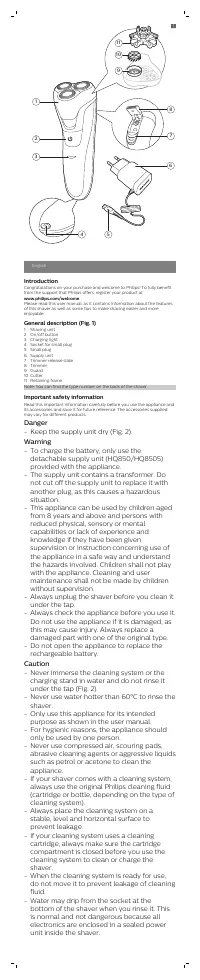
- This shaver is waterproof (Fig. 3). It is suitable for use in the bath or
shower and for cleaning under the tap. For safety reasons, the shaver
can therefore only be used without cord.
- The supply unit is suitable for mains voltages ranging from 100 to 240
volts.
- The supply unit transforms 100-240 volts to a safe low voltage of less
than 24 volts.
- Maximum noise level: Lc = 69
dB(A)
Charging
Charge the shaver before you use it for the first time and when the display
indicates that the battery is almost empty. When you charge the shaver for
the first time or after a long period of disuse, let it charge for at least 10
hours.
A fully charged shaver has a shaving time of up 30 minutes.
The shaving time may be less than expected as a result of your shaving
behavior, your cleaning habits or your beard type.
Note: You cannot use the shaver while it is charging.
Charging with the supply unit
1 Make sure the shaver is switched off.
2 Put the small plug in the shaver and put the supply unit in the wall
socket.
The display of the shaver indicates that the shaver is charging.
3 After charging, remove the supply unit from the wall socket and pull the
small plug out of the appliance.
Charge indications
Battery low
When the battery is almost empty (when there are only 5 or fewer shaving
minutes left), the charging light lights up orange (Fig. 4).
- When you switch off the shaver, the charging light continues to light up
orange for a few seconds.
Charging
When the shaver is charging, the charging light lights up green continuously
(Fig. 4).
- The charging light will keep lighting up green when the shaver is fully
charged.
Using the shaver
Always check the shaver and all accessories before use. Do not use the
shaver or any accessory if it is damaged, as this may cause injury. Always
replace a damaged part with one of the original type.
- Use this shaver for its intended household use as described in this
manual.
- For hygienic reasons, the shaver should only be used by one person.
- Trimming is easier when the skin and hair are dry.
Note: This shaver can only be used without cord.
Switching the appliance on and off
1 To switch the appliance on or off, press the on/off button once (Fig. 5).
Shaving
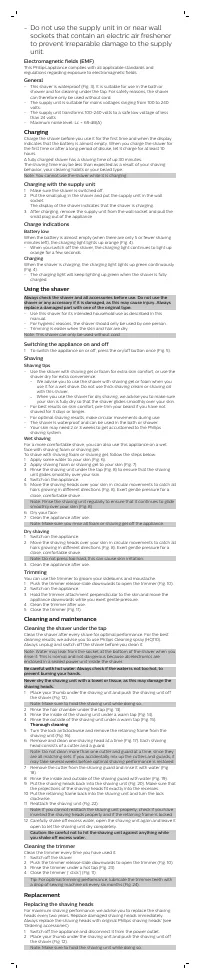
Shaving tips
- Use the shaver with shaving gel or foam for extra skin comfort, or use the
shaver dry for extra convenience.
-
We advise you to use the shaver with shaving gel or foam when you
use it for a wet shave. Do not use thick shaving cream or shaving oil
with this shaver.
-
When you use the shaver for dry shaving, we advise you to make sure
your skin is fully dry so that the shaver glides smoothly over your skin.
- For best results on skin comfort, pre-trim your beard if you have not
shaved for 3 days or longer.
- For optimal shaving results, make circular movements during use.
- The shaver is waterproof and can be used in the bath or shower.
- Your skin may need 2 or 3 weeks to get accustomed to the Philips
shaving system.
Wet shaving
For a more comfortable shave, you can also use this appliance on a wet
face with shaving foam or shaving gel.
To shave with shaving foam or shaving gel, follow the steps below:
1 Apply some water to your skin (Fig. 6).
2 Apply shaving foam or shaving gel to your skin (Fig. 7).
3 Rinse the shaving unit under the tap (Fig. 8) to ensure that the shaving
unit glides smoothly over your skin.
4 Switch on the appliance.
5 Move the shaving heads over your skin in circular movements to catch all
hairs growing in different directions (Fig. 8). Exert gentle pressure for a
close, comfortable shave.
Note: Rinse the shaving unit regularly to ensure that it continues to glide
smoothly over your skin (Fig. 8).
6 Dry your face.
7 Clean the appliance after use.
Note: Make sure you rinse all foam or shaving gel off the appliance.
Dry shaving
1 Switch on the appliance.
2 Move the shaving heads over your skin in circular movements to catch all
hairs growing in different directions (Fig. 8). Exert gentle pressure for a
close, comfortable shave.
Note: Do not press too hard, this can cause skin irritation.
3 Clean the appliance after use.
Trimming
You can use the trimmer to groom your sideburns and moustache.
1 Push the trimmer release slide downwards to open the trimmer (Fig. 10).
2 Switch on the appliance.
3 Hold the trimmer attachment perpendicular to the skin and move the
appliance downwards while you exert gentle pressure.
4 Clean the trimmer after use.
5 Close the trimmer (Fig. 11).
Cleaning and maintenance
Cleaning the shaver under the tap
Clean the shaver after every shave for optimal performance. For the best
cleaning results, we advise you to use Philips Cleaning spray (HQ110).
Always unplug and switch off the shaver before you clean it.
Note: Water may leak from the socket at the bottom of the shaver when you
rinse it. This is normal and not dangerous because all electronics are
enclosed in a sealed power unit inside the shaver.
Be careful with hot water. Always check if the water is not too hot, to
prevent burning your hands.
Never dry the shaving unit with a towel or tissue, as this may damage the
shaving heads.
1 Place your thumb under the shaving unit and push the shaving unit off
the shaver (Fig. 12).
Note: Make sure to hold the shaving unit while doing so.
2 Rinse the hair chamber under the tap (Fig. 13).
3 Rinse the inside of the shaving unit under a warm tap (Fig. 14).
4 Rinse the outside of the shaving unit under a warm tap (Fig. 15).
Thorough cleaning
5 Turn the lock anticlockwise and remove the retaining frame from the
shaving unit (Fig. 16).
6 Remove and clean one shaving head at a time (Fig. 17). Each shaving
head consists of a cutter and a guard.
Note: Do not clean more than one cutter and guard at a time, since they
are all matching sets. If you accidentally mix up the cutters and guards, it
may take several weeks before optimal shaving performance is restored.
7 Remove the cutter from the shaving guard and rinse it with water (Fig.
18).
8 Rinse the inside and outside of the shaving guard with water (Fig. 19).
9 Put the shaving heads back into the shaving unit (Fig. 20). Make sure that
the projections of the shaving heads fit exactly into the recesses.
10 Put the retaining frame back into the shaving unit and turn the lock
clockwise.
11 Reattach the shaving unit (Fig. 22).
Note: If you cannot reattach the shaving unit properly, check if you have
inserted the shaving heads properly and if the retaining frame is locked.
12 Carefully shake off excess water, open the shaving unit again and leave it
open to let the shaving unit dry completely.
Caution: Be careful not to hit the shaving unit against anything while
you shake off excess water.
Cleaning the trimmer
Clean the trimmer every time you have used it.
1 Switch off the shaver.
2 Push the trimmer release slide downwards to open the trimmer (Fig. 10).
3 Rinse the trimmer under a hot tap (Fig. 23).
4 Close the trimmer (‘ click’) (Fig. 11).
Tip: For optimal trimming performance, lubricate the trimmer teeth with
a drop of sewing machine oil every six months (Fig. 24).
Replacement
Replacing the shaving heads
For maximum shaving performance, we advise you to replace the shaving
heads every two years. Replace damaged shaving heads immediately.
Always replace the shaving heads with original Philips shaving heads' (see
'Ordering accessories').
1 Switch off the appliance and disconnect it from the power outlet.
2 Place your thumb under the shaving unit and push the shaving unit off
the shaver (Fig. 12).
Note: Make sure to hold the shaving unit while doing so.


