Электрические зубные щетки Philips HX6511/50 - инструкция пользователя по применению, эксплуатации и установке на русском языке. Мы надеемся, она поможет вам решить возникшие у вас вопросы при эксплуатации техники.
Если остались вопросы, задайте их в комментариях после инструкции.
"Загружаем инструкцию", означает, что нужно подождать пока файл загрузится и можно будет его читать онлайн. Некоторые инструкции очень большие и время их появления зависит от вашей скорости интернета.
ENGLISH
Introduction
Congratulations on your purchase and welcome
to Philips! To fully benefit from the suppor t
that Philips offers, register your product at
www.philips.com/welcome
.
Important
Read this user manual carefully before you use
the appliance and save it for future reference.
Danger
- Keep the charger away from water.
- Do not place or store the appliance where
it can fall or be pulled in a bathtub, washbasin,
sink etc.
- Do not immerse the charger in water or
any other liquid.
- After cleaning, make sure the charger is
completely dr y before you connect it to
the mains.
Warning
- The mains cord cannot be replaced. If the
mains cord is damaged, discard the charger.
Always have the charger replaced with one
- of the original type in order to avoid a hazard.
- If the appliance is damaged in any way
(brush head, toothbrush handle and/or
charger), stop using it.
- This appliance contains no ser viceable par ts.
If the appliance is damaged, contact the
Consumer Care Centre in your countr y
(see chapter ‘Guarantee and ser vice’).
- Do not use the charger outdoors or near
heated surfaces.
- This appliance can be used by children aged
from 8 years and above and by persons with
reduced physical, sensory or mental capabilities
or lack of experience and knowledge if they have
been given supervision or instruction concerning
use of the appliance in a safe way and if they
understand the hazards involved. Cleaning and
user maintenance shall not be made by children
unless they are older than 8 and supervised. Keep
the appliance and its cord out of reach of children
aged less than 8 years.
- Children shall not play with the appliance.
Caution
- If you have had oral or gum surger y in the
previous 2 months, consult your dentist before
you use the toothbrush.
- Consult your dentist if excessive bleeding
occurs after using this toothbrush or if bleeding
continues to occur after 1 week of use.
- If you have medical concerns, consult your
doctor before you use the Sonicare.
- The Sonicare toothbrush complies with the
safety standards for electromagnetic devices. If
you have a pacemaker or other implanted device,
contact your physician or the manufacturer of the
implanted device prior to use.
- This appliance has only been designed for
cleaning teeth, gums and tongue. Do not use it
for any other purpose. Stop using the appliance
and contact your doctor if you experience any
discomfor t or pain.
- Do not use other brush heads than the ones
recommended by the manufacturer.
- If your toothpaste contains peroxide, baking
soda or other bicarbonate (common in
whitening toothpastes), thoroughly clean the
brush head and the handle with soap and water
after each use. Otherwise the plastic may crack.
Electromagnetic fields (EMF)
This Philips appliance complies with all applicable
standards and regulations regarding exposure to
electromagnetic fields.
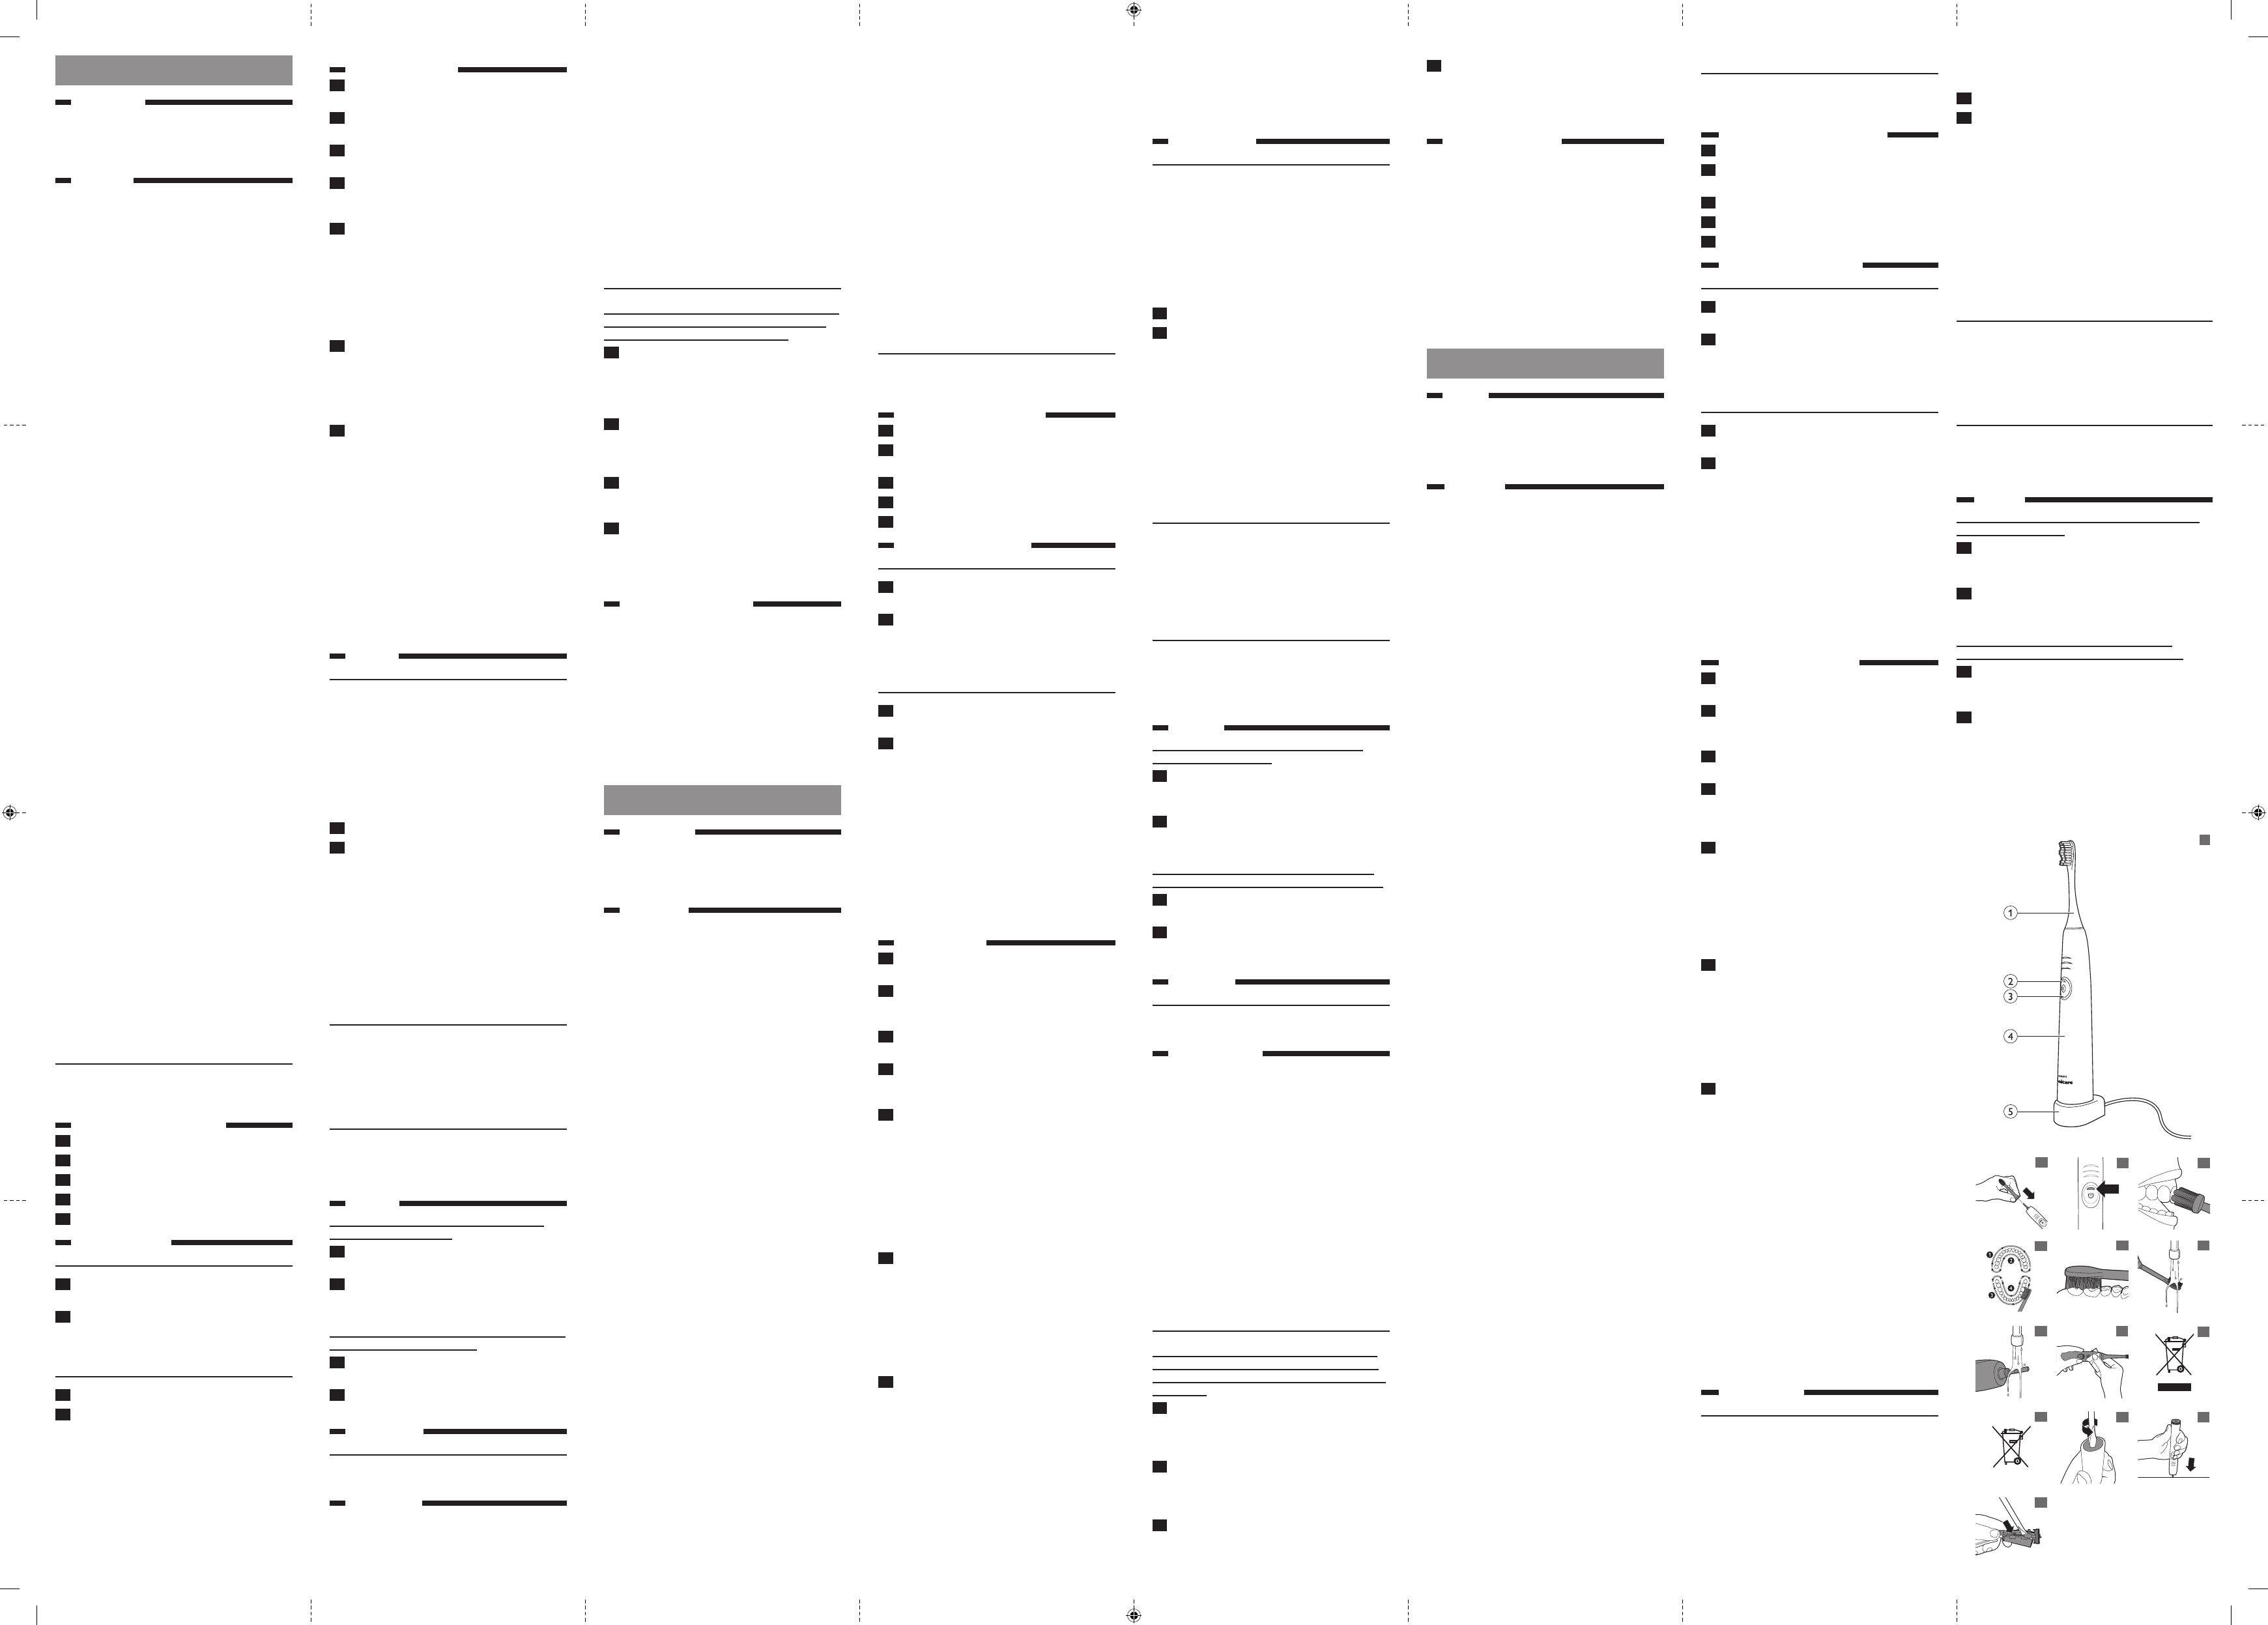
General description (Fig. 1)
1
Replaceable Sonicare brush head
2
Battery charge indicator (specific types only)
3
Power on/off button
4
Handle
5
Charger
Preparing for use
Attaching the brush head
1
Align the front of the brush head with the
front of the toothbrush handle.
2
Push the brush head onto the metal shaft (Fig. 2).
Note: There is a small gap between the brush head
and the handle.
Charging the appliance
1
Put the plug of the charger in the wall socket.
2
Place the handle on the charger.
- The batter y charge indicator shows the
approximate remaining batter y charge (Fig. 3).
- Solid green light: 50-100%
- Flashing green light: 5-49%
- Flashing green light and 3 beeps after the
brushing cycle: less than 5% and toothbrush has
to be recharged.
Note: To keep the battery fully charged at all times, you
may keep your Sonicare on the charger when not in use.
It takes at least 24 hours to fully charge the battery.
Using the appliance
1
Wet the bristles and apply a small amount of
toothpaste.
2
Place the toothbrush bristles against the teeth
at a slight angle towards the gumline (Fig. 4).
3
Press the power on/off button to switch on
the Sonicare.
4
Apply light pressure to maximise Sonicare’s
effectiveness and let the Sonicare toothbrush
do the brushing for you. Do not scrub.
5
Gently move the brush head slowly across
the teeth in a small back and forth motion
so the longer bristles reach between your
teeth. Continue this motion throughout the
brushing cycle.
Note: To make sure you brush evenly throughout the
mouth, divide your mouth into 4 sections using the
Quadpacer feature (see chapter ‘Features’).
6
Brush each section for 30 seconds for a total
brushing time of 2 minutes. Start with section
1 (outside top teeth) and then brush section
2 (inside top teeth). Continue with section
3 (outside bottom teeth) and finally brush
section 4 (inside bottom teeth). (Fig. 5)
7
After you have completed the 2-minute
brushing cycle, you can spend additional
time brushing the chewing surfaces of your
teeth and areas where staining occurs. You may
also brush your tongue, with the toothbrush
switched on or off, as you prefer (Fig. 6).
The Sonicare is safe to use on:
- Braces (brush heads wear out sooner when
used on braces)
- Dental restorations (fillings, crowns, veneers)
Note: When the Sonicare is used in clinical studies,
the handle should be fully charged. Deactivate the
Easy-start feature and for areas where excess staining
occurs, an additional 30 seconds of brushing time can
be spent to assist with stain removal.
Features
Easy-start
This Sonicare model comes with the Easy-star t
feature activated.
The Easy-star t feature gently increases the power
over the first 14 brushings.
Note: Each of the first 14 brushings must be at least
1 minute in length to advance through the Easy-start
ramp-up cycle properly.
Deactivating and activating the
Easy-start feature
1
Attach the brush head to the handle.
2
Place the handle in the plugged-in charger.
- To deactivate Easy-star t:
Press and hold the power on/off button for
2 seconds. You hear 1 beep to indicate that
the Easy-star t feature has been deactivated.
- To activate Easy-star t:
Press and hold the power on/off button for
2 seconds. You hear 2 beeps to indicate that
the Easy-star t feature has been activated.
Note: Using the Easy-start feature beyond the initial
ramp-up period is not recommended and reduces
Sonicare’s effectiveness in removing plaque.
Smartimer
After 2 minutes, the Smar timer automatically
switches off the toothbrush.
To pause or stop brushing during the 2-minute
cycle, press the on/off button. If you press the on/
off button again within 30 seconds, the Smar timer
picks up where you left off.
Quadpacer
The Quadpacer is an inter val timer. At 30, 60 and
90 seconds, you hear a shor t beep and pause in
the brushing action. This is your signal to move to
the next section of your mouth.
Cleaning
Do not place brush head, the handle and the
charger in the dishwasher.
1
Rinse the brush head and bristles after each
use. Let the brush head air-dry only (Fig. 7).
2
Remove the brush head once a week and
clean the connection between the brush
head and the handle (Fig. 8).
Do not use sharp objects to press on the rubber
seal, as this may cause damage.
3
Clean the rest of the handle periodically
with mild soap and a moist cloth (Fig. 9).
4
Unplug the charger before you clean it. Use a
damp cloth to wipe the surface of the charger.
Replacement
Brush head
Replace Sonicare brush heads ever y 3 months for
optimal results.
Environment
- This symbol on a product means that the
product is covered by European Directive
2012/19/EU (Fig. 10).
- This symbol means that the product contains
a built-in rechargeable batter y covered by
European Directive 2006/66/EC which cannot
be disposed of with normal household waste.
Follow the instructions in section ‘Removing
the rechargeable batter y’ to remove the
batter y (Fig. 11).
- Inform yourself about the local separate
collection system for electrical and electronic
products and rechargeable batteries. Follow
local rules and never dispose of the product
and rechargeable batteries with normal
household waste. Correct disposal of old
products and rechargeable batteries helps
prevent negative consequences for the
environment and human health.
Removing the rechargeable battery
Only remove the rechargeable battery when you
discard the appliance. Make sure the battery is
completely empty when you remove it.
1
To deplete the rechargeable battery of any
charge, remove the handle from the charger,
switch on the Sonicare and let it run until it
stops. Repeat this step until you can no longer
switch on the Sonicare.
2
Insert a screwdriver into the slot in
the bottom of the handle and
turn counterclockwise to release the bottom
cap (Fig. 12).
3
Hold the handle upside down and push
down on the shaft to release the internal
components of the handle (Fig. 13).
4
Insert the screwdriver under the circuit
board, next to the battery connections, and
twist to break the connections. Remove the
circuit board and pry the battery from the
plastic carrier (Fig. 14).
Guarantee and support
If you need information or suppor t, please visit
www.philips.com/support
or read the separate
worldwide guarantee leaflet.
Guarantee restrictions
The terms of the international guarantee do not
cover the following:
- Brush heads.
- Damage caused by misuse, abuse, neglect,
alterations or unauthorised repair.
- Normal wear and tear, including chips,
scratches, abrasions, discolouration or fading.
ESPAÑOL
Introducción
Enhorabuena por la compra de este producto y
bienvenido a Philips. Para sacar el mayor par tido
de la asistencia que Philips le ofrece, registre su
producto en
www.philips.com/welcome
.
Importante
Antes de usar el aparato, lea atentamente este
manual del usuario y consér velo por si necesitara
consultarlo en el futuro.
Peligro
- Mantenga el aparato lejos del agua.
- No coloque ni guarde el aparato en un lugar
desde donde pueda caerse a una bañera,
lavabo o fregadero.
- No sumerja el cargador en agua ni en otros líquidos.
- Después de limpiarlo, asegúrese de que el
cargador esté completamente seco antes de
enchufarlo a la red eléctrica.
Advertencia
- El cable de alimentación no se puede sustituir.
Si está dañado, deberá desechar el cargador.
Sustitúyalo siempre por otro del modelo
original para evitar situaciones de peligro.
- Deje de utilizar el aparato si tiene algún daño
(en el cabezal del cepillo, en el mango o en el
cargador).
- Este aparato contiene piezas que no son
reemplazables. Si el aparato está dañado,
póngase en contacto con el Ser vicio de
Atención al Cliente de Philips en su país
(consulte el capítulo “Garantía y ser vicio”).
- No utilice el cargador al aire libre ni cerca de
superficies calientes.
- Este aparato puede ser usado por niños
a par tir de 8 años y por personas con su
capacidad física, psíquica o sensorial reducida y
por quienes no tengan los conocimientos y la
experiencia necesarios, si han sido super visados
o instruidos acerca del uso del aparato de
forma segura y siempre que sepan los riesgos
que conlleva su uso. Los niños no deben llevar
a cabo la limpieza ni el mantenimiento a menos
que tengan más de 8 años o sean super visados.
Mantenga el aparato y el cable fuera del
alcance de los niños menores de 8 años.
- No permita que los niños jueguen con el aparato.
Precaución
- Consulte a su dentista antes de utilizar este
cepillo dental si ha sufrido cirugía oral o de las
encías en los 2 últimos meses.
- Consulte a su dentista si se produce un
sangrado excesivo después de usar este cepillo
dental, o si el sangrado continúa produciéndose
después de 1 semana de uso.
- Si tiene alguna duda médica, consulte a su
médico antes de utilizar su Sonicare.
- El cepillo dental Sonicare cumple las normas de
seguridad para dispositivos electromagnéticos.
Si tiene un marcapasos u otro dispositivo
implantado, consulte a su médico o al
fabricante de dichos dispositivos antes de
utilizar el aparato.
- Este aparato está diseñado para limpiar solo los
dientes, las encías y la lengua. No lo utilice con
otra finalidad. Deje de utilizar este aparato y
consulte a su médico si experimenta algún tipo
de dolor o molestia.
- No utilice otros cabezales que no sean los
recomendados por el fabricante.
- Si su dentífrico contiene peróxido, bicarbonato
sódico u otro bicarbonato (frecuentes en
los dentífricos blanqueadores), limpie bien
el cabezal del cepillo y el mango con agua y
jabón después de cada uso. De lo contrario, el
plástico podría agrietarse.
Campos electromagnéticos (CEM)
Este aparato de Philips cumple los estándares y las
normativas aplicables sobre exposición a campos
electromagnéticos.
Descripción general (fig. 1)
1
Cabezal de Sonicare reemplazable
2
Indicador de carga de la batería (sólo en
modelos específicos)
3
Botón de encendido/apagado
4
Mango
5
Cargador
Preparación para su uso
Cómo fijar el cabezal del cepillo
1
Alinee la parte frontal del cabezal con la parte
frontal del mango del cepillo.
2
Presione el cabezal del cepillo en el eje
metálico (fig. 2).
Nota: Hay un pequeño espacio entre el cabezal
y el mango.
Carga del aparato
1
Enchufe la clavija del cargador a la toma
de corriente.
2
Coloque el mango en el cargador.
- El indicador de carga de la batería muestra
la carga aproximada disponible en la
batería (fig. 3).
- Luz verde permanente: 50-100%
- Luz verde parpadeante: 5-49%
- Luz verde parpadeante y 3 pitidos después
del ciclo de cepillado: menos del 5%;
debe recargarse el cepillo dental.
Nota: Para mantener la batería completamente
cargada en todo momento, puede dejar su
Sonicare en el cargador cuando no lo esté
utilizando. Se necesitan al menos 24 horas
para cargar totalmente la batería.
Uso del aparato
1
Moje las cerdas y aplique una pequeña
cantidad de pasta de dientes.
2
Coloque las cerdas del cepillo sobre los
dientes, formando un ligero ángulo con
la línea de las encías (fig. 4).
3
Pulse el botón de encendido/apagado
para encender su Sonicare.
4
Ejerza una ligera presión para maximizar
la eficacia de Sonicare y deje que éste se
encargue del cepillado. No frote.
5
Desplace suavemente el cabezal del cepillo
por todos los dientes con un pequeño
movimiento hacia delante y hacia atrás,
de forma que las cerdas más largas lleguen
a los espacios interdentales. Continúe con
este movimiento durante el ciclo de cepillado.
Nota: Para asegurar el cepillado uniforme de toda
la boca, divida la cavidad bucal en 4 secciones
mediante la función Quadpacer (consulte el capítulo
“Características”).
6
Cepille cada sección durante 30 segundos
durante un tiempo total de cepillado de
2 minutos. Comience por la sección 1
(cara externa dientes superiores) y
continúe con la sección 2 (cara interna
dientes superiores). Luego cepille la sección 3
(cara externa dientes inferiores) y termine
con la sección 4 (cara interna dientes
inferiores). (fig. 5)
7
Después de completar el ciclo de cepillado
de 2 minutos, puede dedicar un tiempo
adicional al cepillado de la superficie de
masticación de los dientes y las zonas donde
se forman manchas. También puede cepillarse
la lengua con el cepillo encendido o apagado,
como prefiera (fig. 6).
Puede utilizar Sonicare de forma segura en:
- Aparatos correctores (los cabezales se
gastan antes cuando se utilizan sobre
aparatos correctores)
- Restauraciones dentales (empastes,
coronas, carillas)
Nota: Cuando se utiliza Sonicare en estudios clínicos,
el mango debe estar totalmente cargado. Desactive la
función Easy-start y, en zonas con muchas manchas,
cepille durante 30 segundos más para ayudar a
eliminarlas.
Características
Easy-start
Este modelo de Sonicare viene con la función
Easy-star t activada.
La función Easy-star t aumenta paulatinamente la
potencia a lo largo de los primeros 14 cepillados.
Nota: Los 14 primeros cepillados deben tener
una duración de al menos 1 minuto para avanzar
adecuadamente por el ciclo ascendente de Easy-start.
Cómo desactivar y activar la función
Easy-start
1
Fije el cabezal del cepillo al mango.
2
Coloque el mango en el cargador enchufado.
- Para desactivar la función Easy-star t:
Mantenga pulsado el botón de encendido/apagado
durante 2 segundos. Oirá 1 pitido que indica que
se ha desactivado la función Easy-star t.
- Para activar la función Easy-star t:
Mantenga pulsado el botón de encendido/apagado
durante 2 segundos. Oirá 2 pitidos que indican que
se ha activado la función Easy-star t.
Nota: No se recomienda utilizar la función Easy-start
más allá del periodo inicial de regulación, ya que
reduce la eficacia de Sonicare en la eliminación
de la placa.
Smartimer
Transcurridos 2 minutos, el temporizador
Smar timer apagará automáticamente el cepillo.
Para interrumpir el cepillado durante el ciclo de
2 minutos, pulse el botón de encendido/apagado.
Pulse el botón de nuevo pasados 30 segundos y
la función Smar timer continuará desde donde se
detuvo.
Quadpacer
Quadpacer es un temporizador de inter valos. A los
30, 60 y 90 segundos oirá un pitido breve y notará
una pequeña pausa en la acción de cepillado. Ésta
es la señal para pasar a cepillar la siguiente sección
de la boca.
Limpieza
No lave el cabezal del cepillo, el mango ni el
cargador en el lavavajillas.
1
Enjuague el cabezal del cepillo y las cerdas
después de cada uso. Deje secar el cepillo
al aire (fig. 7).
2
Quite el cabezal del cepillo una vez a la
semana y limpie la conexión entre éste
y el mango (fig. 8).
No utilice objetos afilados o puntiagudos para
empujar la junta de goma, ya que podría dañarla.
3
Limpie periódicamente el resto del mango
con jabón suave y un paño húmedo (fig. 9).
4
Desenchufe el cargador antes de limpiarlo.
Utilice un paño húmedo para limpiar la
superficie del cargador.
Sustitución
Cabezal de cepillado
Sustituya los cabezales de Sonicare cada 3 meses
para conseguir unos resultados óptimos.
Medio ambiente
- Este símbolo en un producto significa que
el producto cumple con la directiva europea
2012/19/EU (fig. 10).
- Este símbolo significa que el producto contiene
una batería recargable integrada cubier ta por
la directiva europea 2006/66/CE, que no se
debe tirar con la basura normal del hogar.
Siga las instrucciones de la sección “Cómo
extraer la batería recargable” para extraer la
batería (fig. 11).
- Infórmese sobre el sistema local de recogida
selectiva de baterías recargables y productos
eléctricos y electrónicos. Siga la normativa
local y no deseche el producto ni la batería
recargable con la basura normal del hogar.
El correcto desecho de los productos
antiguos y las baterías recargables ayuda a
evitar consecuencias negativas para el medio
ambiente y la salud humana.
Cómo extraer la batería recargable
Quite la batería recargable únicamente cuando
deseche el aparato. Asegúrese de que la batería
esté completamente descargada cuando la saque
del aparato.
1
Para agotar la carga de la batería recargable, quite
el mango del cargador, encienda su Sonicare y
déjelo funcionar hasta que se pare. Repita esto
hasta que ya no pueda encender el cepillo.
2
Introduzca un destornillador en la ranura
situada en la parte inferior del mango y gírelo
en sentido contrario al de las agujas del reloj
para liberar la tapa inferior (fig. 12).
3
Sujete el mango boca abajo y presione en el eje
para sacar los componentes del mango (fig. 13).
4
Introduzca el destornillador debajo del
circuito, junto a las conexiones de la batería
y gírelo para romper las conexiones. Quite el
circuito y separe la batería de la carcasa de
plástico (fig. 14).
Garantía y asistencia
Si necesita ayuda o más información, visite
www.philips.com/support
o lea el folleto
de garantía mundial independiente.
Restricciones de la garantía
La garantía internacional no cubre los siguientes
daños:
- Cabezales del cepillo.
- Deterioros causados por el uso inapropiado,
abusos, negligencias, alteraciones o
reparaciones no autorizadas.
- Desgaste normal, incluyendo arañazos,
despor tilladuras, abrasiones, desteñidos o
pérdida de color.
ҚАЗАҚША
Кіріспе
Өнімді сатып алуыңызбен құттықтаймыз және
Philips компаниясына қош келдіңіз! Philips
компаниясы ұсынатын қолдауды толығымен
пайдалану үшін өніміңізді
www.philips.com/
welcome
веб-бетінде тіркеңіз.
Маңызды
Құралды қолданар алдында осы нұсқауды мұқият
оқып шығыңыз, оны болашақта қолдану үшін
сақтап қойыңыз.
Қауіпті жағдайлар
-
Зарядтағышты судан алшақ ұстаңыз.
-
Құралды ваннаға, жуыну шұңғылшасына,
шұңғылшаға, т.б. құлауы немесе ішіне
тартылуы мүмкін жерге қоймаңыз немесе
сондай жерде сақтамаңыз.
-
Зарядтағышты суға немесе басқа сұйықтыққа
батыруға болмайды.
-
Тазалаудан кейін желіге қоспай тұрып
зарядтағыштың толығымен құрғақ екенін
тексеріңіз.
Абайлаңыз!
-
Қуат сымын ауыстыруға болмайды. Қуат
сымы зақымданған болса, зарядтағышты
тастаңыз. Қауіп-қатер болмау үшін,
зарядтағышты түпнұсқа зарядтағышпен
алмастырыңыз.
-
Құрылғы қандайда бір жолмен зақымдалса
(щетка басы, сабы және/немесе зарядтағыш),
оны пайдалануды тоқтатыңыз.
-
Бұл құрылғыда жөнделетін бөлшектер
жоқ. Құрылғы зақымдалса, еліңіздегі
тұтынушыларды қолдау орталығына
хабарласыңыз («Кепілдік және қолдау»
тарауын қараңыз).
-
Зарядтағышты далада немесе қызған
беттердің жанында пайдаланбаңыз.
-
Құралды қауіпсіз пайдалану жөніндегі
нұсқаулар беріліп, басқа біреу қадағалаған
және құралды пайдалануға қатысты қауіп-
қатерлер түсіндірілген жағдайда, осы құралды
8 жасқа толған балалар және физикалық
мүмкіндігі мен ойлау, сезу қабілеті шектеулі,
білімі мен тәжірибесі аз адамдар пайдалана
алады. 8 жасқа толмаған балалар ересектің
қадағалауынсыз тазалау және техникалық
қызмет көрсету жұмыстарын жүргізбеуі тиіс.
Құрал мен оның сымын 8 жасқа толмаған
балалардың қолы жетпейтін жерге қойыңыз.
-
Балалар құралмен ойнамауы керек.
Ескерту
-
Тіс щеткасын қолданар алдында, егер сіз
2 ай шамасында жақ сүйекке, бетіңізге
немесе тіс етіне операция жасаған болсаңыз,
дәрігеріңізбен кеңесіңіз.
-
Егер осы тіс щетканы қолданған соң
шамадан тыс қанау орын алса, немесе 1 апта
пайдаланған соң қанау жалғаса берсе, тіс
дәрігеріңізбен кеңесіңіз.
-
Егер сізде медициналық проблемалар болса,
Sonicare құрылғысын пайдаланар алдында
дәрігеріңізбен кеңесіңіз.
-
Sonicare тіс щеткасы электромагниттік
құрылғыларға арналған қауіпсіздік
стандарттарына сәйкес келеді. Егер сізде
кардиостимулятор немесе басқа импланттық
құрылғы болса, пайдаланар алдында
дәрігеріңізге немесе имплант құрылғысын
өндірушіге хабарласыңыз.
-
Бұл құрылғы тек тістер, қызыл иектер мен
тілді тазалауға арналған. Қандай да бір басқа
мақсатта қолдануға болмайды. Қолайсыздық
немесе ауырсыну сезінсеңіз, құрылғыны
қолдануды тоқтатып, дәрігерге хабарласыңыз.
-
Өндірушінің ұсынған щетка басынан басқа
щетка бастарын қолдануға болмайды.
-
Тіс пастаңыздың құрамында пероксид, ас
содасы немесе басқа бикарбонат (әдетте
ағартқыш тіс пасталарында көп кездеседі)
болса, әр қолданғаннан кейін щетка басы мен
тұтқаны сабынды сумен мұқият тазалаңыз.
Әйтпесе, пластик шытынауы мүмкін.
Электромагниттік өрістер (ЭМӨ)
Осы Philips құралы электромагниттік өрістерге
қатысты барлық қолданыстағы стандарттар мен
ережелерге сәйкес келеді.
Жалпы сипаттама (Cурет 1)
1
Ауыстырылатын Sonicare щетка басы
2
Стандартты зарядтау көрсеткіші
(тек белгілі бір түрлері)
3
Қуатты қосу/өшіру түймесі
4
Сап
5
Зарядтағыш
Пайдалануға дайындау
Щетка басын жалғау
1
Щетка басының алдыңғы жағын тіс щеткасы
тұтқасының алдымен туралаңыз.
2
Щетка басын металл біліктің ішіне
кіргізіңіз (Cурет 2).
Ескертпе: Щетка басы мен сабының арасында
кішкентай саңылау бар.
Аккумулятор батареясын зарядтау
1
Зарядтағыштың штепселін қабырға
розеткасына жалғаңыз.
2
Тұтқаны зарядтағышқа қойыңыз.
-
Батареяны зарядтау көрсеткіші қалған
батарея зарядын шамамен
көрсетеді (Cурет 3).
-
Тұтас жасыл шам: 50-100%
-
Жыпылықтаған жасыл шам: 5-49%
-
Тазалау циклінен кейін жыпылықтаған жасыл
шам және 3 сигнал: 5%-дан аз және тіс
щеткасы зарядталуы керек.
Ескертпе: Батареяны барлық уақытта
толық зарядталған күйде ұстау үшін Sonicare
өнімін пайдаланбаған кезде зарядтағышта
қалдыруыңызға болады. Батареяны толық
зарядтау үшін кемінде 24 сағат кетеді.
Құрылғыны пайдалану
1
Қылшықтарды сулап, тіс пастасының
азғана мөлшерін жағыңыз.
2
Щетка қылшықтарын қызыл иекке
азғантай бұрышпен келетіндей етіп тіске
жақындатыңыз (Cурет 4).
3
Sonicare құрылғысын қосу үшін қосу/өшіру
түймесін басыңыз.
4
Sonicare тиімділігін барынша арттыру
және Sonicare щеткасының өз бетінше
тазалауына мүмкіндік беру үшін жайлап
басып, қолданыңыз. Қатты қырмаңыз.
5
Қылшықтары тістердің арасында толығырақ
кіруі үшін щетканы тісте әрі-бері ақырын
қозғалтыңыз. Тазалау циклінде осындай
қозғалысты жалғастырыңыз.
Ескертпе: бүкіл ауыз қуысын тазалау үшін,
ауызды Quadpacer мүмкіндігін пайдаланып
4 бөлікке бөліңіз («Мүмкіндіктер» тарауын
қараңыз).
6
Әр бөлікті 30 секунд бойы тазалаңыз,
жалпы щеткамен тазалау уақыты 2 минут
болуы керек. 1-бөлігінен (жоғарғы тістердің
сыртын) бастаңыз, содан кейін 2-бөлігін
(тістердің ішін) щеткамен тазалаңыз.
3-бөлігінде (төменгі тістердің сыртын)
жалғастырыңыз да, соңында 4-бөлігін
(төменгі тістердің ішін) щеткамен
тазалаңыз. (Cурет 5)
7
Щеткамен тазалау циклін аяқтағаннан
кейін қосымша уақытты тістердің шайнау
беттерін және дақтар пайда болатын
аймақтарды щеткамен тазалауға жұмсауға
болады. Сондай-ақ, қаласаңыз, щетка қосулы
немесе өшірулі кезде щеткамен тілді
тазалауға болады (Cурет 6).
Sonicare щеткасын мына жағдайларда қауіпсіз
пайдалануға болады:
-
Тіс түзегіш пластиналар (тіс түзегіш
пластиналарға қолданғанда щетка бастары
тезірек тозады)
-
Тіс қалпына келтіргіштері (пломбалар,
коронкалар, венирлер)
Ескертпе: Sonicare өнімі клиникалық
зерттеулерде пайдаланылған кезде тұтқа
толық зарядталуы керек. Оңай іске қосу
мүмкіндігін ажыратыңыз және қатты дақтану
орын алатын аймақтар үшін дақты кетіруге
көмектесу мақсатында 30 секунд ұзағырақ
тазалауға болады.
Мүмкіндіктер
Оңай іске қосу
Осы Sonicare үлгісінде Easy-star t (Оңай бастау)
мүмкіндігі қосулы күйде келеді.
Easy-star t (Оңай бастау) мүмкіндігі алғашқы
14 рет тазалағаннан кейін қуатын көбейтеді.
Ескертпе: Оңай іске қосудың жылдамдықты
арттыру циклі арқылы дұрыс өту үшін, алғашқы
14 рет щеткамен тазалау ұзақтығының
әрқайсысы кемінде 1 минут болуы керек.
Easy-start (Оңай бастау) мүмкіндігін
өшіру немесе қосу
1
Щетканың басын сабына кигізіңіз.
2
Сапты электр тогына қосулы зарядтағышқа
қойыңыз.
-
Easy-star t (Оңай бастау) мүмкіндігін өшіру үшін:
қосу/өшіру түймесін 2 секунд басып тұрыңыз.
Easy-start (Оңай бастау) мүмкіндігінің өшірілгенін
білдіретін 1 дыбыстық белгіні естисіз.
-
Easy-star t (Оңай бастау) мүмкіндігін қосу үшін:
қосу/өшіру түймесін 2 секунд басып тұрыңыз.
Easy-start (Оңай бастау) мүмкіндігінің қосылғанын
білдіретін 2 дыбыстық белгіні естисіз.
Ескертпе: оңай іске қосу мүмкіндігін бастапқы
жылдамдықты арттыру кезеңінен кейін пайдалану
ұсынылмайды, бұл Sonicare щеткасының қалдық
қабатты кетіру тиімділігін төмендетеді.
Смарттаймер
2 минуттан кейін таймер тіс щеткасын автоматты
түрде өшіреді.
2 минуттық циклде тазалауды кідірту немесе тоқтату
үшін қосу/өшіру түймесін басыңыз. 30 секунд
ішінде қосу/өшіру түймесін қайтадан бассаңыз,
смарттаймер тоқтаған жеріңізді таңдайды.
Quadpacer
Quadpacer — аралық таймер. 30, 60 және
90 секундта қысқа сигналды естисіз және тазалау
әрекетіндегі кідірісті байқайсыз. Бұл — ауыздың
келесі бөлігіне өтуге арналған сигнал.
Тазалау
Щетка басын, сапты немесе зарядтағышты ыдыс
жуғышта тазаламаңыз.
1
Әр қолданудан кейін щетка басы мен
қылшықтарын шайып тұрыңыз. Щетка
басын тек ауамен құрғатыңыз (Cурет 7).
2
Аптасына бір рет щетка басын алып, щетка
басы мен тұтқа арасындағы қосылымды
тазалаңыз (Cурет 8).
Резеңке тығынды басу үшін өткір заттарды
пайдаланбаңыз, себебі бұл зақымдауы мүмкін.
3
Тұтқаның қалғанын жұмсақ сабынмен
және ылғал шүберекпен мерзімді түрде
тазалаңыз (Cурет 9).
4
Тазаламастан бұрын зарядтағышты
ажыратыңыз. Зарядтағыштың бетін
сүрту үшін дымқыл шүберекті
пайдаланыңыз.
1
2
3
4
5
6
7
8
9
10
11
12
13
14
4235_020_8835_1_v2_A7_Easyclean_Leaflet_64pg.indd 2
20/06/14 15:09
Характеристики

Остались вопросы?Не нашли свой ответ в руководстве или возникли другие проблемы? Задайте свой вопрос в форме ниже с подробным описанием вашей ситуации, чтобы другие люди и специалисты смогли дать на него ответ. Если вы знаете как решить проблему другого человека, пожалуйста, подскажите ему :)


