
Дрели PIT PSB13-C2 - инструкция пользователя по применению, эксплуатации и установке на русском языке. Мы надеемся, она поможет вам решить возникшие у вас вопросы при эксплуатации техники.
Если остались вопросы, задайте их в комментариях после инструкции.
"Загружаем инструкцию", означает, что нужно подождать пока файл загрузится и можно будет его читать онлайн. Некоторые инструкции очень большие и время их появления зависит от вашей скорости интернета.


Impact Drill
05
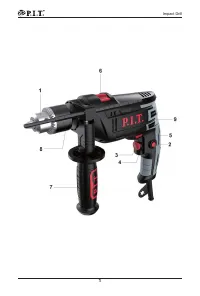
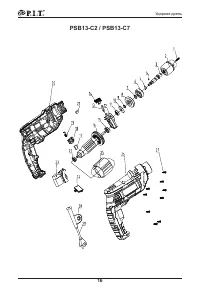
Product features
The numbering of the product features refers
to the diagram of the power tool on the graph-
ics page.
(1) Keyed chuck
(2) Lock-on button for on/off switch
(3) Speed preselection thumbwheel
(4) On/off switch
(5) Rotational direction switch
(6) “Drilling/impact drilling” selector switch
(7) Auxiliary handle
(8) Depth stop
(9 Handle
(10) Chuck key
(11) Screwdriver bit
(12) Universal bit holder
(13)Securing screw
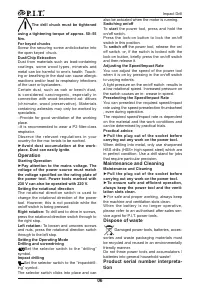
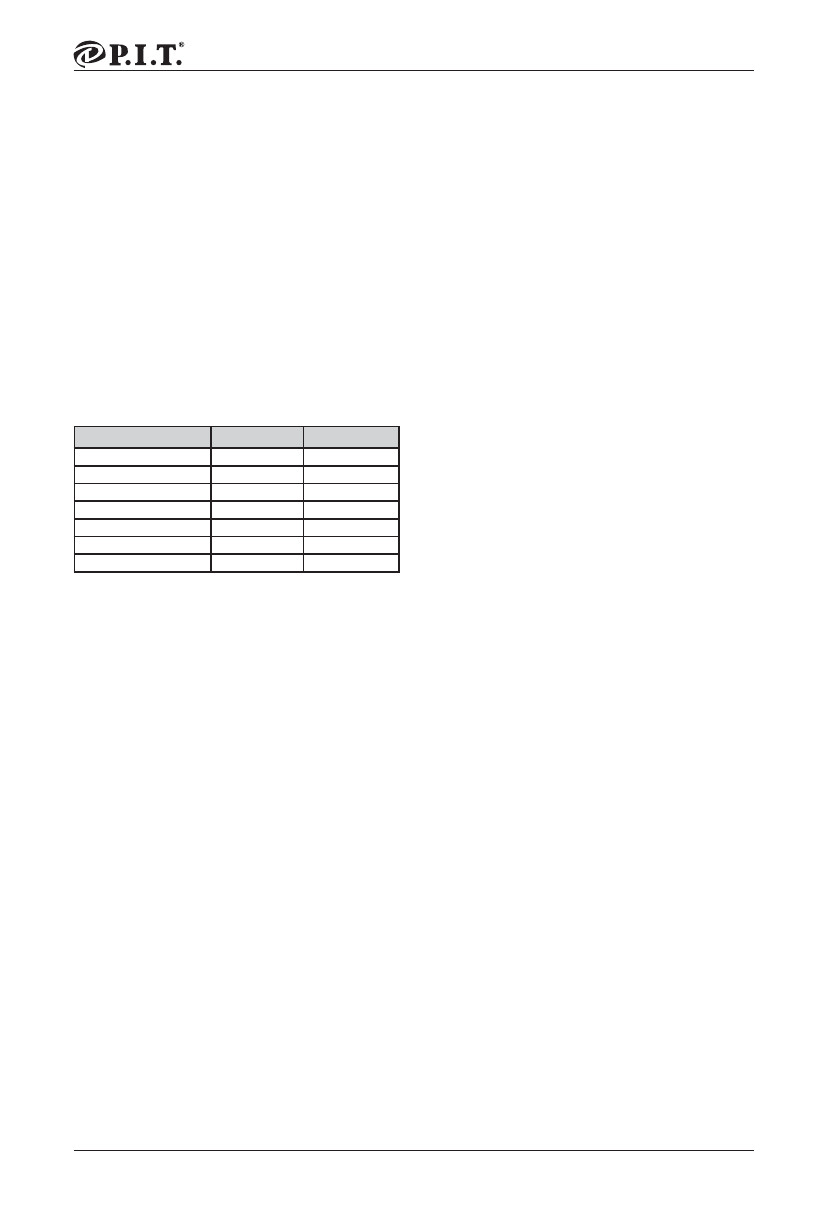
Technical data
Model
PSB13-C2 PSB13-C7
Rated voltage
220 V~/50 Hz
220 V~/50 Hz
Power
780 W
860 W
Speed
0-3000 r/min
0-3000 r/min
Impact rate
0-48000 /min
0-48000 /min
Chuck size
13 mm
13 mm
Protection class
II
II
Weight
2.1 Kg
2.2 Kg
Note
Since the product is constantly being im-
proved,
P.I.T.
reserves the right to make
changes to the specifi cations listed here and
the product bundle without prior notice.
Contents of delivery
- Impact drill 1 pc.
- Depth stop 1 pc.
- Additional handle 1 pc.
- Chuck key 1 pc.
- User manual 1 pc.
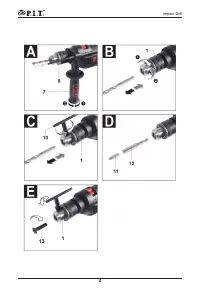
Assembly
►Pull the plug out of the socket before carry-
ing out any work on the power tool.
Auxiliary handle
►
Do not operate your power tool without
the auxiliary handle .
You can adjust the
auxiliary handle to any of positions in order
to achieve a safe work posture that minimises
fatigue.
Turn the lower gripping end of the auxiliary
handle in rotational direction
1
and push the
auxiliary handle forward until you can swivel
it into the required position. Then pull the
auxiliary handle back again and turn the lower
gripping end in rotational direction 2 to tighten
it.
Setting the drilling depth
You can use the depth stop to set the required
drilling depth.
Turn the lower gripping end of the auxiliary
handle anti-lockwise and set the depth stop.
Pull the depth stop far enough out that the
distance between the drill bit tip and the edge
of the depth stop corresponds to the required
drilling depth.
Then, turn the lower gripping end of the auxil-
iary handle clockwise to retighten it.
The fluting on the depth stop must face up-
wards.
Changing the tool
►Pull the plug out of the socket before
carrying out any work on the power tool.
►Wear protective gloves when changing
tools.
The drill chuck may heat up signifi cant-
ly when it is used for long periods.
Keyed chuck
Open the keyed chuck by turning it until the
tool can be inserted. Insert the tool.
Insert the chuck key into the corresponding
holes of the keyed chuck and clamp the tool
evenly.
Note: When using small drill bits, adjust the
tool holder to the rough drilling diameter fi rst.
Otherwise, there is a risk that the drill bit will
not be centred properly.
Changing the drill chuck
►
Pull the plug out of the socket before
carrying out any work on the power tool.
Removing the securing screw
A securing screw protects the keyed chuck
from being accidentally separated from the
d r i l l s p i n d l e . O p e n t h e k e y e d c h u c k f u l l y
and unscrew the securing screw clockwise.
Note that the securing screw has a left-hand
thread.
If the securing screw is stuck, place a screw-
driver on the screw head and loosen the
securing screw by hitting the handle of the
screwdriver.
Removing the keyed chuck
To remove the keyed chuck
,
place the pow-
er tool on a fi rm surface, e.g. a work bench.
Insert the chuck key into one of the three
drilled holes in the keyed chuck and loosen
the keyed chuck using this lever by turning
it anticlockwise. A stuck keyed chuck can be
loosened by gently hitting the chuck key .
Remove the chuck key from the keyed chuck
and fully unscrew and remove the keyed
chuck.
Fitting the drill chuck
The fi tting of the keyless chuck/keyless chuck
with securing ring/keyed chuck takes place in
reverse order.
Содержание
- 11 Сервис
- 12 Описание продукта и услуг
- 13 Ударная дрель; Комплект поставки; Сборка; Настройка глубины сверления; Избегайте скопления пыли на рабочем; Работа с инструментом
- 14 Установка режима работы; Вращающиеся рабочие ин-; Техобслуживание и сервис; При обработке
- 15 Хранение и транспортировка; Утилизируйте электроинструмент
- 21 Талон No 1
Характеристики

Остались вопросы?Не нашли свой ответ в руководстве или возникли другие проблемы? Задайте свой вопрос в форме ниже с подробным описанием вашей ситуации, чтобы другие люди и специалисты смогли дать на него ответ. Если вы знаете как решить проблему другого человека, пожалуйста, подскажите ему :)


