Daikin BRC944B2 - Инструкция по эксплуатации
Кондиционер Daikin BRC944B2 - инструкция пользователя по применению, эксплуатации и установке на русском языке. Мы надеемся, она поможет вам решить возникшие у вас вопросы при эксплуатации техники.
Если остались дополнительные вопросы — свяжитесь с нами через контактную форму.
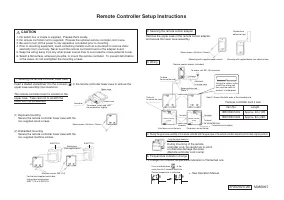
Switch box
(Field supplied parts)
Machine screws (M4 x 16)
For the field supplied switch box,
use optional accessories
KJB1111A or KJB2121A.
KJB2121A
Remote Controller Setup Instructions
CAUTION
1. No switch box or staple is supplied. Prepare them locally.
2. No remote controller cord is supplied. Prepare the optional remote controller cord 4 wire.
3. Be sure to turn off the power to any apparatus connected prior to mounting.
4. Prior to mounting equipment, touch something metallic such as a doorknob to remove static
electricity from your body. Never touch the remote controller board or the adapter board.
5. Keep the wiring away from any other power source lines to avoid electric noise (external noise).
6. Select a flat surface, wherever possible, to mount the remote controller. To prevent deformation
of the cases, do not overtighten the mounting screws.
Insert a bladed screwdriver into the concave ( ) in the remote controller lower case to remove the
upper case assembly (two locations).
(1) Exposed mounting
Secure the remote controller lower case with the
two supplied wood screws.
(2) Embedded mounting
Secure the remote controller lower case with the
two supplied machine screws.
The remote controller board is located on the
upper case. Take care not to scratch the
board with the screwdriver.
1. Securing the remote controller lower case
Remove the upper case of the remote control adapter
and secure the lower case assembly.
During mounting of the remote
controller cord, be careful not to pinch
or otherwise damage the wires.
(Remote controller cord 4 wire)
2. Securing the remote control adapter
3. Wiring
4. Placing the upper case assembly of the remote controller and the upper case of the remote controller adapter back into their original positions
5. Temperature indication change
Upper case
Wood screws (
φ
3.5mm x 16mm)
(Mounting with supplied wood screws)
Remote control adapter (attached)
(Mounting with supplied double-face adhesive tape)
Lower case
Screwdriver
To remove, insert and twist
the screwdriver slightly.
Wood screws (
φ
3.5mm x 16mm)
Double-face
adhesive tape
Attached
five-wire cord
Remote controller cord
(Note 1)
Connector
Connector
Connector
Tie-band
(to secure the cord)
Tie-band
(to secure the cord)
Tie-band
(to secure the cord)
Upper case
assembly
Lower case
(Cord drawn out on the back)
Catch the lower hook first.
(Cord drawn out on the top)
To remote control adapter
Remote controller
board
Remote controller
board
3P202923-2B
M08B097
Note 1) Ground the both ends of the shielded wire.
KJB1111A
Using wire cutters, make
a notch for wiring and
then seal the notch to
ensure it is waterproof.
To indoor unit S21-HA connector
Remote controller cord 4 wire
Item No.
BRCW901A03
BRCW901A08
Length
Approx. 3m (10ft)
Approx. 8m (26ft)
To change from Celsius temperature indication to Fahrenheit one
Press and hold down at the
same time for 5 seconds while the
Celsius temperature is indicated.
←
See Operation Manual
"Загрузка инструкции" означает, что нужно подождать пока файл загрузится и можно будет его читать онлайн. Некоторые инструкции очень большие и время их появления зависит от вашей скорости интернета.