Блендеры VITEK VT-8525 - инструкция пользователя по применению, эксплуатации и установке на русском языке. Мы надеемся, она поможет вам решить возникшие у вас вопросы при эксплуатации техники.
Если остались вопросы, задайте их в комментариях после инструкции.
"Загружаем инструкцию", означает, что нужно подождать пока файл загрузится и можно будет его читать онлайн. Некоторые инструкции очень большие и время их появления зависит от вашей скорости интернета.


5
ENGLISH
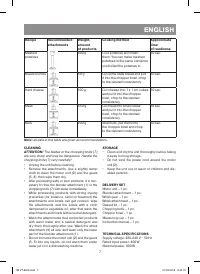
mode for combined processing of liquid and
solid foodstuffs.
–
For operation at the maximal rotation speed,
press and hold down the “II” button (3a).
Notes:
–
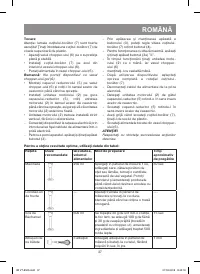
Products should be put into the bowl before
the unit is switched on. The amount of prod-
ucts to be processed should not exceed 2/3 of
the capacity of the bowl in which they are pro-
cessed.
–
Before starting to chop/mix, we recommend
to peel fruit, remove inedible parts, such as
stones, and cut fruit into cubes approximately
2х2 cm in size.
–
After you finish using the unit, take the power
plug out of the mains socket and remove the
detachable blender attachment (1), turning it
clockwise.
ATTENTION!
–
Do not remove the blender attachment (1) dur-
ing operation.
–
To avoid damaging the blades, do not process
too hard products such as cereals, rice, spices,
coffee beans, hard cheeses, frozen products
etc.
–
If the foodstuffs are hard to chop with the
blender attachment (1), add some liquid if pos-
sible.
USING THE WHISK
Use the whisk attachment (9) only for beating cream
and egg whites, making biscuit dough or for mixing
ready desserts.
WARNING: Before installing the whisk (9) and the
gear (8), make sure that the power plug is not
inserted into the mains socket.
•
Insert the whisk attachment (9) into the whisk
gear (8).
•
Insert the whisk gear (8) into the motor unit
(2) and turn it counterclockwise, make sure
that the gear (8) and the whisk (9) are fixed
properly.
•
Insert the power plug into the mains socket.
•
Immerse the whisk (9) into the bowl with food.
Note: You can put the foodstuffs into the measur-
ing cup (10).
•
To switch the unit on, press and hold down the
button (3).
•
When you press and hold the button (3) you can
control the attachment rotation by turning the
control knob (4).
•
For operation at the maximal rotation speed,
press and hold down the “II” button (3a).
•
After you finish using the unit, take the power
plug out of the mains socket, disconnect the
whisk gear (8) from the motor unit (2) by turning
the gear (8) clockwise.
•
Remove the whisk (9) from the gear (8).
ATTENTION!
–
Do not use the whisk attachment (9) to knead
tight dough.
–
Put products into the bowl before switching the
unit on.
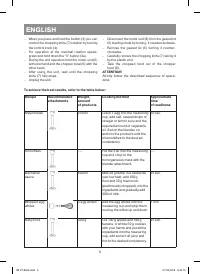
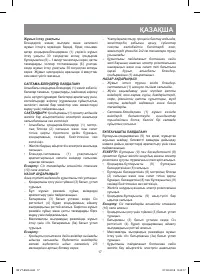
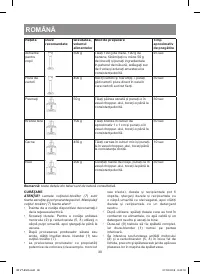
USING THE CHOPPER
The chopper is used to chop meat, cheese, onion,
herbs, garlic, carrots, walnuts, almonds, prunes,
vegetables and fruit.
ATTENTION!
Do not chop very hard products, such as ice cubes,
frozen products, nutmegs, coffee beans, cere-
als etc.
Before you start chopping:
–
Cut meat, cheese, onions, vegetables or fruit
into pieces approximately 2x2 cm in size.
–
Remove stems of herbs, shell nuts.
–
Remove bones, sinews and cartilage from meat.
Chopping
Caution: the blades of the chopping knife (7) are
very sharp! Always hold the chopping knife (7) by
the upper plastic end.
•
Place the chopper bowl (6) on a flat stable sur-
face.
•
Set the chopping knife (7) on the axis inside the
chopper bowl (6).
•
Put the products into the chopper bowl (6).
Note: Do not switch the unit on when the chopper
bowl (6) is empty.
•
Place the geared lid (5) on the chopper bowl (6)
and rotate it clockwise as far as it will go.
•
Install the motor unit (2) on the geared lid (5)
feeding chute, turn the motor unit (2) clockwise
until bumping, make sure that the motor unit (2)
is fixed properly.
•
Install the motor unit (2) strictly in the vertical
position and evenly.
–
To connect the unit to the mains, insert the
power cord plug into the mains socket.
–
To switch the unit on, press and hold down the
button (3).
IM VT-8525.indd 5
07.02.2018 9:40:15


